Table of Contents
Advertisement
Quick Links
Advertisement
Table of Contents

Related Manuals for Oreka Trainer


Summary of Contents for Oreka Trainer
- Page 1 OREKA TRAINING USER MANUAL 10/2020 V1.0...
- Page 2 CONTACT Oreka Traning, S.L. CIF: B 75150219. Address: Oreka Training SL. Poligono. Egiburuberri 3, 20100 Errenteria, Gipuzkoa. Spain info@orekatraning.com OREKA TRAINING Thank you for purchasing our product. To use our product safely, please read this manual carefully beforehand. Should you have any doubts after reading, please visit our website or for more information contact info@orekatraining.com.
-
Page 3: Table Of Contents
CONTENTS 1. GENERAL VIEW OF THE PRODUCT 2. TRAINER USAGE NOTES 3. ASSEMBLY AND TRANSPORT INSTRUCTIONS 4. PLACING THE BICYCLE ON THE TRAINER 5. ADJUSTING THE DAMPERS 6. BEFORE UNDERTAKING YOUR FIRST SESSION 7. EXEMPTION FROM LIABILITY 8. WARRANTY 9. TECHNICAL ASSISTANCE... -
Page 4: General View Of The Product
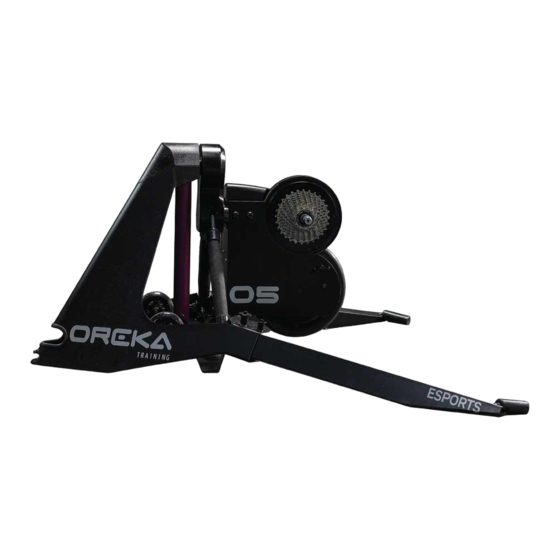
GENERAL VIEW OF THE PRODUCT 2X LEG SUPPORT PIN MAIN BODY 2X FOLDING LEGS MUSCLES SET OF WHEELS FLYWHEEL BELT TENSIONER 2X LEG POSITIOING PIN WITH CASSETTE HUB TWO POSITIONS CENTRAL AIR RESERVOIR 10/2020 V1.0... -
Page 5: Trainer Usage Notes
12 When using the trainer indoors, make sure there is correct ventilation. 13 Make sure that the bike and the axle are correctly positioned. 14 Before each training session, make sure that the trainer is well supported on the floor and that there is no imbalance. - Page 6 20 Do not disassemble the Oreka Training Trainer in case of a fault. It may release electrical charges when handled. Please contact Oreka Training to check it. 21 Do not make holes in, slit or drill any surface of the Trainer. This may produce cracks and the warranty will become void.
-
Page 7: Assembly And Transport Instructions
ASSEMBLY AND TRANSPORT INSTRUCTIONS ASSEMBLY To assemble the Trainer for the first time, unfold the two legs as indicated in the following image, and make sure the two positioning and support pins of the Trainer are firmly positioned. These legs only have two possible positions, which are interchangeable using the pins. - Page 8 To easily and comfortably transport the Trainer, take hold of the wheel axle and, lifting the Trainer through the gap, position the set of wheels. Once the wheels are on, fold the arms. Now we can transport the Trainer comfortably and without lifting its full weight, bearing in mind that the approximate weight of the Trainer is 30kg, so transport it at a speed that ensures stability.
-
Page 9: Placing The Bicycle On The Trainer
You should choose the appropriate bearing according to the axle of the bicycle to be installed. The bearings of the Oreka O5 Trainer are marked with letters for easy identification. They also indicate that the axle that will join the bicycle to the Trainer will be the same. - Page 10 -Axle bearings 148x12 Once the necessary bearings have been located, place them on the corresponding side of the Trainer. After presenting the bicycle with the bearings, install the axle and make sure that it is well tightened and that there is no play.
-
Page 11: Adjusting The Dampers
Thanks to this, you can enjoy hours of pedalling without straining and simply by adjusting the muscles you can do a sprint/series of more than 1000 watts without the Trainer going anywhere. The muscles are designed to be used within a range of 2-6 bars of pressure, with the minimum pressure achieving the pedalling and movement similar to that of climbing a mountain pass, and with the maximum pressure a greater tightness to perform more intense sprints or series. -
Page 12: Before Undertaking Your First Session
Before your first training session, download the Oreka App available on iOS/Android devices. Start pedalling smoothly for the Trainer to gain power and for the App to detect the roller. Once it detects it, link the Trainer to your device. -
Page 13: Exemption From Liability
These updates are free for Trainer users. The user recognises that they are in full physical condition and in full health to exercise on the Oreka Training and assumes full responsibility for this exercise, relieving Oreka Training of any liability. The user is solely responsible for choosing their sports training, as well as for the physical and mental consequences that may ensue. -
Page 14: Warranty
The warranty becomes void when: (1) the Trainer is used for anything other than what it has been designed for, (2) the assembly and preservation instructions have not been followed, (3) the Trainer has been subjected to repair or attempts to repair that have not been carried out by the official technical service. - Page 15 10/2020 V1.0...
Need help?
Do you have a question about the Trainer and is the answer not in the manual?
Questions and answers