Table of Contents
Advertisement
Quick Links
Advertisement
Table of Contents

Related Manuals for MINICAM PROTEUS

Summary of Contents for MINICAM PROTEUS
- Page 1 Original Instruction Manual Version L...
- Page 3 Minicam and its suppliers shall not be liable for any damages related to this software or hardware, or for any other damages whatsoever caused by the use of or inability to use any Minicam product. This is applicable even if Minicam has been advised of the damage risk. Under any circum- stances, Minicam’s entire liability shall be limited to replace such defective...
-
Page 5: Table Of Contents
Removal and Fitting of the Cable Reel Dirt Tray ....... 28 Checking Plug and Socket Connections ........29 CONNECTING THE PROTEUS™ INSPECTION SYSTEM Fitting and removal of crawler wheels ..........30 Connection of Cabling between Control Unit and Cable Reel ..31... - Page 6 Disconnecting Cabling between Cable Reel and Crawler ....33 Connection of Camera to Crawler ............34 Connection of Auxiliary Module to Crawler ........35 Pressurising the PROTEUS inspection system .........36 ™ Check list for adjusting internal pressure of modules ....36 Instructions for Pressurising the CRP300 Crawler ......37 Instructions for Pressurising the CPL150S Crawler ......38...
- Page 7 To confirm copying ............... 58 While the project is being copied to the USB, progress bars are shown ..................59 When file copying has finished ........... 59 WiFi Module ....................60 Connecting to your PC ..............63 File Sharing ....................64 Email ....................64 WincanWeb ..................64 Share Status ..................
- Page 8 Selecting Wheel Size When Powering-On the Crawler ...77 Selecting Wheel Size At Other Times ......... 78 Status Display for the Motorised Cable Reel ........80 Status LED ..................82 Controlling the Motorised Cable Reel ..........83 Control using the Keyboard Keys ..........83 Control using the Coloured Keys ..........84 Cancel Continuous Pay out or Rewind ..........
- Page 9 PROTEUS CRAWLERS CRP300/140/90 - CPL150S CRP300 Connections and Descriptions ..........103 CPL150S Connections and Descriptions ...........104 CRP140 Connections and Descriptions ..........105 CRP90 Connections and Descriptions ..........106 Information and Care of Proteus Crawlers ........108 Pressurisation ................108 Cleaning ..................108 Crawler wheels ................108 Maintenance ................108 CAM026 –...
- Page 10 Connections and Descriptions ............117 Operation of the Dual Lasers ............. 117 Information and Care ................118 Pressurisation ................118 Cleaning ..................118 Maintenance ................118 Technical Details CAM028L ..............119 ALB300 - AUXILIARY MODULE Connections and Descriptions ............121 Information and Care ................
- Page 11 Using CGP01 Cable Guide Pulley ............136 Using CGP01 ..................136 Information and Care ................137 Maintenance ................137 Technical Details - CGP01 ..............137 TRP01 – MANHOLE TOP ROLLER Parts and Descriptions ............... 138 Using TRP01 ..................139 Information and Care ................139 Maintenance ................
- Page 12 REPORTING SOFTWARE Principle ....................160 Basic Usage ................... 161 QUICK USER GUIDE Create a New Project ................162 Choose Which Project to use ............. 162 Create a Section in the Project ............163 Select the Project Section to use ............163 Enter the Section Header Information ..........
- Page 13 Editing an Existing Observation ............186 Creating a New Observation .............. 187 Creating Reports .................. 188 Creating Reports for the Whole Project ........188 Creating Reports for a Selected Section .........190 WEEE STATEMENT BATTERIES PRODUCT SERIAL NUMBERS USEFUL INFORMATION Version L Minicam Proteus...
- Page 14 Minicam Proteus Version L...
-
Page 15: Warranty
Extent of the Limited Warranty Minicam warrants that your equipment will be in good working condition and free of defects in material and/or workmanship for a period of one year. If failure occurs, which is provable due to a defect in material and/or workmanship, we will remedy it free of charge during the warranty period. -
Page 16: Text Conventions
When describing control unit operation, sequential menu selections are described in the following format: Setup > Camera > Enable Backeye Camera > OK This example describes pressing the Setup key and selecting the Camera and Backeye options, and finally pressing the OK key. Minicam Proteus Version L... -
Page 17: Product Description
The inspection system PROTEUS is a modular system designed for, but ™ not limited to, inspecting pipeline systems. Using a variety of colour cameras, optional modules and accessories, the PROTEUS platform ™ offers everything needed for professional pipeline inspection. The comprehensive list of modules and accessories allow inspection of pipes equal to and greater than 150mm diameter. -
Page 18: Ec Declaration Of Conformity
EC Declaration of Conformity CE Declaration We Raven Locks, Ravenscraig Road, Bolton, United Kingdom, M38 9PU hereby declare that the product PROTEUS to which this ™ declaration refers is in compliance with the following standards or standardizing documents: EN61000-6-2:2005 Generic standards - Immunity for industrial environments. -
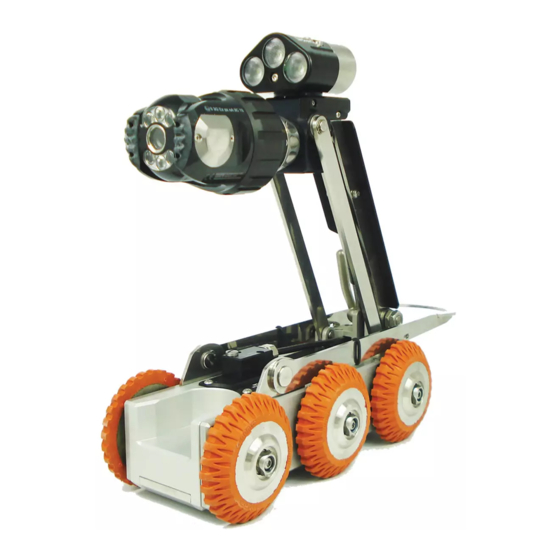
Page 19: System Overview
System Overview The PROTEUS inspection system consists of the following main compo- ™ nents: • Control Unit (A) • Cable Reel • Crawler • Camera A typical configuration is shown in this illustration: *not to scale Version L Minicam Proteus... -
Page 20: Warnings, Safety Measures And Care
CAUTION! The operator of the PROTEUS inspection system must be ™ trained by either Minicam or one of its authorised representatives before using the system. CAUTION! Despite all of the safety functions built into the system, the operator is not exonerated in any way from his/her duty of care. - Page 21 DANGER! Risk of deadly injuries from electrical current! Only the power supply supplied as part of the PROTEUS ™ inspection system can be used and should NOT be replaced by any other.
-
Page 22: Before First Use
• Ensure that the electrical connection cables are intact and that they cannot be bent or crushed. If you find cable damage, immediately disconnect the power supply and inform the appropriately trained staff or Minicam Service Centre. • Work on the electronics, which are not covered in this document, shall only be carried out by trained specialist staff or a Minicam Service Centre. - Page 23 Do not use the inspection system in pipelines which might have contained explosive substances, such as gas or solvents. If this kind of application should be required, contact Minicam to obtain information on system components destined for this purpose. CAUTION!
-
Page 24: Safety Measures
Safety Measures The staff assigned to tasks involving the PROTEUS inspection system ™ must have read and understood this user manual completely before the start of the work. This applies equally to the staff who only work on the inspection system infrequently, e.g. - Page 25 • The operator must wear safety equipment that is appropriate to the survey being performed (such as goggles, gloves, safety shoes, etc). NOTE! Avoid physical damage! The operator of the PROTEUS inspection system is responsi- ™ ble for the following aspects: •...
-
Page 26: Maintenance
Maintenance To ensure the maximum service life of the PROTEUS inspection system ™ the individual modules and accessories belonging to the system have to be independently maintained and kept clean. Moving parts, in particular, can have improved operational life by frequent professional cleaning after inspections. -
Page 27: Cleaning
Cleaning To minimise down time and subsequent repairs it is necessary to keep your PROTEUS inspection system clean. ™ Please follow the instructions below to help avoid disruption. CAUTION! Risk of fatal injuries caused by electrical current! Ensure that no fluids can enter the control panel or penetrate the housing of the cable reel. -
Page 28: Removal And Fitting Of The Cable Reel Dirt Tray
Cable Reel Dirt Tray 1 Pull out the tray. 2 Remove dirt, water and debris. 3 Push the tray back into position. Minicam Proteus Version L... -
Page 29: Checking Plug And Socket Connections
Clean dirt and moisture from the pins and connectors using an electronic contact cleaner aerosol. NOTE! • Disconnect the power supply from the system. • Check the O-rings for damage and replace if necessary. • Grease the O-rings if necessary using O-ring lubricant. Version L Minicam Proteus... -
Page 30: Connecting The Proteus™ Inspection System
Connecting the PROTEUS™ Inspection System Fitting and removal of crawler wheels 1 Ensure the quick release wheel retainer (A) is aligned with the axle (C). 2 Slide wheel (B) on to the crawler axle (C). 3 Turn the wheel retainer bolt clockwise to lock the wheel onto the axle. -
Page 31: Connection Of Cabling Between Control Unit And Cable Reel
2 Plug the female plug (D) of the link cable into the side of the cable reel (E). Notice the orientation of the plugs. Secure in place with locking ring (F). NOTE! To remove the connectors turn the retaining ring anti-clockwise. Version L Minicam Proteus... -
Page 32: Connection Of Cabling Between Cable Reel And Crawler
2 Turn the retaining ring (B) clockwise, as viewed from the cable, to lock the cable end connector into the socket (D). The retaining ring is not able to unscrew itself during use if cleaned and maintained correctly. Minicam Proteus Version L... -
Page 33: Disconnecting Cabling Between Cable Reel And Crawler
1 To unscrew the retaining ring you must pull the ring away from the crawler body before rotating anti-clockwise. NOTE! Always fit the protective caps when the crawler, camera or auxiliary module are not in use to protect from damage, ingress of dirt and moisture. Version L Minicam Proteus... -
Page 34: Connection Of Camera To Crawler
Grub screw has a mushroom head and cannot be fully removed. DO NOT OVERTIGHTEN! NOTE! Always fit the protective caps when the crawler, camera or auxiliary module are not in use to protect from damage, ingress of dirt and moisture. Minicam Proteus Version L... -
Page 35: Connection Of Auxiliary Module To Crawler
4 Fasten 2 x M4 x 45mm screws with 2 x M4 anti-vibration washers to fix the auxiliary module (B) onto the camera housing. NOTE! Always fit the protective caps when the crawler, camera or auxiliary module are not in use to protect from ingress of dirt and moisture. Version L Minicam Proteus... -
Page 36: Pressurising The Proteus ™ Inspection System
Pressurising the PROTEUS inspection system ™ Before use it may be necessary to pressurise the crawler, camera and auxiliary module. The pressure within each of the modules must be checked before the inspection begins. NOTE! The internal pressure of each pressurised module may vary. -
Page 37: Instructions For Pressurising The Crp300 Crawler
Instructions for Pressurising the CRP300 Crawler 1 Connect the PROTEUS inspection system and apply power. ™ 2 Unscrew the pressure valve protection cap (B) and screw on the pres sure valve connection adaptor (A). 3 Set the pressure regulator for the CO or Nitrogen to 10 PSI. -
Page 38: Instructions For Pressurising The Cpl150S Crawler
Instructions for Pressurising the CPL150S Crawler 1 Connect the Proteus Lite inspection system and apply power. ™ 2 Unscrew the pressure valve protection cap ( A ) and screw on the pressure valve connection adaptor ( B ). 3 Set the pressure regulator for the CO or Nitrogen to 10 PSI. -
Page 39: Instructions For Pressurising The Crp140 Crawler
Instructions for Pressurising the CRP140 Crawler 1 Connect the PROTEUS inspection system and apply power. ™ 2 Unscrew the pressure valve protection cap (B) and screw on the pres sure valve connection adaptor (A). 3 Set the pressure regulator for the CO or Nitrogen to 10 PSI. -
Page 40: Instructions For Pressurising The Crp90 Crawler
Instructions for Pressurising the CRP90 Crawler 1 Connect the PROTEUS inspection system and apply power. ™ 2 Unscrew the pressure valve protection cap (B) and screw on the pres sure valve connection adaptor (A). 3 Set the pressure regulator for the CO or Nitrogen to 10 PSI. -
Page 41: Instructions For Pressurising The Cam026/26L
Instructions for Pressurising the CAM026/26L 1 Connect the PROTEUS inspection system and apply power. ™ 2 Unscrew the pressure valve protection cap (B) and screw on the pres sure valve connection adaptor (A). 3 Set the pressure regulator for the CO or Nitrogen to 5 PSI. -
Page 42: Testing The System
Any person in the manhole may suffer serious injuries. CAUTION! Risk of disorientation and temporary blindness! The illumination on the PROTEUS inspection system use ™ high power LED lighting with narrow angle secondary optics. -
Page 43: Lowering The Crawler Into The Manhole
To retrieve the crawler from the manhole use the rope (A) and hook (B) to attach to the crawler lowering device (C). Lift the crawler out of the manhole, balancing the crawler by using the crawler cable (D). Version L Minicam Proteus... -
Page 44: Ccu208 - Control Unit
USB or SD card. The control unit can generate on screen text that is overlaid onto the recorded video in various colours and positions, allowing easy customisation. Minicam Proteus Version L... -
Page 45: Ccu Overview
2 Left joystick for crawler control 10 Camera function keys 3 Right joystick for camera control 11 Snapshot key 4 Speaker 12 Recording and playback 5 ON/OFF button keys 6 ALL STOP button 13 Keyboard 7 Crawler function keys Version L Minicam Proteus... -
Page 46: On/Off Button
• The ALL STOP button can be used in case of emergency, to stop the crawler and disable the power NOTE! The ALL STOP button must be pressed to disable the power to the crawler before disconnecting any part of the system. Minicam Proteus Version L... -
Page 47: Power On Sequence
If the problem persists then contact the Minicam Service Centre or Accredited Minicam Partner in your country. NOTE! Details of the nearest Minicam Service Centre and Accredited Minicam Partners world-wide are made available on the website www.minicam.co.uk Power OFF sequence 1 Press the ALL STOP button. -
Page 48: Crawler Function Keys
Switch between forward and rear view cameras. 6 Sonde a Enable or disable sonde function. b Choose transmission frequency. NOTE! Moving the crawler joystick during Cruise mode will cancel the cruise control function. The operator will now have manual control. Minicam Proteus Version L... -
Page 49: Survey Function Keys
Survey function keys 1 Meterage a Change meterage manually. b Change position of meterage on the screen 2 Text a Change text colour 3 Survey Folder a Start ProPipe or WinCan survey. Version L Minicam Proteus... -
Page 50: Media Function Keys
Media function keys 1 Copy a Copy files from one media source to another 2 Storage media a Choose storage media – Internal/USB/SD card 3 Gallery a Browse surveys, videos and pictures Minicam Proteus Version L... -
Page 51: Camera Function Keys
Camera function keys 1 Digital Zoom 2 Camera Illumination 3 Focus- 4 Focus+ 5 Camera Home a Automatically move camera to home position (CAM026 only) 6 Camera Settings Version L Minicam Proteus... -
Page 52: Snapshot Key
Press this key to take a JPG image of the live video or video during play- back Recording and Playback keys These keys control the recording and playback of video files QWERTY keys These keys allow the user to enter text for onscreen text or survey com- ments Minicam Proteus Version L... -
Page 53: Pressurising Operation Mode
To access the Pressurisation Operation Mode press the HELP key and select the module you want to pressurise. Image shows an example screenshot for the camera Version L Minicam Proteus... -
Page 54: Connections And Descriptions
3 External media protection cover a To protect the connectors from dirt and moisture. NOTE! Always fit the external media protection cover (3) into position to protect from ingress of dirt and moisture. Minicam Proteus Version L... -
Page 55: Rear View
3 Expansion Slot Protection Cover a To protect the expansion slot from ingress of dirt and moisture. NOTE! Always fit the expansion slot protection cover (3) into position to protect from ingress of dirt and moisture. Version L Minicam Proteus... -
Page 56: Media Transfer
Select a media to browse, either Internal, USB, or SD The screen shows information about the highlighted media. To choose a different media to view: • Highlight the media you want to view and press OK. Explore the contents of a media Minicam Proteus Version L... -
Page 57: Explore The Contents Of A Project
• If you have highlighted a file, you can play it (if a video) or view it (if a photo). • You can copy the project or file to another media, eg. to USB or SD card memory. • You can delete it. continued on next page Version L Minicam Proteus... -
Page 58: To Confirm Copying
• Highlight the project or file you want to copy onto that media. • Press OK, then a submenu appears • Select the media you want to copy onto, then press OK. To confirm copying Note that once copying has started, it can’t be stopped. Minicam Proteus Version L... -
Page 59: While The Project Is Being Copied To The Usb, Progress Bars Are Shown
If you have copied to a media such as a USB or SD card, and you then want to remove the media, you MUST press the eject button and wait for the GREEN LED to show, else data could be lost. Version L Minicam Proteus... -
Page 60: Wifi Module
WiFi Module Your Proteus system is enabled with a WiFi module to connect your CCU to a local, company network to allow an easy file transfer between the system and your office or local computer. It improves the speed of reporting without the need of exchanging SD cards or USB sticks. - Page 61 4 Select Find WiFi... F1 (Red Key) to search for available networks. 5 Select the required network from the menu. 6 Select Connect F1 (Red Key) to connect to the selected network (you will have to type a WiFi password in if required). Version L Minicam Proteus...
- Page 62 IP Address. 8 The main display screen shows the WiFi status icon at the bottom right-hand side of the sidebar. WiFi NOT CONNECTED Red cross indicates no signal WiFi CONNECTED Vertical blue coloured bars indicate signal strength Minicam Proteus Version L...
-
Page 63: Connecting To Your Pc
Alternatively, use the search bar in Explorer by typing \\ followed by the IP Address shown on your Proteus (Example - \\192.168.1.144) This will then connect you to your Proteus control unit which will display a folder named CCU Memory. Double click on this folder to access all files currently on that control unit. -
Page 64: File Sharing
WinCan project to be sent. 2 Navigate to a WinCan project, press OK. 3 Select the Share option. 4 From the menu select the WincanWeb option. A text box with all the necessary data inputs fields will be displayed. Minicam Proteus Version L... -
Page 65: Share Status
NOTE: To successfully share files, the CCU needs to remain on and connected to the internet until the sharing has finished. Version L Minicam Proteus... -
Page 66: Information And Care
It must be noted that although the cable reel and crawler are for use in wet environments the control unit is for indoor use but may also be used outdoor in very light rain. The external PSU is for indoor use only as marked on its label. Minicam Proteus Version L... -
Page 67: Technical Details - Ccu208
Technical Details - CCU208 Product ID: CCU208 Dimensions: 430 x 280 x 150mm (L x W x D) Power Consumption: 30W (standalone) Weight: 5.5Kg (12.12lb) Temperature Range: -10°C ~ +40° C Environmental Protection: IP54 Version L Minicam Proteus... -
Page 68: Rmp100 / Rmp200 / Rmp300 - Manual Cable Reel
RMP100 / RMP200 / RMP300 - Manual Cable Reel The manual cable reels on the PROTEUS inspection system are ™ available with either 100m, 200m or 300m of cable. They have the follow- ing features: • Up to 300m of cable •... -
Page 69: Connections And Descriptions
Connections and Descriptions 1 Dirt tray 2 Winding arm and handle 3 Cable layering mechanism 4 Meterage wheel 5 Friction brake 6 Connection to control unit 7 Connection to crawler Version L Minicam Proteus... -
Page 70: Information And Care
High-pressure cleaners must not be used. It can cause considerable damage to the crawler, camera and other sys- components. Cleaning agents or solvents must not be used. These can damage the seals and other materials on the system. Only clean water should be used. Minicam Proteus Version L... -
Page 71: Technical Details - Rmp100
-20°C ~ +50° C Environmental Protection: IP54 Technical Details - RMP300 Product ID: RMP300 Dimensions: 530 x 390 x 520mm (L x W x D) Power Consumption: Weight: 39Kg (85.98lb) Temperature Range: -20°C ~ +50° C Environmental Protection: IP54 Version L Minicam Proteus... -
Page 72: Rap200-Rap300 - Motorised Cable Reel
RAP200-RAP300 – Motorised Cable Reel Proteus Motorised Cable Reel RAP200 AND RAP300 are designed to allow for easy one-man operation in remote locations. Both RAP200 AND RAP300 feature a powerful 3 phase DC motor and cable layering mechanism for uninterrupted, tangle-free winding and re-winding of the Kevlar reinforced inspection cable. -
Page 73: Parts And Descriptions
A Emergency stop button. F Cable End Connector. B Friction adjustment. G Removable Drip Tray. C Status LED. H Cable Layering Mechanism and D Lifting handle Meterage Counter. E Vehicle/Portable Trolley Fixing. J Clear Rigid Protection Screen. Version L Minicam Proteus... -
Page 74: Connections
In Manual mode, you can control the paying out or rewinding of the cable yourself. This allows you to drive the crawler forward or reverse without the cable reel motor moving. Paying Out When running forwards, the motorised cable reel motor does not feed Minicam Proteus Version L... -
Page 75: Rewinding
Each press decreases the torque. Increase motor torque: Each press increases the torque. The blue coloured bar/s represent torque adjustment. This is only active during rewind. The orange coloured bar/s represent how much cable is in the pipe Version L Minicam Proteus... -
Page 76: Motor Torque Value
You may need to adjust the torque a few times during the rewind of a long length of cable. With usage, you will gain some experience of the ideal settings for the torque. Minicam Proteus Version L... -
Page 77: Selecting The Crawler Wheel Size
1. Press a coloured key to confirm the size of the crawler wheels. With CPL150 connected With CRP300 connected 2. Press the appropriate coloured Function key to select confirm the size of wheel. Version L Minicam Proteus... -
Page 78: Selecting Wheel Size At Other Times
The CCU will display the followings short keys With CPL150 connected With CRP300 connected 2. Press Red Function to select Wheel Size. The CCU will ask you to confirm the size of the wheels: With CPL150 connected Minicam Proteus Version L... - Page 79 With CRP300 connected 2. Press the appropriate coloured Function key to select confirm the size of wheel. Version L Minicam Proteus...
-
Page 80: Status Display For The Motorised Cable Reel
Status Display for the Motorised Cable Reel The CCU screen displays the status of the motorised cable reel. CPL150 CPL150 CRP300 CRP300 connected connected connected connected without camera with camera without camera with camera Minicam Proteus Version L... - Page 81 The MCR has stopped because of a blockage, or the Stop button is activated. The blue coloured bar/s represent torque adjustment. This is only active during rewind. The orange coloured bar/s represent how much cable is in the pipe Version L Minicam Proteus...
-
Page 82: Status Led
Flashing LED, the MCR Stop button has been activated. See “Cable Reel Emergency Stop But- ton” on page 88 Solid LED, the MCR Stop button was activated, and the CCU needs to reset it. See “Cable Reel Emergency Stop Button” on page 88. Minicam Proteus Version L... -
Page 83: Controlling The Motorised Cable Reel
Press and hold to feed until released. Decrease motor torque Each press decreases the torque. Increase motor torque Each press increases the torque. To pay out or to rewind continuously, use the coloured keys. See Using the Coloured Keys page 84. Version L Minicam Proteus... -
Page 84: Control Using The Coloured Keys
You can also select the cable settings and size using the Crawler Settings 1. Press Crawler Tools: The CCU will display the followings short keys With CPL150 connected With CRP300 connected 2. Press Blue Function to select Cable. The CCU will display the followings short keys. Minicam Proteus Version L... -
Page 85: Cancel Continuous Pay Out Or Rewind
Press either the Pay Out key or the Rewind key Power 00.0 ON/OFF STOP! Press either key once to cancel continuous paying out or rewinding, and to stop the motor. The motorised cable reel pay out and rewind then goes back to automatic mode. Rewind Version L Minicam Proteus... - Page 86 Each press of F5 decreases the torque. To wind manually Each press of F6 increases the torque. 4. Press OK when you have finished. If the motorised cable reel is continuously paying out or rewinding, it will continue to do so. Minicam Proteus Version L...
-
Page 87: Cancel Using The Coloured Keys
3. Press Red Function to revert to Automatic operation. The CCU will display the followings short keys 4. Press once to cancel continuous paying out or rewinding, and to stop motor. The MCR pay out and rewind then goes back to Automatic mode. Version L Minicam Proteus... -
Page 88: Cable Reel Emergency Stop Button
The Control Unit (CCU) will show that the Emergency Stop Button has been activated. You can’t control the cable reel or the crawler until the stop condition has been cleared. Minicam Proteus Version L... -
Page 89: Clearing The Emergency Stop Condition
1. First ensure that it is safe to clear the Emergency Stop condition! 2. Turn the Emergency Stop button clock-wise, to reset it. 3. Press Crawler Tools: The CCU will display the followings short keys With CPL150 connected With CRP300 connected 4. Press Blue Function to select Cable. Version L Minicam Proteus... - Page 90 5. Press Red Function to select Restart. This will clear the Stop Condition and restart the motorised cable reel Minicam Proteus Version L...
-
Page 91: Cable Reel Blocked
Reset the Blocked Condition 1. Remove the cable blockage, and ensure that it is safe to reset the blocked condition! 2. Press Crawler Tools. The CCU will display the followings short keys With CPL150 connected With CRP300 connected Version L Minicam Proteus... - Page 92 3. Press Blue Function to select Cable. 4. Press Red Function to select Restart. This will clear the Stop Condi- tion and restart the motorised cable reel Minicam Proteus Version L...
-
Page 93: Troubleshooting
1. Check the CCU is using the cor- reversing. rect wheel size, see section Selecting the Crawler Wheel Size. 2. Adjust the Torque, see section Rewinding. No LEDs are on. Check all cable fittings and that the CCU is powered on. Version L Minicam Proteus... -
Page 94: Information And Care
High-pressure cleaners must not be used. It can cause considerable damage to the crawler, camera and other system components. Cleaning agents or solvents must not be used. These can damage the seals and other materials on the system. Only clean water should be used. Minicam Proteus Version L... -
Page 95: Safety
Cable Length: 200m Power Supply: IP Rating: IP54 Technical Details - RAP300 Product ID: RAP300 Dimensions: 530 x 440 x 520mm (L x W x H) Weight: 42.5Kg (00lb) Cable Length: 300m Power Supply: IP Rating: IP54 Version L Minicam Proteus... -
Page 96: Rcp4 - 4 Button Remote Control
The four button Remote Control (RCP4) is used to control a Crawler and Motorised Cable Reel (MCR) remotely using Bluetooth technology. The ® MCR can be controlled directly without the presence of the Control Unit (CCU) after the “pairing” process has been completed. ▲ ▲ Minicam Proteus Version L... -
Page 97: Parts And Descriptions
Parts and Descriptions ▲ ▲ A Status LED. D Crawler Reverse Button. B Reel Paying Out Button. E Crawler Forward Button. C Reel Rewind Button. Version L Minicam Proteus... -
Page 98: Pairing Rcp4 With Mcr
3.3.6 (date 06/09/2017) is needed. 1 Select Cable and Sonde from the Setup and Configuration drop -down menu. If the menu is not visible then the CCU requires a software update. 2 Select Motorised Cable Reel from the list. Minicam Proteus Version L... -
Page 99: Connecting Rcp4
2 If the green LED keeps flashing it indicates that the RCP4 is not able to connect to the MCR. Please make sure the pairing with the RCP4 has Version L Minicam Proteus... -
Page 100: Rcp4 Operational Range And Disconnection
Emergency Stop button being pressed, by flashing the red LED and bleeping twice per second. b The user can press and hold both cable reel buttons (B) and (C) for 5 seconds to clear the alert. The Emergency Stop button has to be released first. Minicam Proteus Version L... -
Page 101: Ccu And Rcp4 Interactions
LED for 5 seconds and sounding a warning every time the RCP4 is switched on. At this point the user should contact their local Minicam service agent to arrange a battery replacement. When the battery level is critically low the RCP4 wonít switch on after sounding the warning. -
Page 102: Proteus Crawlers Crp300/140/90 - Cpl150S
• Motorised Elevator • Optional performance wheels for specific conditions All Proteus crawlers are pressure-tight up to 1Bar, and are suitable for inspections up to 10m water depth. All six wheels of the crawler are driven by two motors ensuring that it is possible to move and steer the crawler on extremely difficult surfaces. -
Page 103: Crp300 Connections And Descriptions
CRP300 Connections and Descriptions Crawlers wheels Lowering device Elevation arm Auxiliary lights Connector for camera Pressurisation point Serial number location Crawler axle Version L Minicam Proteus... -
Page 104: Cpl150S Connections And Descriptions
A Heavy duty rear connector B Multi-frequency sonde C Lowering handle D Manual height adjusters E Manual elevator F Connection point for the auxiliary module G Connector for the camera H Quick release mechanism J Crawler wheel K Pressurisation Point Minicam Proteus Version L... -
Page 105: Crp140 Connections And Descriptions
CRP140 Connections and Descriptions A Connection point for the auxiliary module B Connector for the camera C Sonde D Lowering device E Crawler wheel F Quick release mechanism G Flexible rear connector H Elevation arm J Pressurisation Point Version L Minicam Proteus... -
Page 106: Crp90 Connections And Descriptions
A Flexible rear connector B Pressurisation Point C Motorised elevation arm D Serial number location E Connection point for the auxiliary module F Lowering device G Sonde H Connector for the camera J Crawler wheel K Quick release mechanism Minicam Proteus Version L... - Page 107 Version L Minicam Proteus...
-
Page 108: Information And Care Of Proteus Crawlers
Information and Care of Proteus Crawlers Pressurisation The crawler must always be correctly filled with CO or Nitrogen. The control unit displays the internal pressure. Cleaning Ensure the crawler is thoroughly cleaned after each inspection. Ensure the connectors are free from dirt and moisture. Always fit the dust caps immediately after disconnecting the crawler from the system. - Page 109 Version L Minicam Proteus...
-
Page 110: Cam026 - Pan & Rotate Camera
CAM026 – Pan & Rotate Camera The camera module CAM026 provides a high resolution, colour, pan and rotate camera for the PROTEUS platform. It has the following features: ™ • High resolution colour CCD image sensor • Powerful LED lighting with narrow beam width lenses •... -
Page 111: Cam026L - Pan & Rotate Laser Camera
CAM026L – Pan & Rotate Laser Camera The camera module CAM026L provides a high resolution, colour, pan, rotate and laser camera for the PROTEUS platform. It has the following ™ features: • High resolution colour CCD image sensor • Powerful LED lighting with narrow beam width lenses •... -
Page 112: Information And Care
High-pressure cleaners must not be used. It can cause considerable damage to the crawler, camera and other system components. Cleaning agents or solvents must not be used. These can damage the seals and other materials on the system. Only clean water should be used. Minicam Proteus Version L... -
Page 113: Technical Details Cam026
Sensitivity: < 1.0 lux Aperture/Field of View: F2.5 / 75° Maximum Illumination Intensity: 12.5k lux at 150mm 1 bar (14.50psi) Pressure Depth Rating: 120 x 74 x 74mm (L x W x H) Dimensions: Weight: 860g Version L Minicam Proteus... -
Page 114: Cam027 - Axial Camera
CAM027 – Axial Camera The camera module CAM027 provides a high resolution, colour, axi- al camera for the PROTEUS inspection system. It has the following ™ features: • High resolution colour CCD image sensor • Powerful LED lighting with narrow beam width lenses •... -
Page 115: Information And Care
Technical Details CAM027 Product ID: CAM027 Dimensions: 63 x 52 x 52mm (L x W x D) Power Consumption: Weight: 0.25Kg (0.55lb) Temperature Range: -20°C ~ +50° C Environmental Protection: Pressure Tested IP68 Internal Pressure: None Version L Minicam Proteus... -
Page 116: Cam028L - Pan, Rotate, Zoom & Laser Camera
CAM028L – Pan, Rotate, Zoom & Laser Camera The camera module CAM028L provides a high resolution, colour, pan, rotate laser and zoom camera for the PROTEUS platform. It has the ™ following features: • High resolution colour CCD image sensor •... -
Page 117: Connections And Descriptions
To turn the Dual Lasers On and Off 1 Press the Camera Settings key. 2 From the on-screen menu, select Lasers by pressing the F3 key. 2 To switch off the dual lasers press the F3 key. Version L Minicam Proteus... -
Page 118: Information And Care
High-pressure cleaners must not be used. It can cause considerable damage to the crawler, camera and other system components. Cleaning agents or solvents must not be used. These can damage the seals and other materials on the system. Only clean water should be used. Minicam Proteus Version L... -
Page 119: Technical Details Cam028L
Aperture/Field of View: F1.8 – F2.9 / 46° – 4.6° Maximum Illumination Intensity: 12.5k lux at 150mm Pressure Depth Rating: 1 bar (14.50psi) Dimensions L x W x H: 143 x 80 x 80 Weight: 1148g Version L Minicam Proteus... -
Page 120: Alb300 - Auxiliary Module
ALB300 - Auxiliary Module The auxiliary module ALB300 provides additional illumination for the forward view camera and a rear view, high resolution, colour, camera for the PROTEUS platform. It has the following features: ™ • High resolution colour CCD image sensor •... -
Page 121: Connections And Descriptions
Connections and Descriptions 1 Forward LED illumination 2 Rear view camera 3 Connector 4 Serial number location Version L Minicam Proteus... -
Page 122: Information And Care
Technical Details ALB300 Product ID: ALB300 Dimensions: 84 x 68 x 50mm (L x W x D) Power Consumption: Weight: 0.32Kg (0.70lb) Temperature Range: -20°C ~ +50° C Environmental Protection: Pressure Tested IP68 Internal Pressure: None Minicam Proteus Version L... -
Page 123: Psp24 - External Power Supply Unit
OTHER Weight 1.25Kg (2.75lb) DANGER! Risk of deadly injuries from electrical current! Only the power supply supplied as part of the PROTEUS ™ inspection system can be used and should NOT be replaced by any other. Version L Minicam Proteus... -
Page 124: Bpp24 - External Battery Pack
BPP24 - External Battery Pack The external battery pack BPP24 provides power to the PROTEUS ™ inspection system when used in portable applications or where conven- tional mains power is not readily available. It uses the PSP24 external power supply unit to recharge. -
Page 125: Specifications
10% ~ 95% RH DANGER! Risk of deadly injuries from electrical current! BPP24 Only the external battery pack supplied as part of the PROTEUS system can be used and should be replaced by any ™ other. Version L Minicam Proteus... -
Page 126: Ccp60 - Compatible Coiler
The compatible coiler CCP60 provides a push camera solution to the PROTEUS ™ inspection system when the application may prohibit the use of a crawler inspection. It features an interchangeable camera head and connects directly to the CCU via the supplied 5m cable. Minicam Proteus Version L... -
Page 127: Connections And Descriptions
CAM026 pan and rotate camera instead of the supplied CAM025 self-levelling axial camera. This provides great flexibility to meet demanding inspection requirements. NOTE! The CCU can power the compatible coiler without the use of External Charger PSP24 or Proteus Battery Pack BPP24 . Version L Minicam Proteus... -
Page 128: Technical Details - Ccp60
Dimensions: 890 x 360x 690mm (H x W x D) Power Consumption: Weight (without CCU): 21.35Kg (47.1lb) Temperature Range: -20°C ~ +50° C Environmental Protection - Cam- IP68 era: Environmental Protection Coiler: IP54 Internal Pressure: None Minicam Proteus Version L... -
Page 129: Ptp01 - Portable Trolley
Digital Control Unit (not shown), Battery Pack (BPP24), Accessory Case and 100m Motorised Cable Reel (RMP100) or 200m Motorised Cable Reel (RMP200) or 200m Manual Cable Reel (RAP200), making the whole PROTEUS inspection ™ system highly portable. -
Page 130: Connections And Descriptions
Connections and Descriptions A Cable reel link cable for (Minicam Part No. LCP1.5). B CCU location pins C Battery pack link cable (Minicam Part No. ASS-002-974). D Keyboard support. E Battery pack fixing brackets. F Accessory box tray. G Cable reel (RMP100/RMP200/RAP200) fixing locations. -
Page 131: Equipping Ptp01 Portable Storage Trolley
2 Align the fixing plates to the fixing brackets (E). 3 Secure the battery pack in place using the nuts and bolts provided. Accessory Box The accessory case supplied with your PROTEUS inspection system ™ should be positioned into the accessory box tray (F). -
Page 132: Ptp01 Portable Storage Trolley Equipped
PTP01 Portable Storage Trolley Equipped A Digital Control Unit B Accessory Case C Battery Pack (behind Accessory Case) D Cable Reel Minicam Proteus Version L... -
Page 133: Technical Details - Ptp01
Technical Details - PTP01 Product ID: PTP01 Dimensions: 650 x 1150 x 720mm (Wx H x D) Weight: 9.75Kg (21.5lb) Unladen Version L Minicam Proteus... -
Page 134: Cgp01 - Cable Guide Pulley
The Cable Guide Pulley Reduces wear by preventing kinks and chaffing, and assists in the smooth guiding of the inspection cable during your survey. CGP01 comes complete with 12metres of heavy-duty reinforced rope and features a quick release mechanism for easy deployment. Minicam Proteus Version L... -
Page 135: Parts And Descriptions
Parts and Descriptions A Quick-release cable retainer.. B Roller. C Rope. Version L Minicam Proteus... -
Page 136: Using Cgp01 Cable Guide Pulley
5 Lower the guide pulley down the cable and position into the invert of the pipe. 6 Tie-off the rope (C) to secure into place. Minicam Proteus Version L... -
Page 137: Information And Care
Information and Care Maintenance Ensure all parts are free from debris and dirt. Technical Details - CGP01 Product ID: CGP01 Dimensions: 490 x 80 x 100mm (L x W x H) Weight: 2.7Kg (5.9lb) Version L Minicam Proteus... -
Page 138: Trp01 - Manhole Top Roller
Fully adjustable to fit most manhole sizes. Parts and Descriptions A Roller. B Size adjustment screw. C Adjustable extension arm. Minicam Proteus Version L... -
Page 139: Using Trp01
3 Tighten the size adjustment screw (B) to secure the extension arm. Information and Care Maintenance Ensure all parts are free from debris and dirt. Technical Details - TRP01 Product ID: TRP01 Dimensions: 650 x 280 x 160mm (L x W x H) Weight: 4.3Kg (9.4lb) Version L Minicam Proteus... -
Page 140: Frpo1 - Floatation Raft
Designed for use in large diameter high flow pipes in excess of 1000mm. The raft is small enough to be lowered down most common sizes manhole cover, eliminating the need for man-entry. Specifications of the FRP01 comply with today’s stringent health and safety policy requirements. *from 600mm Minicam Proteus Version L... -
Page 141: Parts And Descriptions
Parts and Descriptions A Guide Eyelet B Balance Plate C Camera Connector Protection D LED Auxiliary Light Cluster E Lowering Loop F Pressure Valve Protection Cap G Strain Relief H Raft Version L Minicam Proteus... -
Page 142: Connection Of Cabling Between Cable Reel And Raft
2 Turn the retaining ring (D) clockwise, as viewed from the cable, to lock the plug into the connector at the rear of the raft (B). The retaining ring is not able to unscrew itself during use, providing it is cleaned and maintained. Minicam Proteus Version L... -
Page 143: Disconnecting Cabling Between Cable Reel And Raft
1 To unscrew the retaining ring you must pull the ring away from the body of the floatation raft before rotating anti-clockwise. NOTE! Always fit the protective caps when the raft or camera are not in use to protect from ingress of dirt and moisture. Version L Minicam Proteus... -
Page 144: Connection Of Camera To Floatation Raft
Grub screw has a mushroom head and cannot be fully re moved. DO NOT OVERTIGHTEN! NOTE! Always fit the protective caps when the raft or camera are not in use to protect from ingress of dirt and moisture. Minicam Proteus Version L... -
Page 145: Information And Care
Maintenance Ensure all parts are free from debris and dirt. Technical Details - FRP01 Product ID: FRP01 Dimensions: 680 x 420 x 200mm (L x W x H) Weight (without camera): 5.8Kg (12.7lb) IP Rating: IP68 Version L Minicam Proteus... -
Page 146: Instructions For Pressurising The Frp01 Floatation Raft
Instructions for pressurising the FRP01 Floatation Raft 1 Connect the PROTEUS inspection system and apply power. ™ 2 Unscrew the pressure valve protection cap (1) 3 Screw on the pressure valve (2). 4 Set the pressure regulator for the CO or nitrogen to 10 PSI. - Page 147 Refer to the CCU section of this manual on specific instructions on how to access the pressure gauges. Image shows an example of the control unit raft pressure gauge: 6 Remove the pressure valve (2). 7 Refit the pressure valve protection cap (1) . Version L Minicam Proteus...
- Page 148 Minicam Proteus Version L...
-
Page 149: Inclination Logging & Reporting
The inclination feature is for use only to show the estimated general trend of the pipe slope. Due to varying conditions such as pipe type, environments, vibration, sensor technologies, etc. Minicam cannot be held responsible for any inaccuracies or consequences arising from the use of the inclination feature, logged inclination data, or generated inclination reports. -
Page 150: Before Commencing The Inclination Logging
Inclination Sensing Some Proteus crawlers are fitted with a sensor for inclination. The incli- nation measures the “slope” of the pipe as the crawler is driving along. The CCU, or a PC running suitable software applications (such as WinCan), can log the values of the crawler inclination during the survey. -
Page 151: Setting Up The Crawler
Setting up the Crawler Setting the Inclination Polarity Some Proteus crawlers produce an inclination signal which works up- side-down (‘reversed’). For these crawlers you can tell the CCU to swap the signal around. • When you lift the front of the crawler, the inclination values shown on the CCU screen should show POSITIVE values. - Page 152 If your crawler supports inclination zero calibration, you will see a menu item “Zero Inclination”. If it does not support inclination zero calibration, you can ignore the rest of this setup. Select “Zero Inclination” and the first stage of the zero calibration begins: Minicam Proteus Version L...
- Page 153 Place the crawler on a reasonably flat level surface (it does not need to be completely level). Now press the Red F1 key to perform the first stage of the cali- bration, and the CCU then moves on to Stage 2. Stage 2 The CCU shows: Version L Minicam Proteus...
-
Page 154: Setting The Inclination Smoothing
• To enable or disable Inclination Smoothing, press for Setup. • Then select the menu item Survey / Inclination. • Then the menu item Inclination Smoothing. • From there you can select Disable or Enable, then press Minicam Proteus Version L... - Page 155 This graph was produced WITHOUT smoothing. This graph was produced WITH smoothing. Version L Minicam Proteus...
-
Page 156: Interpreting The Inclination Graph
GREEN line, it means the pipe has a peak in it. A perfect pipe that had no dips or peaks would draw a BLACK inclination GREEN line directly over the top of the ideal straight line. Minicam Proteus Version L... - Page 157 Here the BLACK line goes below the GREEN line, so it means the pipe has a dip in it. Here the BLACK line goes above the GREEN line, so it means the pipe has a peak in it. Version L Minicam Proteus...
- Page 158 Minicam Proteus Version L...
-
Page 159: Reporting Software
PRO PIPE+ WinCan Embedded and ProPIPE+ Reporting Software for Proteus and SOLOPro+ Systems ™ Version B Version L Minicam Proteus... -
Page 160: Principle
Principle WinCan Embedded and ProPIPE+ on the Proteus and SOLOPro+ CCUs ™ allows you to create and maintain your surveys collected together as “Projects”. Within a Project you can have many separate “Sections”. For example, a “Project” might be a housing estate, and each street within that housing estate could be a “Section”. -
Page 161: Basic Usage
Create a report from a choice of different styles. You get an RTF report document and a PDF report document. Export the Project to a USB memory device so you can view on the For WinCan Projects, these can be imported into WinCan VX on the Version L Minicam Proteus... -
Page 162: Quick User Guide
Project, then this New Project will be listed as available. Choose Which Project to use to highlight the Project Name you require and then press . This then opens the Project for you to create your Sections. Minicam Proteus Version L... -
Page 163: Create A Section In The Project
If you would like to display any of the Header Information on the live video ‘project bar text’, press . This then displays the keys for you to select the information you would like to display by highlighting the desired Header Information line Version L Minicam Proteus... -
Page 164: Start Your Survey
Status Box on the right of the screen which in dicates your video recording and survey has begun. After a few seconds the on-screen video text will automatically disappear so that you can proceed with survey. Minicam Proteus Version L... -
Page 165: Create A New Observation
NOTE! If you move the camera before auto recording resumes you may notice a slight jump in the video playback! Repeat these steps each time you wish to capture a new observation. Version L Minicam Proteus... -
Page 166: Review Your Survey
If multiple surveys are being performed immediately within the same Project, press and then press to create a New Section, then repeat everything, starting from that New Section’s creation. Otherwise you can just create a report for that section if you wish to. Minicam Proteus Version L... -
Page 167: Create Your Report Documents
You can copy the report onto a USB memory device using the Gallery Browser for later printing on a PC, or you can copy it to USB using the Project Export feature. Version L Minicam Proteus... -
Page 168: Detailed User Guide
Press the Projects key, and the Project Type choice appears. Choose The Projects List appears If you have any existing Projects, they will appear in the list. If you have no existing Projects, the list will be empty Minicam Proteus Version L... -
Page 169: Choose New Project Or An Existing Project
Or to open an existing Project, highlight it using the arrows then press If you chose to create a New Project Use the arrows to select which Inspection Standard you wish to use, then press Enter a Name for the Project. Version L Minicam Proteus... -
Page 170: The Projects List Appears
You may also enter Comments for the Project of you wish. Press to create the Project. The Projects List appears If you just created a New Project, it will appear in this list Choose a Project to open Highlight the Project using the arrows and press Minicam Proteus Version L... -
Page 171: The Project Is Now Opened
The project is now opened A summary of the Project is shown. A New Project will not yet have any Sections. An existing Project may already have Sections. Press to see existing Sections or create New Sections in the Project. Version L Minicam Proteus... -
Page 172: Using Project Sections
If the Project has no existing Sections, the list will be empty. You can choose to create a New Section in the Project, or open an Existing Section To create a New Section, press Or to open an existing Section, highlight it using the arrows then press Minicam Proteus Version L... -
Page 173: If You Chose To Create A New Section
Press to create the Section. The Sections List appears If you just created a New Section, it will appear in this list. Choose a Section to open. Highlight the Section using the arrows and then press Version L Minicam Proteus... -
Page 174: The Section Is Now Opened
If this is an Existing Section, it may already have had a survey performed for it, and will have existing Observations. Press to review the existing Observations for this Section. You can generate a Report Document for the survey Observations in this Section Press to generate a Report Document Minicam Proteus Version L... -
Page 175: Preparing For The Survey
If you chose to perform a survey for the Section: The Survey Header Information appears Type in, or select, the appropriate information for the survey. Anything marked with a is mandatory information that must be provided. There may be several pages of Header Information. Version L Minicam Proteus... -
Page 176: For Each Header Information Item, You Can Choose Whether
Header Item is shown constantly throughout the survey. Header Items can be both “On Video” and also “On Project Bar”. There is a limit to the number of Header Items that can be selected simultaneously. Minicam Proteus Version L... - Page 177 After entering all the Header Information, you can enter some comments for the Survey Type in some Survey Comments if you wish Then press to prepare for performing the survey. Version L Minicam Proteus...
- Page 178 The system is now in Survey Standby, waiting for you to begin the survey. Video recording is ready, but is paused. Press the key, and position the inspection equipment ready for the survey. Minicam Proteus Version L...
-
Page 179: Beginning The Survey
Video recording starts. Your selected “On Video” Header Information text about the survey appears on the camera screen, and is recorded onto video. After a short time, this information is removed. You can now perform the inspection Survey. Version L Minicam Proteus... -
Page 180: Performing The Survey
Survey Features menu appears. If you know the Defect Code, you can simply type it in. If you don’t know the code, you can search, or you can use the Lookup to find it. Minicam Proteus Version L... - Page 181 You see a list of the Defect Code categories Use the arrows , and to browse the Defect Code categories to find the Defect Code that you require. When you have found the Defect Code, press Version L Minicam Proteus...
- Page 182 There may be more than one page of Observation Information. When you have entered the information, you can store the Observation. Press to store without taking a photo. Press to take a photo then store. Minicam Proteus Version L...
- Page 183 Your entered Observation Text information is shown on the camera screen The system takes a photo, with this information on it. After a short time, the information is removed. Video recording then restarts automatically and you can now move on to find the next Defect. Version L Minicam Proteus...
-
Page 184: Ending The Survey
Press the Projects key, and the Survey Features menu appears. Select End Survey and press You are asked to confirm you do want to end the survey. Press to confirm. Any other key cancels ending the survey. Minicam Proteus Version L... -
Page 185: Reviewing The Survey
Reviewing the Survey Viewing the Observations When you have selected a Section, the Section Information is shown. Press to Review the existing Observations for this Section. The Section Observations are shown. Version L Minicam Proteus... -
Page 186: Editing An Existing Observation
New Observation. Editing an Existing Observation When you have selected the Observation to be edited, the Observation Information is shown. Make any changes as you desire. Press to store your changes to that Observation. Minicam Proteus Version L... -
Page 187: Creating A New Observation
Either enter the Defect Code directly, or use Search, or use the Lookup. When you have selected the Defect Code for the new Observation, the Observation Information is shown. Enter the information as desired. Press to store this as a New Observation. Version L Minicam Proteus... -
Page 188: Creating Reports
Observations. New created Observations don’t have photos. The Observations are sorted into ascending distance order. Creating Reports Creating Reports for the Whole Project When you have selected and opened a Project, the Project Information is shown. Minicam Proteus Version L... - Page 189 Press the relevant coloured key to generate a report document of your chosen style. Most reports are generated as both RTF and PDF documents. style generates only RTF. The report documents are stored into the Project’s memory Folder, along with the Project’s video and photo files. Version L Minicam Proteus...
-
Page 190: Creating Reports For A Selected Section
Report Documents of this Section. Previews of the various Report Styles are displayed. Press the relevant coloured key to generate a report document of your chosen style Most reports are generated as both RTF and PDF documents. Minicam Proteus Version L... - Page 191 RTF. The report documents are stored into the Project’s memory Folder, along with the Project’s video and photo files. Version L Minicam Proteus...
-
Page 192: Weee Statement
For disposal contact Minicam or the Minicam partner in your country. Information on Disposal for Business Users Your Proteus CCU is marked with the symbol shown above. It means that used electrical and electronic products should not be disposed of in with general household waste. - Page 193 Batteries As a producer of industrial batteries under the Waste Batteries and Ac- cumulators Regulations 2009, we Minicam produce Lithium Ion batteries. We are obliged to take back free of charge, waste industrial batteries sup- plied to an end user for treatment and recycling. We are required to do this in any calendar year we place new industrial batteries on the market.
- Page 194 Useful Information UK Customers: For service and repair contact Minicam Tel: 01942 270524 Email: service@minicam.co.uk International Customers: For service and repair contact your local Minicam Approved Dealer View Minicam “How To” videos on our YouTube Channel Minicam Proteus Version L...
- Page 196 Minicam Ltd Unit 4, Yew Tree Way, Stonecross Park, Golborne, Warrington, WA3 3JD United Kingdom Tel: +44 (0)1942 270524 Email: info@minicam.co.uk www.minicamgroup.com ©2022 Minicam. All rights reserved. Specifications subject to change without notice. Minicam is a Halma Company.
Need help?
Do you have a question about the PROTEUS and is the answer not in the manual?
Questions and answers