Sign In
Upload
Manuals
Brands
MINICAM Manuals
Analytical Instruments
PROTEUS
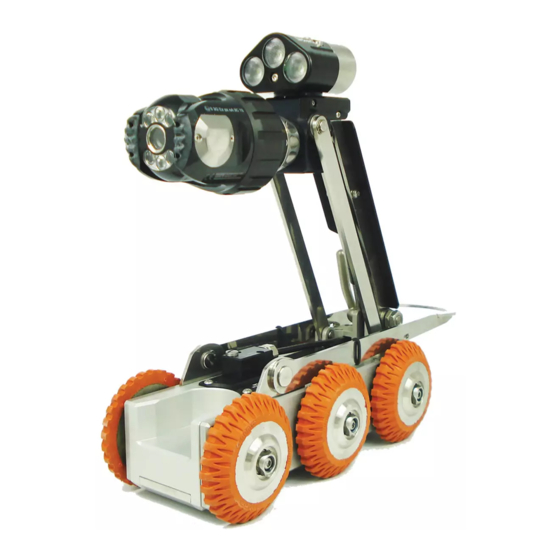
MINICAM PROTEUS Manuals
Manuals and User Guides for MINICAM PROTEUS. We have
1
MINICAM PROTEUS manual available for free PDF download: Original Instruction Manual
MINICAM PROTEUS Original Instruction Manual (196 pages)
Brand:
MINICAM
| Category:
Analytical Instruments
| Size: 18 MB
Table of Contents
Table of Contents
5
Warranty
15
Limited Warranty
15
Extent of the Limited Warranty
15
Conditions of the Limited Warranty
15
Warranty Limitations
15
Text Conventions
16
Danger, Caution and Note
16
Bold Font
16
Lists
16
Menu Selections
16
Product Description
17
Ec Declaration of Conformity
18
CE Declaration
18
System Overview
19
Warnings, Safety Measures and Care
20
Before First Use
22
Safety Measures
24
Maintenance
26
Cleaning
27
General Cleaning Work
27
Removal and Fitting of the Cable Reel Dirt Tray
28
Checking Plug and Socket Connections
29
Connecting the Proteus™ Inspection System
30
Fitting and Removal of Crawler Wheels
30
Connection of Cabling between Control Unit and Cable Reel
31
Connection of Cabling between Cable Reel and Crawler
32
Disconnecting Cabling between Cable Reel and Crawler
33
Connection of Camera to Crawler
34
Connection of Auxiliary Module to Crawler
35
Pressurising the PROTEUS ™ Inspection System
36
Check List for Adjusting Internal Pressure of Modules
36
Instructions for Pressurising the CRP300 Crawler
37
Instructions for Pressurising the CPL150S Crawler
38
Instructions for Pressurising the CRP140 Crawler
39
Instructions for Pressurising the CRP90 Crawler
40
Instructions for Pressurising the CAM026/26L
41
Testing the System
42
Lowering the Crawler into the Manhole
43
Ccu208 - Control Unit
44
CCU Overview
45
ON/OFF Button
46
ALL STOP Button
46
Power on Sequence
47
Power off Sequence
47
Crawler Function Keys
48
Survey Function Keys
49
Media Function Keys
50
Camera Function Keys
51
Snapshot Key
52
Recording and Playback Keys
52
QWERTY Keys
52
Pressurising Operation Mode
53
Connections and Descriptions
54
Front View
54
Rear View
55
Media Transfer
56
Select a Media to Browse, Either Internal, USB, or SD
56
Explore the Contents of a Media
56
Explore the Contents of a Project
57
To Confirm Copying
58
While the Project Is Being Copied to the USB, Progress Bars Are Shown
59
When File Copying Has Finished
59
Wifi Module
60
Connecting to Your PC
63
File Sharing
64
Email
64
Wincanweb
64
Share Status
65
Information and Care
66
Cleaning
66
Maintenance
66
Technical Details - CCU208
67
Rmp100 / Rmp200 / Rmp300 - Manual Cable Reel
68
Connections and Descriptions
69
Information and Care
70
Cleaning
70
Maintenance
70
Technical Details - RMP100
71
Technical Details - RMP200
71
Technical Details - RMP300
71
Rap200-Rap300 - Motorised Cable Reel
72
Parts and Descriptions
73
Connections
74
Using Motorised Cable Reel RAP200-RAP300
74
Automatic Mode
74
Manual Mode
74
Paying out
74
Rewinding
75
Motor Torque Value
76
Selecting the Crawler Wheel Size
77
Selecting Wheel Size When Powering-On the Crawler
77
Selecting Wheel Size at Other Times
78
Status Display for the Motorised Cable Reel
80
Status LED
82
Controlling the Motorised Cable Reel
83
Control Using the Keyboard Keys
83
Control Using the Coloured Keys
84
Cancel Continuous Pay out or Rewind
85
Cancel Using the Keyboard Keys
85
Cancel Using the Coloured Keys
87
Cable Reel Emergency Stop Button
88
Clearing the Emergency Stop Condition
89
Cable Reel Blocked
91
Reset the Blocked Condition
91
Troubleshooting
93
Information and Care
94
Cleaning
94
Maintenance
94
Safety
95
Technical Details - RAP200
95
Technical Details - RAP300
95
Rcp4 - 4 Button Remote Control
96
Parts and Descriptions
97
Pairing RCP4 with MCR
98
Connecting RCP4
99
RCP4 Operational Range and Disconnection
100
Buttons
100
MCR Blocked and Emergency Stop Button Pressed
100
CCU and RCP4 Interactions
101
RCP4 Battery
101
All Stop Pressed
101
No CCU Present
101
Information and Care
101
Cleaning
101
Proteus Crawlers Crp300/140/90 - Cpl150S
102
CRP300 Connections and Descriptions
103
CPL150S Connections and Descriptions
104
CRP140 Connections and Descriptions
105
CRP90 Connections and Descriptions
106
Information and Care of Proteus Crawlers
108
Pressurisation
108
Cleaning
108
Crawler Wheels
108
Maintenance
108
Cam026 - Pan & Rotate Camera
110
Connections and Descriptions
110
Cam026L - Pan & Rotate Laser Camera
111
Connections and Descriptions
111
Information and Care
112
Pressurisation
112
Cleaning
112
Maintenance
112
Technical Details CAM026
113
Technical Details CAM026L
113
Cam027 - Axial Camera
114
Connections and Descriptions
114
Information and Care
115
Pressurisation
115
Cleaning
115
Maintenance
115
Technical Details CAM027
115
Cam028L - Pan, Rotate, Zoom & Laser Camera
116
Connections and Descriptions
117
Operation of the Dual Lasers
117
Information and Care
118
Pressurisation
118
Cleaning
118
Maintenance
118
Technical Details CAM028L
119
Alb300 - Auxiliary Module
120
Connections and Descriptions
121
Information and Care
122
Pressurisation
122
Cleaning
122
Maintenance
122
Technical Details ALB300
122
Psp24 - External Power Supply Unit
123
Specifications
123
Bpp24 - External Battery Pack
124
Specifications
125
Ccp60 - Compatible Coiler
126
Connections and Descriptions
127
Technical Details - CCP60
128
Ptp01 - Portable Trolley
129
Connections and Descriptions
130
Equipping PTP01 Portable Storage Trolley
131
PTP01 Portable Storage Trolley Equipped
132
Technical Details - PTP01
133
Cgp01 - Cable Guide Pulley
134
Parts and Descriptions
135
Using CGP01 Cable Guide Pulley
136
Using CGP01
136
Information and Care
137
Maintenance
137
Technical Details - CGP01
137
Trp01 - Manhole Top Roller
138
Parts and Descriptions
138
Using TRP01
139
Information and Care
139
Maintenance
139
Technical Details - TRP01
139
Frpo1 - Floatation Raft
140
Parts and Descriptions
141
Connection of Cabling between Cable Reel and Raft
142
Disconnecting Cabling between Cable Reel and Raft
143
Connection of Camera to Floatation Raft
144
Information and Care
145
Maintenance
145
Technical Details - FRP01
145
Instructions for Pressurising the FRP01 Floatation Raft
146
Inclination Logging & Reporting
149
Before Commencing the Inclination Logging
150
What Inclination Is for
150
Recommended Conditions for Inclination Logging
150
Setting up the Crawler
151
Setting the Inclination Polarity
151
Inclination Zero Calibration
151
Setting the Inclination Smoothing
154
Interpreting the Inclination Graph
156
Reporting Software
159
Principle
160
Basic Usage
161
Quick User Guide
162
Create a New Project
162
Choose Which Project to Use
162
Create a Section in the Project
163
Select the Project Section to Use
163
Enter the Section Header Information
163
Start Your Survey
164
Create a New Observation
165
Review Your Survey
166
End Your Survey
166
Create Your Report Documents
167
Detailed User Guide
168
Using Projects
168
The Projects List Appears
168
Choose New Project or an Existing Project
169
If You Chose to Create a New Project
169
The Projects List Appears
170
The Project Is Now Opened
171
Using Project Sections
172
The List of Existing Sections Is Shown
172
If You Chose to Create a New Section
173
The Sections List Appears
173
The Section Is Now Opened
174
Preparing for the Survey
175
Entering Survey Header Information
175
For each Header Information Item, You Can Choose Whether
176
Beginning the Survey
179
Performing the Survey
180
Creating Defect Observations
180
Ending the Survey
184
Reviewing the Survey
185
Editing an Existing Observation
186
Creating a New Observation
187
Creating Reports
188
Creating Reports for the Whole Project
188
Creating Reports for a Selected Section
190
Weee Statement
192
Advertisement
Advertisement
Related Products
MINICAM SOLO PRO+
MINICAM SoloPro
MINICAM Categories
Analytical Instruments
Action Cameras
More MINICAM Manuals
Login
Sign In
OR
Sign in with Facebook
Sign in with Google
Upload manual
Upload from disk
Upload from URL