Table of Contents
Advertisement
Quick Links
Advertisement
Table of Contents

Related Manuals for Asus H61M-PRO


Summary of Contents for Asus H61M-PRO
- Page 1 H61M-PRO...
- Page 2 INCIDENTAL, OR CONSEQUENTIAL DAMAGES (INCLUDING DAMAGES FOR LOSS OF PROFITS, LOSS OF BUSINESS, LOSS OF USE OR DATA, INTERRUPTION OF BUSINESS AND THE LIKE), EVEN IF ASUS HAS BEEN ADVISED OF THE POSSIBILITY OF SUCH DAMAGES ARISING FROM ANY DEFECT OR ERROR IN THIS MANUAL OR PRODUCT.
-
Page 3: Table Of Contents
BIOS setup program ..................2-5 Main menu ..................... 2-9 Ai Tweaker menu ..................2-11 Advanced menu ..................2-13 Monitor menu ....................2-21 Boot menu ....................2-24 Tools menu ....................2-30 Exit menu ....................2-31 Appendices Notices ........................A-1 ASUS contact information ..................A-3... -
Page 4: Safety Information
Safety information Electrical safety • before relocating the system. • When adding or removing devices to or from the system, ensure that the power cables for the devices are unplugged before the signal cables are connected. If possible, disconnect all power cables from the existing system before you add a device. •... - Page 5 Refer to the following sources for additional information and for product and software updates. ASUS websites The ASUS website provides updated information on ASUS hardware and software products. Refer to the ASUS contact information. Optional documentation that may have been added by your dealer. These documents are not part of the standard package.
-
Page 6: Package Contents
22nm/32nm CPU ® Supports Intel Turbo Boost Technology 2.0 ® The Intel Turbo Boost Technology 2.0 support depends on the CPU • types. Refer to www.asus.com for Intel ® CPU support list. • Chipset Intel ® H61 Express Chipset Memory 2 x DIMMs, max. - Page 7 - 8 x USB 2.0/1.1 ports (4 ports at the mid-board, 4 ports at the back panel) ASMedia ® ASM1042 USB3.0 controller - support ASUS 3.0 Boost UASP Mode - 2 x USB 3.0 ports at mid-board Rear panel ports...
- Page 8 BIOS features 64 Mb Flash ROM, UEFI BIOS, PnP, DMI v2.0, WfM 2.0, ACPI v2.0a, SM BIOS v2.7, SLP 3.0, Multi-language BIOS, ASUS EZ Flash 2, ASUS CrashFree BIOS 3, F12 PrintScreen function, F3 Shortcut function, and ASUS DRAM SPD (Serial Presence Detect) memory information...
-
Page 9: Product Introduction
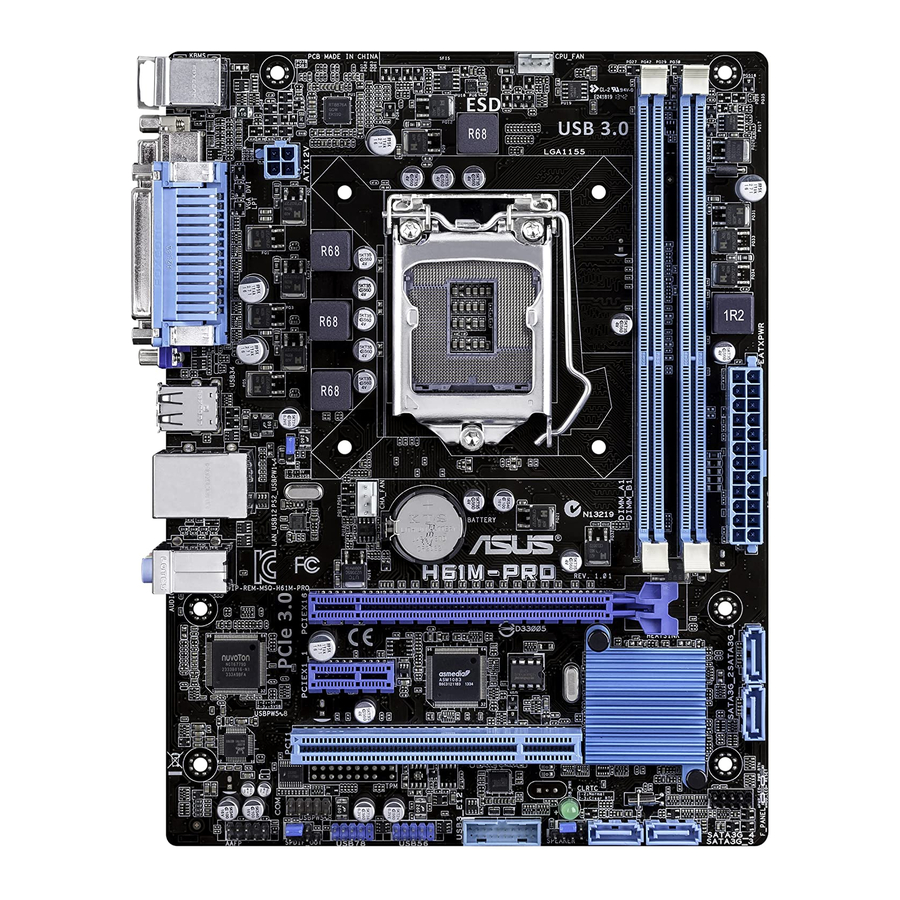
1.2.2 Screw holes Place six screws into the holes indicated by circles to secure the motherboard to the chassis. Do not overtighten the screws! Doing so can damage the motherboard. ASUS H61M-PRO... - Page 10 Place this side towards the rear of the chassis 1.2.3 Motherboard layout 17.8cm(7.0in) KBMS CPU_FAN 8876 ATX12V USB34 CHA_FAN LAN_USB12 BATTERY 8111G AUDIO H61M-PRO PCIEX16 Super 64Mb PCIEX1_1 BIOS 1083 Intel ® PCI1 887-VD2 1042 SB_PWR AAFP USB3_E12 SATA3G_4 SATA3G_3...
-
Page 11: Central Processing Unit (Cpu)
Contact your retailer immediately if the PnP cap is missing, or if you see any damage to the PnP cap/socket contacts/motherboard components. ASUS will shoulder the cost of repair only if the damage is shipment/ transit-related. - Page 12 1.3.1 CPU installation The LGA1156 CPU is not compatible with the LGA1155 socket. DO NOT install an LGA1156 CPU on the LGA1155 socket. Chapter 1: Product introduction...
- Page 13 1.3.2 CPU heatsink and fan assembly installation Apply the Thermal Interface Material to the CPU heatsink and CPU before you install the heatsink and fan if necessary. To install the CPU heatsink and fan assembly ASUS H61M-PRO...
-
Page 14: System Memory
To uninstall the CPU heatsink and fan assembly System memory 1.4.1 Overview This motherboard comes with two Double Data Rate 3 (DDR3) Dual Inline Memory Modules (DIMM) sockets. A DDR3 module has the same physical dimensions as a DDR2 DIMM but is notched differently to prevent installation on a DDR2 DIMM socket. - Page 15 Under the default state, some memory modules for overclocking may operate at a lower frequency than the vendor-marked value. To operate at the vendor-marked or at a higher frequency, refer to section 2.4 Ai Tweaker menu for manual memory frequency adjustment. memory load (2 DIMMs) or overclocking condition. ASUS H61M-PRO...
- Page 16 1.4.3 Installing a DIMM To remove a DIMM Chapter 1: Product introduction...
-
Page 17: Expansion Slots
Assign an IRQ to the card. Install the software drivers for the expansion card. When using PCI cards on shared slots, ensure that the drivers support “Share IRQ” or that groups, making the system unstable and the card inoperable. ASUS H61M-PRO... - Page 18 1.5.3 PCI slot The PCI slot supports cards such as a LAN card, SCSI card, USB card, and other cards that 1.5.4 PCI Express 2.0 x1 slot This motherboard supports PCI Express 2.0 x1 network cards, SCSI cards, and other cards 1.5.5 PCI Express 3.0/2.0 x16 slot This motherboard has a PCI Express 3.0/2.0 x16 slot that supports PCI Express 3.0/2.0 x16...
-
Page 19: Jumpers
You do not need to clear the RTC when the system hangs due to overclocking. For system failure due to overclocking, use the CPU Parameter Recall (C.P.R) feature. Shut down and reboot the system so the BIOS can automatically reset parameter settings to default values. ASUS H61M-PRO 1-11... - Page 20 DRAM in slow refresh, power supply in reduced power mode). USBPW5-8 H61M-PRO +5VSB (Default) H61M-PRO USB Device Wake Up • The USB device wake-up feature requires a power supply that can provide 500mA on • The total current consumed must NOT exceed the power supply capability (+5VSB) whether under normal condition or in sleep mode.
Need help?
Do you have a question about the H61M-PRO and is the answer not in the manual?
Questions and answers