Table of Contents
Advertisement
Quick Links
INSTRUCTION MANUAL
700120D
EN1000/EN1001
SERIES CONTROLS
MICROPROCESSOR BASED
Welding Controls
Solid State Thyristor Contactors
Cabinet Style
EN1000
S
421180
T/D/LS/LF/FP
421210
E
421212
D/T
421377
RDE
421274
ENTRON Controls, Inc.
465 Randy Road
Carol Stream, IL 60188
(630) 682-9600
Fax: (630) 682-3374
www.entroncontrols.com
with
Wiring Diagrams
EN1001
421270
421269
421268
421288
421274
Advertisement
Table of Contents
Troubleshooting

Related Manuals for Entron EN1000


Summary of Contents for Entron EN1000
- Page 1 Welding Controls with Solid State Thyristor Contactors Wiring Diagrams Cabinet Style EN1000 EN1001 421180 421270 T/D/LS/LF/FP 421210 421269 421212 421268 421377 421288 421274 421274 ENTRON Controls, Inc. 465 Randy Road Carol Stream, IL 60188 (630) 682-9600 Fax: (630) 682-3374 www.entroncontrols.com...
- Page 3 Model Series EN1000/EN1001 NEMA Type: ALL READ THIS MANUAL COMPLETELY BEFORE ATTEMPTING TO INSTALL OR OPERATE THIS CONTROL ENTRON Controls, Inc., reserves the right to alter the contents of this manual without previous notice. ENTRON Controls, Inc. Carol Stream, Illinois, 60188...
-
Page 4: Table Of Contents
1.2 EN1000/EN1001 CONTROL PANEL LAYOUT ........ - Page 5 APPENDIX A - ERROR CODES LIST ............122 APPENDIX B - INTRODUCTION TO PROGRAMMING EN1000 SERIES CONTROLS ......123...
-
Page 6: General Description
500 Hz to 2000 Hz operating frequency rating. The EN1001 differs from EN1000 as it has a Constant Current mode of operation, see Section 5.4.14 and Section 8. 1.1 STANDARD FEATURES (All Models) - Page 7 PRESSURE SWITCH FIRING terminal strip connection allows the control to be initiated from a pressure switch closure. Remove the jumper from TS1-PS1 and TS1-GND and connect pressure switch leads. Pressure switch is not furnished with control. EMERGENCY STOP - This is a terminal strip connection that allows all control functions to be reset upon opening of the EMERGENCY STOP switch.
-
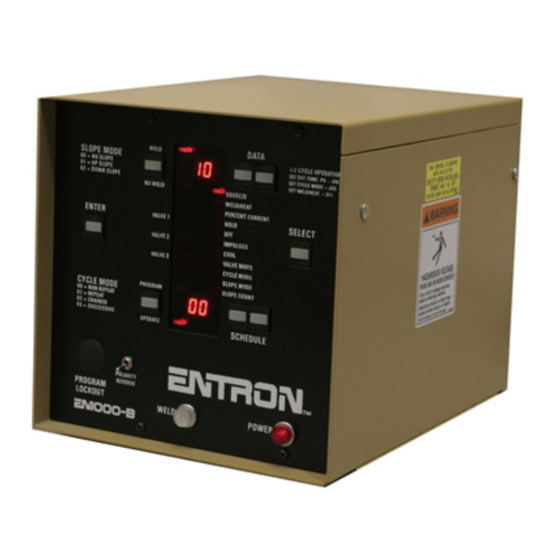
Page 8: En1000/En1001 Control Panel Layout
* For operator convenience, codes for Slope and Cycle mode functions are printed on the left side of the control panel, below the ENTER push-button. On the EN1000 Control Panel layout there is no added text for clarification of Constant Current modes. -
Page 9: Programmable Functions
2. PROGRAMMABLE FUNCTIONS SCHEDULES - The EN1000/EN1001 can store up to 50 Schedules, from 00 to 49. A weld sequence may include more than one schedule. A chain of schedules, for example, may be used to add a forge operation during a weld sequence, or add a quench and temper sequence to a schedule. - Page 10 SCHEDULE DISPLAY (22) - The SCHEDULE DISPLAY shows the number of the active SCHEDULE. The EN1000/EN1001 can store up to 50 schedules [ 00 to 49 ]. SCHEDULE PUSH-BUTTONS (20) & (21) - The right button increments SCHEDULE by one, and the left button increments SCHEDULE by ten.
-
Page 11: Sequence Timed Parameters
2.1 CONTROL FUNCTIONS - Continued - See Figure 1, CONTROL PANEL LAYOUT (Page 6) ENTER (28) - The ENTER push-button is used to STORE the data shown, FROM the DATA Display INTO the non-volatile MEMORY. (The non-volatile memory retains data with the power OFF). -
Page 12: Other Programmable Sequence Parameters
2.3 OTHER PROGRAMMABLE SEQUENCE PARAMETERS IMPULSES (13) - The number of HEAT IMPULSES that will occur in a schedule. PERCENT CURRENT (9) - The PERCENTAGE of conduction time provided to the welding transformer primary from 0 to 99 percent, adjustable in 1% steps. SLOPE MODE (17) - Determines the DIRECTION of the ramp with respect to the programmed weld percent current. - Page 13 VALVE MODE (15) - The three solenoid valves are activated based on the code programmed as shown in Table 2.1. Table 2.1 Valve Codes Since the valve codes are in Binary form, valve assignments are clarified in this table. Valves LED indicators Valves Output Valve Code Description...
-
Page 14: Installation
3. INSTALLATION The EN1000 and EN1001 Series of controls can be provided in different cabinet style. 3.1 INSTALLATION DIAGRAMS “S” CABINET The Installations diagrams for S cabinet are shown on the Figure 3.1. Figure 3.1 Style “S” Cabinet for EN1000/EN1001 Controls... -
Page 15: Installation Diagrams "E" Cabinet
3.2 INSTALLATION DIAGRAMS “E” CABINET Figure 3.2.1 Style E Cabinet - 300/600/1200A Contactor NOTE: See Section 3.4 for more information about mounting. Figure 3.2.2 Style “E” Cabinet - 1800/2200 A Contactor Page 13... -
Page 16: Installation Diagrams "T/D" And "L" Cabinet
3.3 INSTALLATION DIAGRAMS “T/D” AND “L” CABINET Style T/D and L Cabinets are shown on the Figure 3.3.1 and 3.3.2. Figure 3.3.1 Style T/D and L Cabinet - 600/1200 A NOTE: See Section 3.4 for more information about mounting. Figure 3.3.2 Style T/D and L Cabinet - 1800/2200 A Page 14... -
Page 17: Installation Diagrams, 'E' And 'T' Cabinet
3.4 MECHANICAL MOUNTING DIAGRAMS “E” AND “T” CABINETS Figure 3.4.1 Mechanical mounting diagram for “E” Cabinet Figure 3.4.2 Mechanical mounting diagram for “T” Cabinet Page 15... -
Page 18: Welding Transformer Primary Wiring
3.5 WELDING TRANSFORMER PRIMARY WIRING SCR OR IGNITRON TUBE CONTACTORS WARNING When power is ON, all exterior surfaces of the ignitron tubes and SCR's carry line voltages of 240 V or 480 V (or 575 V). Contact with these devices may cause serious or fatal injuries. For your convenience, many electrical and mechanical connections have been performed at the factory. - Page 19 Figure 3.6 External SCR Contactor connection Page 17...
-
Page 20: Cooling Requirements For Contactors
The EN1000 water cooled SCR contactors are electrically isolated from the electrical circuit within the contactor section. No minimum length of water hose is required for electrical isolation of the contactor. -
Page 21: General Operating Requirements
USED ON A VOLTAGE OTHER THAN THE ONE FOR WHICH IT IS WIRED, SERIOUS DAMAGE CAN RESULT. It is possible to operate the EN1000 Series control at 208, 240, 380, 480, and 575 VAC. When a 380 or 575 VAC main is desired, please consult the factory. When the control is converted from one line voltage to another, there are three changes required. - Page 22 3. Valve Transformer: Jumpers on the valve transformer H1, H3, H2, and H4 must be configured to match the line voltage, Figure 4.1.2. The standard valve transformer included with the EN1000/EN1001 (either 50 VA or 150 VA) is configured for 240VAC or 480VAC input, for 380 or 575 VAC operation, consult the factory.
-
Page 23: Fusing And Safe Operation
4.2 FUSING AND SAFE OPERATION CONTROL FUSE- This fuse, a 1/4 A, is used to protect the control circuits. The fuse holder is located in the upper left corner of the contactor door opening or within the “S” Cabinet. VALVE FUSES- These fuses, a 2AG 1 A, are used to protect the valve circuits. -
Page 24: Terminal Strip Diagrams And Connections
4.3 TERMINAL STRIP DIAGRAMS AND CONNECTIONS 4.3.1 TERMINAL STRIP TS1/PCB2 SEE CUSTOMER WIRING DIAGRAM 421269 “T/D or L/LS” STYLE CABINET, 421270 “S” CABINET, OR 421268 “E” CABINET Figure 4.3.1a Terminal Strip / Firing Board For most current revision of the component placement on this board see Figure 4.3.1b. Page 22... - Page 25 Starting in June 2004, a new tape-layout revision of Terminal Strip/Firing Board A/N 410319 has been shipped with new Controls. Beside new layout of the components on the board, board now includes optional manufacture of assembly with 24VDC Valves. For more information about 24VDC Valve option see Application Note 700189.
-
Page 26: Terminal Strip Connections
4.3.2 TERMINAL STRIP CONNECTIONS See the diagrams on Figure 4.3.1a and Figure 4.3.1b. Terminal Strip Customer Connections Description TS1- Used as the Common Connection Point for all of the other terminal strip input connections. There are six GND terminals provided on TS1. TS1- Used to connect one side of the First Stage of a Two Stage Pilot Switch . - Page 27 Terminal Strip Customer Connections Description TS1- When initiated via TS1-FS11/SS3 the weld control will begin execution at FS11 SCHEDULE 20. -or- Used to connect one side a third Single Stage Pilot. For initiations of a third of three pre-assigned schedules. Connect a single stage pilot between TS1- FS11 and TS1-GND terminals.
-
Page 28: Terminal Strip Ts1 Inside The Cabinet
Terminal Strip Customer Connections Description TS1-VL1 Used to connect one side of internal or external Valve Power (115 VAC internal, or 24-240 VAC external*). TS1- Used to connect other side of Valve Power* and other side of Solenoid SV2/SV4/ Valve 1 and 2 coil(s). TS1-SV1 Used to connect one side of Solenoid Valve #1 coil. -
Page 29: Initiation
4.4 INITIATION The EN1000/1001 Series of controls are equipped with four weld initiation inputs FS1, FS3, FS7 and FS11, as shown on Figure 4.4.1 (see also section 5.4.3), and provide two basic weld initiations: • single stage pilot, and •... - Page 30 NOTE: If a pressure switch is not used, place a jumper (factory installed) between TS1- PS1and TS1-GND. Pressure Switch is not furnished with the control. EN1000/EN1001 Series Controls with firmware A/N 619016-002J revision or latter will have the following Pressure Switch Function Revised. As of this Revision the Pressure Switch will be ignored if Weld Time is set to [""].
-
Page 31: Non-Volatile Memory Error
When an ENTRON EN1000 or EN1001 control is powered up, or returns from an emergency stop condition, it executes a diagnostic test that reads all memory locations within the schedule storage areas. - Page 32 L1 and H1 will radiate electromagnetic spikes onto the parallel wires bundled with it. The initiation wires are low voltage and are the most vulnerable to electromagnetic spikes. Also, a short within this bundle could cause severe damage. Caution: NEVER connect Terminal Strip GND to Earth Ground.
-
Page 33: Isolation Circuitry Description
4.7 EN1000/EN1001 ISOLATION CIRCUITRY DESCRIPTION The EN1000 Series of controls are microprocessor based resistance welding controls that incorporate circuitry designed to prevent any output from the control due to spurious or unexpected or false conditions or failure of circuit components. The intent of this application note is to explain how the circuitry accomplishes this isolation. - Page 34 It is always necessary to take personal safety precautions when operating any machinery. Through a "process output" system, the EN1000 Series of controls can be programmed so that if the 20 volt energizing voltage for the isolation relays appears in the absence of an initiation, or if the SCR contactor conducts current at any time other than when programmed, an output voltage will appear at the valve #3 terminals.
-
Page 35: Introduction To Data Programming
5. INTRODUCTION TO DATA PROGRAMMING The EN1000 or EN1001 control is capable of storing and accessing up to 50 unique welding Schedules. This makes the EN1000 or EN1001 particularly suitable for complex welding operations, as well as automated machinery. Programming allows the operator... -
Page 36: Program Lockout Options
5. PRESS the ENTER push-button to store the data from the DATA DISPLAY into non-volatile memory. As the enter key is pressed, the data display will blink and then remain steady. Repeat the steps described above as required. Any or all Functions may be programmed depending on the final welding schedule or sequence required. -
Page 37: Sequence Parameters Programming
5.3 SEQUENCE (SCHEDULE) PARAMETERS PROGRAMMING Beside standard schedule parameters, there are several extended parameters. The associated extended schedule parameters are accessible by first using SELECT to choose the main function such as SQUEEZE, and then clicking either SCHEDULE push-button to access a schedule function such as [;!X!] or [;!Z!]. -
Page 38: Using Programming Shortcuts
5.3.1 USING PROGRAMMING SHORTCUTS TO QUICK COPY A SCHEDULE UP TO THE NEXT SCHEDULE 1. Put the control in the PROGRAM Mode. 2. Press and hold ENTER. 3. Click the SCHEDULE “ONES” button. The displayed schedule is copied to the next higher schedule. The new schedule is displayed. -
Page 39: Extended Functions
5.4 EXTENDED FUNCTIONS The EN1000 EXTENDED FUNCTIONS allow the operator to change normal operation modes and add various operating functions that are useful for special applications of the control. The Extended Functions are used instead of Jumper or Dip-switch settings. They are accessible from the front panel. -
Page 40: Identification Number
5.4.17 5.4.1 IDENTIFICATION NUMBER - [4!J!] The EN1000/EN1001 control may be equipped with RS485 option to communicate to a PC or any other device with RS485 interface. The device with RS485 interface is capable of communicating with up to 64 Controls on a common two-wire network. For this reason the control needs to be identified. -
Page 41: Seam Welding
5.4.2 SEAM WELDING MODE - [=!0!] To program the control for SEAM OPERATION: 1. Put the control in PROGRAM MODE. 2. Use SELECT to find [01]. 3. Use the SCHEDULE push-buttons to scroll through extended functions and find [=0]. 4. Enter a value for [=0] of ["#] using the DATA push-buttons. 5. -
Page 42: Schedule Selection (Int./Ext.) And Anti-Tie Down
See also Application Note 700199, Using External Surge Resistors. The EN1000 or EN1001 control is equipped with Temperature Limit Switch, usually mounted on the Heatsink of the SCR Contactor. An Error Code ["#] will appear on the display if the Temperature Limit Switch is open. - Page 43 TS1-FS11 AUTOMATICALLY SELECTS AND INITIATES ON 20: 1. Select schedule 20 using the SCHEDULE push-buttons 2. Program SCHEDULE 20 (or a sequence starting at schedule 20 ) 3. Use FS11 to initiate schedule 20 (or a sequence starting at schedule 20). NOTE: Regardless of what schedule the front panel displays, FS11 is dedicated to initiate only on schedule 20.
- Page 44 The foot switches, and additional diode assembly A/N 600573, are connected to the TS1 terminal strip as shown on Figure 5.4.1. The diode assembly may be substituted with most any silicon diode rated 1 A at 100 V. See Application Note 700118 . ANTI-TIEDOWN MODE [=!=!] = ["$] When configuring the control for ANTI-TIEDOWN mode using the TS terminal strip connections, the TS-FS7/SS1 and TS-FS11/SS3 terminals become inputs for ANTI-TIE-...
- Page 45 Control Board. The option consists of a J4 ribbon cable an additional PCB A/N 410329-004 with six binary schedule select inputs and Control board A/N 600572-009 (EN1001) or 600541-009 (EN1000). These six dry contact closure (approximately 24 VDC) inputs make all 49 schedules remotely available to the operator or machine process control system.
-
Page 46: Automatic Voltage Compensation And Monitoring
In addition to the original Automatic Voltage Compensation (AVC), an additional series of settings are available in the EN1000 or EN1001 series of weld controls with software firmware P/N 619016-002 revision A or later. The new settings allow voltage monitoring, or compensation and monitoring. - Page 47 For example: if the steady state line voltage is approximately 480 VAC, do not program [.!.!] until the line voltage is as close to 480 VAC as possible. If nominal set point value is too low or too high compared to nominal voltage level, the Control will display one of the following errors: [0!X!] = 17 AVC nominal set point voltage is too low, compared to nominal...
-
Page 48: Clear All Functions
5.4.5 CLEAR ALL FUNCTIONS - [.!,!] It is sometimes desirable to CLEAR ALL previous schedules and extended functions from the memory and return the programmed control parameters to factory defaults. To use the CLEAR ALL feature: 1. Put the control in PROGRAM MODE. 2. -
Page 49: Back-Step / Temperature Limit Switch
5.4.6 BACK-STEP / TEMPERATURE LIMIT SWITCH - [H!=!] The BACK-STEP function is designed to add flexibility while welding with SUCCESSIVE schedules. While active, [H!=!] steps back to the previous schedule, and allows the operator to initiate on that schedule again while in the middle of a successive sequence. As an example, suppose the control executes a sequence and automatically advances the schedule number and flashes schedule ["%]. -
Page 50: Process Outputs
5.4.7 PROCESS OUTPUTS - [;!:!] The EN1000 and EN1001 provides an output that can be useful when the operator or the system needs feedback from specific parts of the welding sequence, such as: Major or minor error conditions to machine controls, shunt trips, or indicator lamps. Some process outputs may result in changes of the control sequence, status, fault, or major or minor error conditions. - Page 51 Table 5.4.7 Process Output codes and descriptions CODE PROCESS OUTPUT DESCRIPTION PROCESS OUTPUT disabled ON during WELD ON during WELD and HOLD ON during HOLD ON during OFF ON after OFF until INITIATION is removed ON for 0.5 sec after EOS (End of Sequence) special AIR over OIL retraction RETRACTION mode HALF WELD CYCLE mode...
- Page 52 [;!:!] = ["#] ON during WELD PROCESS OUTPUT - When [;!:!] = ["#], the valve 3 output will be on during WELD time part of the sequence, regardless whether the Control is in Weld or No Weld mode. [;!:!] = ["$] ON during WELD AND HOLD PROCESS OUTPUT - When [;!:!] = ["$], the valve 3 output will be on during application of welding current and the programmed HOLD time.
- Page 53 [;!:!] = [##] TEMPERATURE LIMIT SWITCH OR WFS PROCESS OUTPUT - When [;!:!]=[##], the valve 3 output will be on when the TEMPERATURE LIMIT SWITCH input TLS1 is open. [;!:!] = [#$] CURRENT OUTSIDE LIMIT FLASH HI or LO PROCESS OUTPUT - When [;!:!]=[#$], the data display will flash HI or LO when the control is unable to keep the current constant within the programmed HI or LO windows limits.
- Page 54 [;!:!] = [$%] - Used with RS232 or RS485 Option - EN1001 ONLY. This Process Output will prepare Error Code and Current to be sent to master on ENBUS or to Serial Printer: Error message 0!X!3O if current was above maximum limit and current value in [%] or [kA].
-
Page 55: Beat Operation - Initiation Modes
5.4.8 BEAT OPERATION - INITIATION MODES - [H!0!] The EN1000 Series of controls can provide several INITIATION modes: • non-beat initiation • beat initiation during squeeze • beat initiation during squeeze and weld • beat initiation during weld with using NW1 input NON-BEAT INITIATION MODE, [H!0!] = [""]... - Page 56 BEAT INITIATION DURING SQUEEZE AND WELD, [H!0!] = ["$] BEAT DURING SQUEEZE AND WELD Is typically used for brazing applications. It provides the same functions as provided by Beat During Squeeze; in addition the weld sequence can be terminated before weld time has elapsed. If the operator opens the initiation during WELD time, the WELD time is interrupted and the control immediately advances to HOLD time.
-
Page 57: Degree Delay
How far would the Initiation Button need to be for reliable initiation? Using the following times: 1. Weld control ESTOP response = 60 ms 2. Typical light curtain response = 50 ms 3. Typical speed of travel of hand used in calculations for light curtains is 63 "/sec. "... -
Page 58: Power Factor Programming
5.4.10 MANUAL POWER FACTOR PROGRAMMING - [;!;!] If required the EN1000/EN1001 Control can be placed in the MANUAL POWER FACTOR Mode as follows: 1. Place the control in the PROGRAM MODE. 2. Use SELECT and find [ 01 ]. 3. Use the SCHEDULE push-buttons to find [;!;!]. -
Page 59: Squeeze Delay
5.4.12 SQUEEZE DELAY - [=!J!] SQUEEZE DELAY [=!J!] is a pre-squeeze which energizes the scheduled valves for the programmed interval of time. Squeeze Delay occurs after initiation and immediately before the first SQUEEZE is executed, (a form of retraction to position electrodes closer to the work in a “Repeat”... -
Page 60: Constant Current Modes
5.4.14 CONSTANT CURRENT MODES - (EN1001 only) [.!X!] This parameter is used to select desired constant current mode and to select current sensor. The EN1001 Constant Current control can be programmed for constant current operation and two basic modes: 1. Compensation ( both monitoring and compensation), 2. -
Page 61: Ratio Or Range
5.4.15 RATIO OR RANGE - (EN1001 only) [X!,!] This parameter is used in constant current mode to program: 1. ratio of the welding transformer for monitoring and compensation with primary current sensor in ratio mode, i.e. for [.!X!] = 12, 13, 14, 15, 16, and 17. 2. -
Page 62: Current Offset
5.4.16 CURRENT OFFSET - [.!:!] The new Extended Functions parameter [.!:!], Current Offset, provides adjustment CURRENT in either [kA] or [%] in OPERATE mode without going into PROGRAM mode. With this parameter an adjustment limit window is set within which the weld current can be changed. - Page 63 Using Current Offset This feature is very useful when a Program Lockout Key is used, an operator may change the Current without changing any other welding parameters and without going into PROGRAM mode. The operator may increase the operating Percent Current only up to Base Current plus Current Offset, or decrease the operating Percent Current up to Base Current minus Current Offset.
- Page 64 Current Offset Examples Current Offset is disabled. The Current cannot be changed in [.!:!]=00 OPERATE mode. Current Offset is +/-5%. For Single Schedule the Current can be [.!:!]=05 changed in OPERATE mode within 10% window, i.e. up to +/-5% from original base value programmed in PROGRAM mode. [.!:!]==!05 For example: For an original base Weld Current value of 70%, [%] mode...
-
Page 65: Pin Lockout Mode
5.4.17 LOCKOUT MODE This feature has been added in revision 619016-002N and it does not require any hardware change or additional option. Operation of the hardware Program Lockout key, when used, has not been changed. Enabling PIN Lockout To enable PIN Lockout Mode, 4-digit PIN number must be programmed: 1. -
Page 66: General Operating Instructions
6. GENERAL OPERATING INSTRUCTIONS For your convenience, many electrical and mechanical connections have been performed at the factory. Refer to CUSTOMER WIRING DIAGRAM for other connections. Be sure ALL electrical connections are properly made and that all fittings are securely tightened. -
Page 67: Cycle Modes
6.2 CYCLE MODES The EN1000/EN1001 can be programmed to operate in several operating modes. They are: Non-Repeat, Repeat, and Successive. Each of the 50 possible schedules has a cycle mode parameter that dictates the sequence of events that will follow an initiation. -
Page 68: Repeat
Figure 6.1 Non Repeat sequence In this example, pulsation is shown after Cool, until the number of Impulses has elapsed, then moving to Hold. Hold time is when the electrodes are closed with no current present, but the selected valve will still be energized. Since this in a Non-Repeat sequence, there is no Off time mentioned. - Page 69 If CYCLE MODE ["#] is used in the last schedule of a chained sequence, the entire chain will be repeated if the initiation is held closed. Select the first Schedule of a CHAINED sequence in the example below can be any of the 50 possible.
-
Page 70: Successive
["$] CHAINED: The SCHEDULE SELECT display will increment by one and continue as explained in CHAINED Mode. ["%] SUCCESSIVE: The sequence will end as if it were in NON REPEAT mode. The SCHEDULE display would then be incremented by one to next Schedule as in SUCCESSIVE Mode but not start that sequence until the next initiation. -
Page 71: Conditional Successive
When the EXTENDED FUNCTION [=!=!] SCHEDULE SELECT INTERNAL/EXTERNAL MODE is programmed to the EXTERNAL ["#] Mode, the SUCCESSIVE series will start with the externally selected SCHEDULE and will automatically return to that SCHEDULE once the series is completed. See section 5.4 EXTENDED FUNCTIONS. The BACK-STEP FUNCTION can be used to return to the previous SCHEDULE "N-1"... -
Page 72: Wait-Here
Squeeze & Weld The third schedule (02 ), executes a Squeeze, Weld and Hold using valve 3. Valves 1 and 2 are still active (Position and Clamp). This sequence adds Valve 3, which closes the weld gun. WELD/ PERCENT VALVE CYCLE SLOPE SLOPE... -
Page 73: Slope Modes
Impulses must not be programmed to 99. 6.3 SLOPE MODES The EN1000 Series of weld controls offer UP SLOPE and DOWN SLOPE as standard features for applications that require its use. Up/Down-Slope Control provides a means of gradually increasing or decreasing weld current. -
Page 74: Up Slope
6.3.2 UP SLOPE - ["#] IN SLOPE MODE When ["#] is selected and the control initiated, UP SLOPE will occur before WELD. If the Control Sequence is REPEAT Mode or PULSATION Mode, the UP SLOPE will only occur before the first WELD IMPULSE. If in INTERMITTENT or CONTINUOUS SEAM Mode UP SLOPE will only occur when first initiated. -
Page 75: Valve Modes
6.4 VALVE MODES Each schedule programmed can have any one of the three valve outputs (or none) enabled during its schedule. The three solenoid valves are activated based on the VALVE Mode programmed as shown in Table 6.2. Table 6.2 Valve Codes and Valve outputs Valve Code LED Valves: (binary) -
Page 76: Stepper On En1000 Series Controls
7. STEPPER ON EN1000/EN1001 SERIES CONTROLS Up to five steppers may be programmed on the EN1000 or EN1001 series of weld controls with PROM P/N 619016-001 revision R or later. The Weld Stepper may be used for compensate the gradual deformation of a welding machine's electrodes. -
Page 77: Schedule Map
7.1 SCHEDULE MAP Since up to ten steps may be programmed per stepper in Stepper Mode 01, ten schedules are assigned for each stepper, as illustrated in the Table 7.1. Table 7.1 Schedule Map used for stepper programming WELD STEPS STEPPER SCHEDULES Last Step Last Count... -
Page 78: Stepper Programming
7.2 STEPPER PROGRAMMING 7.2.1 EXTENDED FUNCTION PROGRAMMING Stepper enable [=!Z!] Extended Function parameter is used to enable stepper. 1. Click the SELECT push button until SLOPE COUNT is reached, then click once more. 2. Press the SCHEDULE push buttons to find [=!Z!] in the schedule display. 3. - Page 79 6. Program the required WELD COUNT for this step, e.g. 0325 welds. 7. Click SELECT push button to find CURRENT and program the required CURRENT in [%] or [kA] for this step of the weld sequence. 8. Put the control in OPERATE mode by clicking PROGRAM/OPERATE push button. 9.
-
Page 80: Schedule Initiation In Stepper Mode
7.3 SEQUENCE INITIATION IN STEPPER MODE 7.3.1 SCHEDULE SELECT OPTIONS FOR STEPPER MODE [=!Z!]="# Since the Stepper requires certain specific starting Schedules, the Schedule Select function [=!=!] with Stepper mode 01 is described in the following sections for Internal schedule selection, External schedule selection, or S49 Option. -
Page 81: Stepper Algorithm
7.4 STEPPER OPERATION 7.4.1 OPERATION ALGORITHM FOR STEPPER MODE [=!Z!]="# INITIALIZATION Update STEPPER status if [=!Z!]=00 - stepper disabled if [=!Z!]=01 - stepper enabled INITIATION START of SEQUENCE [=!Z!]=01 AND [x.0] > 0000 (where x= G, H, ., J, 0) Prepare STEPPER: reload [7!=!] and [7!..] SQUEEZE... - Page 82 7.4.2 STEPPER OPERATION FOR STEPPER MODE [=!Z!]="$ In this mode, the maximum number of steps is 50, which is possible only if a single schedule is used per step. If more chained schedules are required in a welding sequence, the number of steps is determined by the number of chained schedules used in each step.
-
Page 83: Stepper Reset
7.5 STEPPER RESET 7.5.1 MANUAL STEPPER RESET 1. Dial any schedule from schedule map for desired stepper. For example, in stepper mode 01 for stepper 0, dial any schedule from 00 to 09; in stepper mode 02, dial any schedule. 2. -
Page 84: Using Stepper As A Counter
7.5.3 STEPPER RESET USING EXTERNAL SWITCH INPUT From Software revision 619016-002S, it is possible to use an external RESET switch (normally closed) connected between ES1-GND terminals on TS1 to cause a stepper reset. To enable external reset, the Extended Function parameter [H!0!] must be programmed to 06. Whenever momentary switch is activated (open) the Control will automatically reset the active stepper. -
Page 85: Constant Current Operation
8. CONSTANT CURRENT OPERATION (EN1001 only) To operate the control with Constant Current, it is necessary to be familiar with the operation of the control in non-constant current mode. The function of the Current compensation feature of the EN1001 series controls is that of maintaining the welding current constant at the preset level, despite influencing factors which could otherwise make the current vary. - Page 86 The following messages are readily available at the end of the sequence. Average RMS Current in [kA] Average RMS Current in [kA] is shown on the display if the control is operating in the proper mode and a weld has been made. A valid operating for [kA] display is any mode that allows programming the control in [kA] in the weld schedule.
- Page 87 8.1.2 USING THE CONSTANT CURRENT PROCESS OUTPUTS The EN1001, while in any Constant Current mode, can be programmed to provide always, no matter what is shown on display before beginning of weld sequence, a weld current readout at the end of any sequence. Several Constant current Process Outputs function as defined in section 5.4.7 and can be programmed to function as follows.
- Page 88 8.1.3 SETTING UP CURRENT REGULATOR ON EN1001 (for primary sensor, secondary Hall Effect sensor or secondary coil with Auto Range selection only) Set-up must be done in spot mode ([=!0!]=00). If doing seam welding, re-program Seam Mode parameter after the set-up is complete. The control must be initiated using a FS3 initiation switch connected between TS1-FS3 and GND.
- Page 89 8.1.4 SETTING UP CURRENT REGULATOR ON EN1001 FOR BOARDS WITH PROMS BEFORE 619016-001R REVISION (for archival purpose only) 1. Set-up must be done in spot mode ([=!0!]=00). If doing seam welding, re-program parameter [=!0!] after set-up. The control must be initiated using a FS3 initiation switch connected between TS1-FS3 and GND.
-
Page 90: Constant Current Operation With Primary Sensor
8.2 CONSTANT CURRENT OPERATION WITH PRIMARY SENSOR The EN1001 Control in constant current mode with a primary Current Transformer as current sensor beside percent mode, allows two kA modes of operation: Range (Proportional) Mode and Ratio Mode. Choose and program one of the modes from the Table 5.4.14 or Table 5.4.15, as described in sections 5.4.14 and 5.4.15. - Page 91 5. Click the left SCHEDULE push-button until the SCHEDULE display shows [X!,!]. 6. Use the DATA and ENTER push-buttons to program: [X!,!] = xxxx, where xxxx is: welding transformer ratio rA SECONDARY PRIMARY or any number from 0001 to max 0435, 0174, 0087, or 0043 for PT2, PT5, PT10 or PT20, respectively.
-
Page 92: Constant Current Operation With Secondary Hall-Effect Sensor
5. Before sequence initiation, select Percent Current using the SELECT push-button. 6. Make sample welds with chosen schedule to determine the proper welding transformer tap switch setting . Weld time should be the recommended number of cycles for the material being welded. Percent current should be high enough in order to achieve desired secondary current. - Page 93 8.3.2 MANUAL RANGE MODE WITHOUT SETUP In case that setup procedure is not allowed due to some circumstances, a manual range selection is possible without running the setup. This is possible with combination of adjusting the relative position of the Hall effect Current Transducer and programming one of the manual ranges as described in Section 8.4.2.
-
Page 94: Constant Current Operation With Secondary Sensor
After choosing desired range and sensor positioning, if necessary program [.!X!]=32 for Compensation (Regulation) and Monitoring. In this mode, Current can be programmed only in [kA]. Monitoring mode [.!X!] = 33 has following exceptions: CURRENT - current is only in [%] from 0000 (0 %) to 0099 (99%); 7!U! - Low current limit window in [kA] from 00.00 (0 kA) to 99.99 (99.99 kA);... - Page 95 After finishing setup, the Control is in Constant Current mode and ready to operate. Original value for Current Percent used in Non Constant Current mode is no longer available. 8.4.2 MANUAL RANGE SELECTION In this mode, setup is NOT required, since the Control is already calibrated in the Factory by using two independent calibration procedures for the Control Board and for the Secondary Coil.
-
Page 96: Sensor Selection Jumper Settings
Monitoring mode [.!X!] = 33 has following exceptions: CURRENT - current in [%] from 0000 (0 %) to 0099 (99%); 7!U! - Low current limit window in [kA] from 00.00 (0 kA) to 99.99 (99.99 kA); 3!O! - High current limit window in [kA] from 00.00 (0 kA) to 99.99 (99.99 kA). In this mode also, RMS in [kA] will be shown on DATA display after end of the sequence, which may be useful for setting Hi/Low limit window. -
Page 97: Applications And Programming Examples
9. APPLICATIONS AND PROGRAMMING EXAMPLES The EN1000/EN1001 Series Control could be programmed for numerous welding applications, but only few of them are highlighted here. The schedules shown are for demonstration purposes. In order to easily follow visually the schedules as they progress, the individual "times" in each one have been made longer than they would be for an actual machine operation. - Page 98 9.1.3 QUENCH TEMPER WITH CHAIN MODE Schedules 03 and 04 are chained together to illustrate "Quench-Temper" operation. Schedule 03 performs the squeeze, weld and quench functions (using "Hold" for Quench), and 04 performs the temper and hold functions (using "Weld" for Temper). Valve output #3 is used. The weld light gives a visual indication of the relative amplitude and duration of current during weld and temper times.
- Page 99 Forge delay is defined as the delay from the beginning of the weld to the activation of the forging solenoid valve. To accomplish a FORGE DELAY operation on EN1000/EN1001 series controls, it is necessary to chain together 2 or more SCHEDULES as outlined below.
- Page 100 SCHEDULE 00 SQUEEZE count desired SQUEEZE count WELD /HEAT count desired WELD count before forging takes place PERCENT CURRENT desired PERCENT CURRENT for WELD HOLD count 00 cycles (cycles after weld before forge) VALVE MODE 02 (Valve #2) CYCLE MODE 02 (chained mode) SCHEDULE 01 SQUEEZE count...
-
Page 101: Seam Mode Examples
9.2 SEAM MODE EXAMPLES 9.2.1 CONTINUOUS SEAM MODE Schedule 13 is a continuous seam mode. The control is switched to the seam mode by programming the [=!0!] extended function to 01. Welding current starts when the initiation contact is closed, and stays on as long as it is held closed. WELD/ PERCENT VALVE... - Page 102 9.2.4 SEAM MODE 06 This mode was primarily designed as a NON-BEAT SEAM mode, to enable a user to execute a fixed time weld using a number of repetitions in addition to alternate two heats within single schedule. The Control is programmed as follows: 1.
- Page 103 9.2.5 OTHER SEAM MODES SEAM MODE 02 - ADJUST CURRENT DURING WELD In this mode during welding it is possible to change PERCENT, Up-Down current adjustment, with DATA push-buttons. Use 10's DATA push-button to increase current percent, and 1's DATA push-button to decrease. SEAM MODE 03 - SEAM/SPOT SEQUENCE COMBINATION This mode is SEAM - SPOT sequence combination.
-
Page 104: Brazing Application
The EN1000 series of controls can be operated in two brazing modes; automatic, for short brazing times, and manual, most useful for long brazing times. For the AUTOMATIC brazing mode, the EN1000 is initiated in the same manner as for spot welding. However, it must be programmed through the extended functions for "Beat initiation during squeeze and weld", in accordance with instructions in the manual. -
Page 105: Squeeze Delay Application
9.4 SQUEEZE DELAY APPLICATION Some applications require the welder arms be opened wide to allow the electrodes to access areas to be welded. Squeeze Delay was designed for use with welding guns and stationary machines incorporating standard air cylinders and valves without retraction features. The additional time provided by the Squeeze Delay will allow the electrodes to travel a greater distance and simulate the retraction function. -
Page 106: Retraction Application
9.5 RETRACTION APPLICATION Retraction is used for welding guns and stationary machines with cylinders and valves configured for retraction operation. Retraction can be accomplished by de-energizing a valve solenoid allowing the electrode arms to separate, further than normal, to allow large parts to be placed between welding electrodes. -
Page 107: Maintained Closure - [H!=!]
9.5.2 RETRACTION OPERATION - MAINTAINED CLOSURE - [H!=!]=["+] (THREE STAGE FOOT-SWITCH RETRACTION ADDITION EN1000/EN1001 Series Controls incorporating ROM #619016-002 Revision “R” or later will have the following Retraction Feature added. If [H!=!] is set to ["+] the control will now enter this new Retraction Mode. This Retraction implementation is different from [;!:!]=07 or [;!:!]=08 in that it uses one foot switch that... -
Page 108: Air Over Oil Retraction - [;!:!]=[07]
PROGRAMMING RETRACTION [H!=!]=["+] 1. Provide a constant closure of TLS1/AUX1 to GND 2. Press the SELECT push button repeatedly until the Function indicator has advanced past SLOPE COUNT to enter data in the EXTENDED FUNCTIONS [01]. 3. Scroll through the EXTENDED FUNCTIONS until [H!0!] appears in the SCHEDULE Display. - Page 109 1. Connect a normally open momentary close type switch between FS1 and GND. 2. Program Squeeze Delay to time the Advance of the gun to a ready position. 3. Program an Off time in the first of the two schedules composing the weld sequence. This Off time is designated as ADVANCE STOP time.
- Page 110 PROGRAMMING AIR OVER OIL RETRACTION [;!:!]=[")] 1. Press the SELECT push button repeatedly until the Function indicator has advanced past SLOPE COUNT to enter data in the EXTENDED FUNCTIONS [01]. 2. Scroll through EXTENDED FUNCTIONS until [;!:!] appears in the SCHEDULE Display.
- Page 111 TIMING CHART ANALYSIS Detailed sequencing of the cylinder can be better understood by studying sequence time charts discussed in sections as follows: SECTION A Section A details a basic sequence and how it may begin. The blocking valve may be on or off and will be cleared by an Emergency Stop.
- Page 112 Non-Retracted mode or vice-versa. After a momentary closure of FS1 (Squeeze Delay) is followed by Advance Stop before blocking occurs. This is only available in ROM 619016-002 Rev. G (or later) for EN1000 or EN1001 Series Controls. Page 110...
-
Page 113: Multiple Schedule Operation
9.6 MULTIPLE SCHEDULE OPERATION TRIPLE count/TRIPLE current or 3C/3C also can be accomplished on the EN1000/EN1001 Series Controls. Extended Function [=!=!] must be set to INTERNAL Schedule Select mode or [=!=!] = 00. In this mode: 1. A switch closure between TS1-FS3 and TS1-GND then will initiate any schedule shown in the SCHEDULE window. -
Page 114: Options For En1000 And En1001 Series Controls
MM2 MEMORY MODULE The Memory Module, MM2, is designed as a backup device for any EN1000 series Control. There are two versions of this device: MM2-RDE, for Controls with RDE option; and MM2, for all other Controls. The only difference between these two versions is the connection to the Control. - Page 115 With this option, the three standard binary Valves are decoded to one of seven Valves. See Application Note 700110. The S49 Option adds 6 Binary Select Inputs to the EN1000 Series of Controls. Through the use of these added inputs the user can select any one of 49 schedules to begin a sequence from.
-
Page 116: Error Codes And Troubleshooting
11. ERROR CODES AND TROUBLESHOOTING Please refer to other manual pages and wiring diagrams for location of fuses, terminal strips, etc. 11.1 ERROR CODES ERROR POSSIBLE CAUSE REMEDY Data/Schedule Error Code #01. Wait for the Temperature Limit Switch to cool, or Check for Display E.r. - Page 117 ERROR POSSIBLE CAUSE REMEDY Data/Schedule Error Code #14. 1. Clear all Schedules and E.F. Display E.r. 14 EEPROM error. Memory corrupt due 2. Re-route wiring in Cabinet. (Flashing) to electrical transients. Replace Control Board, if necessary See section 4.6, 5.4.5. Data/Schedule Error Code #15.
-
Page 118: Troubleshooting
11.2 TROUBLESHOOTING Please refer to other manual pages and wiring diagrams for location of fuses, terminal strips, etc. It is very easy to press a schedule button and select a different schedule accidentally. This causes no problem when initiating on FS7 or FS11. However, when initiating on FS3 always verify that the schedule to be initiated is displayed prior to initiation. - Page 119 TROUBLE POSSIBLE CAUSE REMEDY Control initiates 1. Solenoid valve coil. 1.a) Check that valve supply voltage is and sequences not varying below tolerance, -15%. properly, but 1.b) Check if valve coil is proper voltage. solenoid valve 1.c) Insufficient air pressure. chatters.
-
Page 120: Troubleshooting Guide
11.3 TROUBLESHOOTING GUIDE Page 118... - Page 121 Page 119...
-
Page 122: Block Diagram
11.4 BLOCK DIAGRAM Page 120... -
Page 123: Warranty And Service
ENTRON will repair or replace, at its discretion, the defective part without any cost for parts or labor. -
Page 124: Appendix A - Error Codes List
Generally shown after the weld for [P.O.]=12, 13,14, 22, 23, 24 or 25 (EN1001 only). Over Current from Primary Current Sensor (EN1200/EN1201 only). SCR’s Firing Board is not ready for weld (EN1200/EN1201 only). *These Error Codes affect Controls in Series EN1000, EN1001,EN1000B, EN1003, EN1000/EN1001 Cascade, EN1200, EN1201, EN1280, TW1280, EN1380, EN1500 and EN1501. 700158D... -
Page 125: Appendix B - Introduction To Programming En1000 Series Controls
APPENDIX B INTRODUCTION TO PROGRAMMING EN1000 SERIES CONTROLS Fig. B1 Turn ON Air supply to machine Fig. B2 Turn ON Water supply to machine Fig. B3 Set welder switch LOW Be sure welder head or arms are fully retracted! Fig. B4 Retracted Head or arms Fig. - Page 126 Fig. B7 Put Control in NO WELD Fig. B8 Put Control in PROGRAM Mode Fig. B10 SELECT Squeeze and Fig. B9 Choose SCHEDULE to program program 30 to 60 cycles; e.g. 45 cycles Fig. B12 SELECT Percent Current and Fig. B11 SELECT Weld/Heat and program 70% to 80%;...
- Page 127 Fig. B13 SELECT Hold and Fig. B14 SELECT Impulses and program 01 (one pulse) program 10 to 15 cycles; e.g. 12 cycles NOTE: Press ENTER whenever new values for any parameter are programmed. Fig. B15 SELECT Valve Mode and program 01 (Valve 1) Make sure that all unnecessary parameters are set to “00”...
- Page 128 Fig. B17 Closed Head or arms Make sure machine head (or arms) close properly. (On machines with single stage initiation, depressing the foot switch will sequence the control but will not weld.) Machine will sequence but will not weld, then the head (or arms) will retract.
- Page 129 Before running production quantities of welded parts ENTRON recommends destructive testing of the welds. Set the welding machine to RWMA recommended standards. Weld the parts. Then clamp one end of the welded part in a vise and PEEL the other side back against the weld. Ideally, in low carbon steel, the weld will pull a hole thru one or the other parent materials.
- Page 130 For Primary Coil Sensing, program 10, 11, 12, ... , 18, or 19. Fig. B23 For Primary Sensing Coil For Hall Effect Secondary Sensing, program 20 or 21. Fig. B24 For Secondary Hall-Effect For Secondary Rogowski Coil Sensing, program 30, 31, 32, or 33. Fig.
- Page 131 In order to self-adjust gains for current sensor signal, Control must automatically perform Setup Procedure, as described in section 8.1.3. This Setup Procedure is necessary only for following constant current modes: [.!X!] = 10, 11 - for Primary Coil; [.!X!] = 20, 21 - for Hall-Effect Secondary; NOTE: When setup procedure is not allowed due to some circumstances, even if Hall-Effect current sensor is used, a manual range selection...
Need help?
Do you have a question about the EN1000 and is the answer not in the manual?
Questions and answers