
Related Manuals for Stanley RD60


Summary of Contents for Stanley RD60
- Page 1 OPERATOR’S MANUAL CORDLESS RAIL DRILL RD60 Manual Number: 62211 Date: February 2022 Rev. 4 503-659-5600 I www.stanleyinfrastructure.com | 6430 SE Lake Road, Portland, OR. 97222, United States of America | Copyright ©2021...
-
Page 3: Table Of Contents
Table of Contents Preface ................................5 Safety Statements ............................6 General Safety Precautions ........................6 Decals ................................16 General Information ..................................16 Nomenclature ............................... 18 Installation ..............................19 General Information ..................................19 Charge Battery .....................................19 Store Drill Bit for Transportation to Jobsite .........................20 Operation ............................... - Page 4 THIS PAGE IS INTENTIONALLY BLANK...
-
Page 5: Preface
Preface General Comments Congratulations on the purchase of your new product! This product was carefully designed and manufactured to give you many years of dependable service. Only minor maintenance (such as cleaning and lubricating) is required to keep it in top working condition. -
Page 6: Safety Statements
Safety Statements THIS SYMBOL BY ITSELF OR WITH A WARNING WORD THROUGHOUT THIS MANUAL IS USED TO CALL YOUR ATTENTION TO INSTRUCTIONS INVOLVING YOUR PERSONAL SAFETY OR THE SAFETY OF OTHERS. FAILURE TO FOLLOW THESE INSTRUCTIONS CAN RESULT IN INJURY OR DEATH. - Page 7 PERSONAL PROTECTIVE EQUIPMENT (PPE) ⊲ Always wear personal protective equipment (PPE) appropriate for the job, such as eye protection, ear protection, gloves, head protection, breathing protection and safety shoes. PPE should be worn at all times when operating, maintaining or observing the tool.
- Page 8 General Safety Precautions ⊲ Do not alter or remove any safety feature from the prime mover or tool. ⊲ Stay alert, watch what you are doing and use common sense when operating the tool. Do not operate the tool if you are tired or under the influence of drugs, alcohol or medication.
- Page 9 ⊲ Wear protective equipment specified by the tool manufacturer. ⊲ Do not perform any work on the tool unless you are authorized and qualified to do so. Always read the operator service manuals before any repair is made. After completing maintenance or repair, check for correct functioning of the tool.
- Page 10 ⊲ Slips, trips and falls are major causes of workplace injury. Be observant of hoses lying about the work area, as they can be a tripping hazard. ⊲ Only use clean fluids and lubricants that have been recommended by STANLEY.
- Page 11 ⊲ Repair and service of this tool must only be performed by an authorized D WALT service center. ⊲ Do not force the tool to do the work of a larger tool. Use the correct tool for your application. ⊲ Keep hands away from rotating chuck, drill bits or drives. ⊲...
- Page 12 ⊲ Use and maintain tool as recommended in the manual to prevent an unnecessary increase in vibration. ⊲ Check the vibration level after each service. If higher than normal, contact your STANLEY dealer. BATTERY AND CHARGER ⊲...
- Page 13 ⊲ WARNING: Fire hazard. Never attempt to open the battery pack for any reason. If the battery pack case is cracked or damaged, do not insert into the charger. Do not crush, drop or damage the battery pack. Do not use a battery pack or charger that has received a sharp blow, been dropped, run over or damaged in any way (e.g., pierced with a nail, hit with a hammer, stepped on).
- Page 14 Equipment Safety Precautions Total Length of Cord in Feet Volts (Meters) 120 V 25 (7.6) 50 (15.2) 100 (30.5) 150 (45.7) 240 V 50 (15.2) 100 (30.5) 200 (61.0) 300 (91.4) Ampere Rating American Wire Gauge More More Than Than Not Recommended ⊲...
- Page 15 +104°F (+40°C). This is important and will prevent serious damage to the battery pack. Cutting Fluid ⊲ Use only cutting fluid that has been recommended by STANLEY. ⊲ Do not handle cutting fluid until all safety precautions have been read and understood.
-
Page 16: Decals
Keep all safety decals clean and legible. Replace all missing, illegible, or damaged safety decals. When replacing parts with safety decals attached, the safety decals must also be replaced. Safety decals are available from your local dealer or STANLEY. REPLACING SAFETY DECALS: Clean the area of application with nonflammable solvent, then wash the same area with soap and water. - Page 17 Then press the cycle start button (green) start the drilling cycle. to retract the tool to it’s home position. To power down RD60, hold the cycle Press cycle start button (green) stop button for 4 seconds. The button to start a new drilling cycle.
-
Page 18: Nomenclature
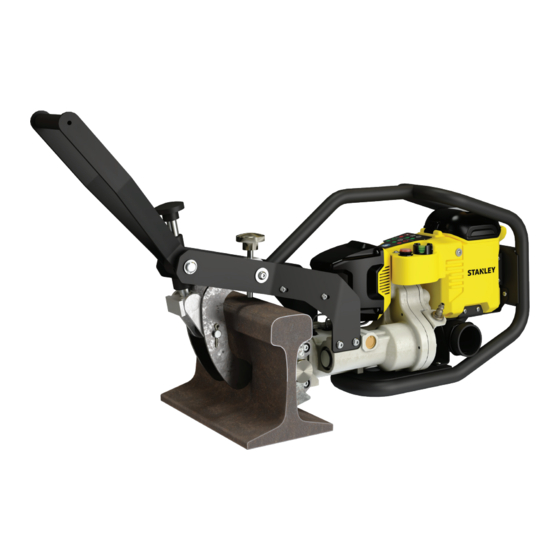
Nomenclature RAIL CLAMP HANDLE RAIL CLAMP ADJUSTMENT KNOB BATTERY COMPARTMENT CARRYING HANDLE COOLANT CANISTER RAIL CLAMP TEMPLATE KNOB CYCLE START BUTTON CYCLE STOP BUTTON DRILL BIT WITH EJECTION PIN DRILL BIT CONTAINER COOLANT INLET RAIL TEMPLATE FITTING SERIAL NUMBER XXXXXXXXXX... -
Page 19: Installation
RD60 is a battery powered rail drill that cycles automatically. With a D WALT FLEXVOLT battery and the included hand pumped coolant canister, the RD60 can be used easily in places where hydraulic tools may be difficult to operate. Read all safety warnings, decals and operating instructions before operating the tool. If there is any portion of this manual that you do not understand, contact your dealer. -
Page 20: Store Drill Bit For Transportation To Jobsite
Installation Push the battery release button on the battery pack to remove the battery from the charger. NOTE The charger and battery pack may become warm to the touch during charging. This normal and does not indicate a problem. Unplug the charger when battery charging is complete. Store charger as described in “Storage”... -
Page 21: Operation
3. Lift the tool and move it to the jobsite. INSTALL RAIL TEMPLATE NOTE Use only rail templates and rail guides that are recommended by STANLEY. See “Accessories” on page 34 for a list of compatible rail templates and guides. When possible, use the RD60 templates listed. -
Page 22: Install Drill Bit
To remove the drill bit, see “Removing the Drill Bit” on page 27. PREPARE COOLANT CANISTER NOTE Use only coolant recommended by STANLEY. 1. Open the top of the coolant canister. 2. Pour the supplied coolant into the cannister using a 20:1 water-to-coolant ratio. Use only clean water. -
Page 23: Attach The Rail Clamp To The Rail
ATTACH THE RAIL CLAMP TO THE RAIL 1. Grab the carrying handle with your dominant hand. 2. Grab the clamp handle with your secondary hand. 3. Fit the rail clamp over the top of the rail. 4. Use the rail clamp adjustment knob to tighten the clamp around the rail. RAIL CLAMP ADJUSTMENT KNOB NOTE... -
Page 24: Insert The Battery
Operation 2. Pump the coolant canister handle to increase the pressure in the canister. Pressurize the canister until the pressure relief valve opens. Note Route the canister hose so that workers will not trip. COOLANT CANISTER HANDLE COOLANT INLET FITTING INSERT THE BATTERY 1. - Page 25 NOTE To remove the battery, open the battery compartment and press the battery lock to release the battery from the receptacle. 62211 | February 2022 | 25...
-
Page 26: Starting The Tool Cycle
3. Press cycle start button (green) again to start the drilling cycle. The drill will start to rotate and move toward the rail. 4. RD60 will drill and retract without further interaction. 5. To immediately stop the tool, press the cycle stop button (red). Then press the cycle start button (green) to retract the tool to it’s home position. -
Page 27: Removing The Drill Bit
10. To power down RD60, hold the cycle stop button for 4 seconds. The button light will flash, then turn off. REMOVING THE DRILL BIT WARNING! DISCONNECT BATTERY Do not install, change tool accessories, clean or perform maintenance on the tool while the battery is connected to the tool. -
Page 28: Storage
⊲ Fully charge the tool battery. ⊲ Inspect all the tool safety labels. Replace if they are damaged or not legible. Contact your STANLEY dealer for replacements. TRANSPORTING WARNING! FIRE HAZARD Do not store or carry the battery pack so that metal objects can contact exposed battery terminals. - Page 29 your tool. ⊲ Ensure the battery is removed, the bit is stowed in the bit storage container and the drill is fully retracted before transport. ⊲ Always use the lifting handle when moving the tool. ⊲ Lift only as high as necessary to load. NEVER lift or transport over people. ⊲...
-
Page 30: Maintenance
Inspect all the tool safety labels. Replace if they are damaged or not legible. Contact your STANLEY dealer for replacements. Check the bit and replace if necessary. RD60 bits are designed to break when their lifespan has been depleted. Check coolant level in the coolant cannister. Fill if necessary. -
Page 31: Troubleshooting
Troubleshooting Problem Possible Cause Possible Solution BATTERY PACK IS NOT No power to charger Check operation of receptacle by plugging in CHARGING PROPERLY a lamp or other appliance. Check to see if receptacle is connected to a light switch which turns power off when you turn out the lights. -
Page 32: Tool Disposal
Tool Disposal Tool Body Disassemble the tool and dispose of all non-metal parts. Take care to properly collect all fluids. Recycle the metal components. Contact your local municipal recycling authorities for recycling instructions. Gear Oil Drain the gear oil and collect it for recycling. Do not throw away or pour down the drain. Contact your local municipal recycling authorities for recycling instructions. -
Page 33: Specifications
Specifications SPECIFICATIONS AND DESIGN ARE SUBJECT TO CHANGE WITHOUT NOTICE AND WITHOUT LIABILITY THEREFOR. RD60 Cordless Rail Drill Description Value A. Overall Length (Handle Down) 38 In (965 mm) B. Overall Width 7.5 In (190 mm) C. Overall Height (Handle Down) 16 In (406 mm) D. -
Page 34: Accessories
Accessories RAIL TEMPLATES / RAIL GUIDES RD60 Rail Templates and Rail Guides Drill Templates Guide Assy PN: ING (mm/ Rail Size (Double Sided / Country Inches) Single Sided 60 ASCE (6040)# (34525) 65 ASCE (6540)# (35975) 68GN (52636) 38644 [2 1/8 X 4 1/2 X 7]... - Page 35 Accessories RD60 Rail Templates and Rail Guides Drill Templates Guide Assy PN: ING (mm/ Rail Size (Double Sided / Country Inches) Single Sided 100 RE Head Free (37341) (37341 HD) 100 RE 88269 100 CN&W (10035) (34982) 39229 [2-31/32 x 6] 100 GRT.
- Page 36 Accessories RD60 Rail Templates and Rail Guides Drill Templates Guide Assy PN: ING (mm/ Rail Size (Double Sided / Country Inches) Single Sided 31979 / 31980 / 119 AREA (11922) 35105 / (31985) 22625 [3 1/2 X 6 X 6] 2 7/8"...
- Page 37 RD60 Rail Templates and Rail Guides Drill Templates Guide Assy PN: ING (mm/ Rail Size (Double Sided / Country Inches) Single Sided 136 RE STOCK RAIL (66945 HD) (3 11/32 Elevation) 136 RE 88267 (88272) 136 LVH (62412) 136 LV (13633)
- Page 38 RD60 Rail Templates and Rail Guides Drill Templates Guide Assy PN: ING (mm/ Rail Size (Double Sided / Country Inches) Single Sided 50 KG UNI ** 31976 / (31982) 30675 (47 X 165) 60 KG UIC/UNI 31976 / (31983) 30675 (47 X 165)
-
Page 39: Consumables
12 Amp Fast Charger DCB104 4 Port Battery Charger 24774 Coolant Cannister with Hose Warranty In order to provide you with the most UP-TO-DATE Warranty information, STANLEY Warranty information can be found at www.stanleyinfrastructure.com. 62211 | February 2022 | 39... - Page 40 © 2021 Stanley Black&Decker, Inc. New Britain, CT 06053 USA...
Need help?
Do you have a question about the RD60 and is the answer not in the manual?
Questions and answers