Advertisement
Quick Links
Specifications
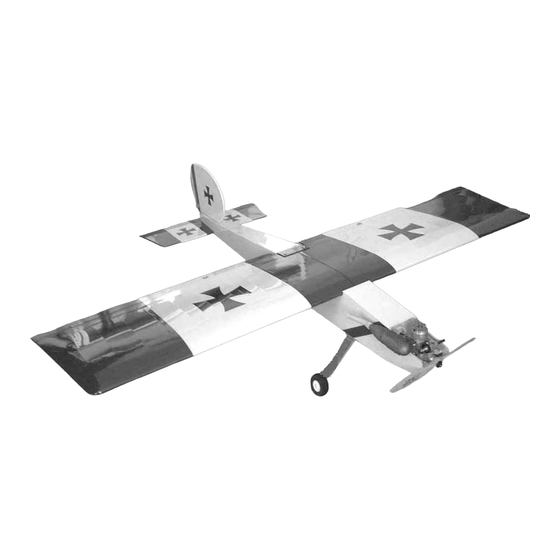
Wingspan: 70.9 in
Wing Area: 1,060 sq in
Weight: 9.0 lb
Length: 66.9 in
Engine: 2-stroke .91-1.20
Radio: 4-channel, five servos
Special Notes
•
Due to temperature changes during transportation and storage, the airplane you receive
might have wrinkles on the covering. This could be easily removed by applying a little heat
gun and with no adverse effect on performance.
•
The pushrods that came with this plane are uncut and unbent. Be sure to cut the pushrods
to the proper length.
•
This airplane is intended for intermediate to advanced modelers with experience with
previous airplanes. Please use the same caution and judgments as in your previous ARFs.
•
When balancing the airplane, the suggested balance point is 5 in from the leading edge.
Ultra Easy Stik - 120 ARF
INSTRUCTION MANUAL
Advertisement

Related Manuals for RC Groups Ultra Easy Stik 120 ARF

Summary of Contents for RC Groups Ultra Easy Stik 120 ARF
- Page 1 Ultra Easy Stik - 120 ARF INSTRUCTION MANUAL Specifications Wingspan: 70.9 in Wing Area: 1,060 sq in Weight: 9.0 lb Length: 66.9 in Engine: 2-stroke .91-1.20 Radio: 4-channel, five servos Special Notes • Due to temperature changes during transportation and storage, the airplane you receive might have wrinkles on the covering.
- Page 2 1. Parts of the airplane 2. Included accessories...
- Page 3 3. Connect the two piece fuselage using the 7. Remove the covering over the vertical fin included wood sticks 4. Glue the wood sticks 8. Install the horizontal stabilizer 5. Connect the two piece fuselage 9. Install the vertical fin 6.
- Page 4 15. Install the wheel 11. Add glue to secure the vertical fin 16. Install the rudder along the hinges 12. Assemble the steerable tail wheel (1) 13. Assemble the steerable tail wheel (2) 17. Add glue to secure the rudder 14.
- Page 5 19. Install the elevator pushrod 23. Complete the install of elevator and rudder servos 20. Install the elevator control horn 24. Connect the fuel tank 25. Install the fuel tank in the fuselage 21. Complete the installation of the elevator control 26.
- Page 6 27. Install the engine pushrod 31.Install the receiver switch 28. Connect the pushrod to the servo 32. Install the aileron along the hinges 29. Install the wheel on the landing gear 33. Add glue to secure the aileron 30. Secure the landing gear 34.
- Page 7 39. Cut the pushrod to the necessary length 35. Take the extension wire through the servo opening 40. Secure the pushrod 36. Take the extension wire out at the other 41. Aileron servo installation complete 37. Secure the aileron servos 42.
- Page 8 43. Join the two wings 45. Join the two servo wires 46. Secure the main wing on the fuselage 44. Add glue to the join area to secure 47. Installation is complete...
Need help?
Do you have a question about the Ultra Easy Stik 120 ARF and is the answer not in the manual?
Questions and answers