Table of Contents
Advertisement
Quick Links
Advertisement
Table of Contents

Related Manuals for Hyundai H-MW1425


Summary of Contents for Hyundai H-MW1425
- Page 1 H-MW1425 MICROWAVE OVEN Instruction manual...
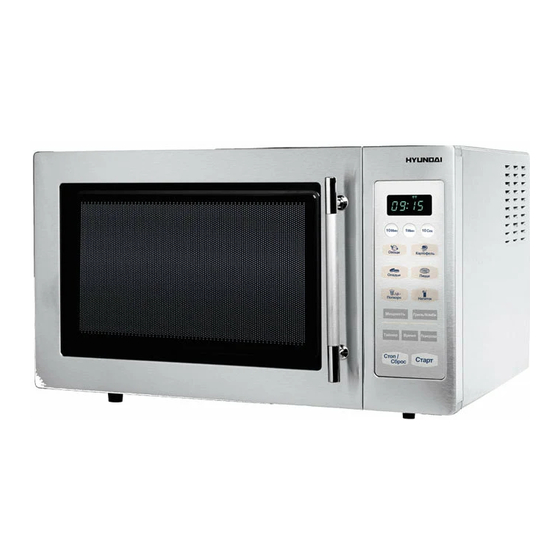
- Page 2 Description 1. Door safety lock system 2. Oven window 3. Oven air vent 4. Shaft 5. Roller ring 6. Glass tray 7. Control panel button button button button button button 14. 10 button button 16. Digital display 17. 10 button button button button...
-
Page 3: Important Safeguards
· To reduce the risk of fire in the oven cavity it is necessary to follow the bellow rules: Do not overcook food. Carefully attend microwave oven if paper, plastic or other combustible materials are placed inside the oven. Remove wire twist-ties from bags before placing food into the oven. -
Page 4: Before You Call For Service
· Microwave utensils should be used only in accordance with manufacturer s instructions. · Please remember that a microwave oven heats the liquid in the container quicker that the container itself. Therefore, though the lid of a container is not hot to touch when removed from the oven please remember that the food/liquid inside will be hot. -
Page 5: Installation
If there is any damage, do not operate the oven and contact qualified service personnel. · This microwave oven must be placed on a flat, stable surface to hold its weight and the heaviest food likely to be cooked in the oven. -
Page 6: How To Choose Your Microwave Cookware
How to choose your microwave cookware SORTS INSTRUCTIONS Heat-proof It most suitable for microwave cooking. glassware Conventional utensils of these Earthenware or materials allowed unless firmed chinaware with gold, silver. SORTS INSTRUCTIONS Metal wares (e.g. May spark or ignite while aluminum, stainless touching the cavity wall during steel, etc.) -
Page 7: Operation
How to identify if certain cookware is suitable for microwave cooking purpose? · Put the intended cookware together with a glass of water (300 ml) inside the oven cavity, and then set the oven at the "HIGH" stage for one minute. ·... - Page 8 · Press button, the minute figures flash · Press 10 once and · Press button, the clock adjustment is completed Setting to microwave power · The longest cooking time is 99 minutes 90 seconds. · Five microwave power levels are available. ·...
-
Page 9: Express Cooking
Grill · Grill is used for grilling thin slice of meat, as beef, pork, skewered meat sausage, chicken wings, etc. This function is also applicable for sandwiches and makes the food golden, crisp and fragrant. · In the process of grill, turn over the food to make a better effect. ·... -
Page 10: Automatic Defrosting
· The result of automatic cooking is subject to the placing of food, the voltage and so on factors. If it is not done, cook it another several minutes of instant cooking. MENU PORTIONS 100g 1 portion 2 portions 3 portions 200g 300g 1 portion... -
Page 11: Automatic Start
Time once Display Time five times Display · For example, input the program of defrost 600 g shrimp: · Press the "200" key on the digital display three times. Set the weight 600g. · Press the key. Automatic start · If you do not want the oven starts operation immediately you can activate the automatic start function. For example, you need to cook by 12:12 : ·... -
Page 12: Care And Cleaning
· To maintain the appearance of your oven, never use abrasive cleaning agents (such as cleaning powders, scouring pads or steel wool pads), spray. Also, never use commercial oven cleaners on any part or your microwave oven. · If the microwave is very dirty, otherwise, use a damp cloth. -
Page 13: Specification
· If a stain should still remain, remove stain with a paste of two parts braking soda and three parts water. Apply paste to stain, let stand one or two hours, then wipe with a clean damp cloth, rinse and dry. Specification Power supply Power:... - Page 15 · · · · · · · · · · · ·...
- Page 16 · · · · · · · · · · · · · · ·...
- Page 17 · · · · · · ·...
- Page 19 · · · · · · · · · · · · · · (~ 300 «0:00» , 12:12.
- Page 20 · · · · · · · · · · · · · «1 » «1 » 50%.
- Page 21 · · · · · · · 100% , «1 » 2 «10 » 5 - 12...
- Page 22 · · · · · « · · · · « » · « » « » « » ), «1 » (2 «10 », «1 » «10 », » «10 » (5 100%. - 12...
- Page 23 · · « · · · 1000 . · · » 3000 ;...
- Page 24 · « · « · · · · · · · · · · · · » 600 . » 12:12, «1 » «1 »...
- Page 25 · · · · · · · · · · ·...
- Page 26 · · · · · , 50 1000 1300 2600 17,00 / 18,90 " " " "...
Need help?
Do you have a question about the H-MW1425 and is the answer not in the manual?
Questions and answers