Table of Contents
Advertisement
OWNER'S MANUAL
MIRACOOL™ GLASS DOOR MERCHANDISER
260L - 1300L
300L
750L
1300L
a79-15
a79-14
a79-13
Sales Office:
P.O. Box 5932
Spartanburg, S.C. 29304-5932
Technical Service: 1-800-558-7627
Parts Order Fax: 1-800-262-9381
Manufacturer reserves the right to discontinue, or change at any time, specifications or designs without notice and without incurring obligations.
Printed in Mexico
6-06
79BC560002-01_C
Advertisement
Table of Contents

Subscribe to Our Youtube Channel
Related Manuals for Carrier Miracool 1300L


Summary of Contents for Carrier Miracool 1300L
- Page 1 OWNER’S MANUAL MIRACOOL™ GLASS DOOR MERCHANDISER 260L - 1300L 300L 750L 1300L a79-15 a79-14 a79-13 Sales Office: P.O. Box 5932 Spartanburg, S.C. 29304-5932 Technical Service: 1-800-558-7627 Parts Order Fax: 1-800-262-9381 Manufacturer reserves the right to discontinue, or change at any time, specifications or designs without notice and without incurring obligations. Printed in Mexico 6-06 79BC560002-01_C...
-
Page 2: Table Of Contents
INTERIOR SURFACE ......14 GENERAL These instructions cover the installation, operation, and maintenance of Carrier Miracool™ series glass door merchandiser units, sizes 260L, 300L, 750L, 1100L, and 1300L. -
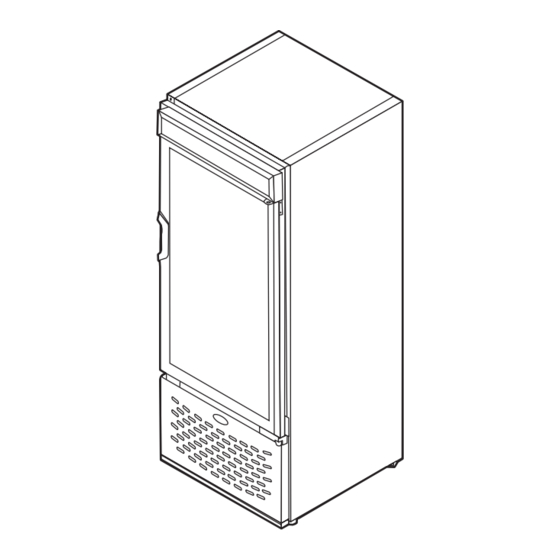
Page 3: Front View
FLUORESCENT LAMP SIGNBOARD (SIZES 750L, 1100L, AND 1300L ONLY) UNIT DATA LABEL (INSIDE COOLER IN UPPER LEFT CORNER) SHELF PRODUCT CHAMBER INTERNAL FLUORESCENT LAMP — SIZE 750L (SIZE 260L, 300L — ALONG TOP; SIZE 1100L, 1300L — IN CENTER) FRONT GRILLE LEVELING FOOT FRONT VIEW GRILLE RETAINING SCREW... -
Page 4: Level Unit
LEVEL UNIT To provide adequate condensate drainage and proper door alignment and operation of unit, the unit cabinet must be level. Leveling feet are factory installed. Remove refrigeration system cartridge for easier access to back feet. Before servicing unit, disconnect electrical service. On sizes 1100L and 1300L, turn disconnect switch (located on power cord) to the OFF position. -
Page 5: Install Shelves
INSTALL SHELVES Product shelves and a bag containing shelf support clips are packed inside the unit. Refer to Table 1 to verify quantity of shelves and shelf supporting clips. Bottom shelf must be placed on interior floor and should be inserted into the two retainer clips provided at the rear corners of the unit floor. -
Page 6: Start-Up
Sizes 260L and 300L have one lamp inside the cooler. Improperly installed lamps may cause damage to the lighting circuit. Carrier will not be responsible for equipment or component failures or other dam- ages or losses that arise as a result of improper lamp installation. -
Page 7: Electrical Supply And Connections
ELECTRICAL SUPPLY AND CONNECTIONS — Check to be sure that the electrical service to the unit meets all local and national electrical codes. Unit elec- trical data is shown in the unit data label, located on the inside of the cabinet in the upper lefthand corner. Review this label before initiating electrical service. -
Page 8: Refrigeration System Service
REFRIGERATION SYSTEM SERVICE COMPONENTS The Carrier Miracool™ refrigeration system consists of a hermetically sealed compressor and finned evapo- rator and condenser coils. CONDENSER — The condenser has wide finned spaces, which allow more air passage with less dirt or dust accumulation. The condenser still requires peri- odic cleaning for maximum efficiency. - Page 9 EVAPORATOR COMPARTMENT (Interior top area) — All serviceable parts are directly accessible from the top of the cartridge compartment. COMPRESSOR COMPARTMENT (Bottom rear area) — Access to compressor compartment requires removal of the side panel of the cartridge. Condenser fan access also requires removal of a side panel. Side panels are secured with 5 Phillips screws.
- Page 10 TABLE 3 — REFRIGERATION SYSTEM SERVICE AND ANALYSIS CHART MALFUNCTION Compressor Will Not Start — No Hum. Compressor Will Not Start — Hums but Trips on Overload Protector. Compressor Starts but Does Not Switch Off of Start Winding. Compressor Starts and Runs, but Short Cycles on Overload Protector.
- Page 11 a79-10 FIGURE 10 — WIRING DIAGRAM, SIZES 260L, 300L...
- Page 12 a79-12 FIGURE 11 — WIRING DIAGRAM, SIZE 750L...
- Page 13 a79-11 FIGURE 12 — WIRING DIAGRAM, SIZES 1100L, 1300L...
-
Page 14: Maintenance
MAINTENANCE LAMP REPLACEMENT Before proceeding with replacement, disconnect electrical service. Failure to unplug unit could result in serious personal injury or death. Remove lamp by rotating lamp 90 degrees to align lamp pins with holder slots. Refer to Bi-Pin Fluores- cent lamp Installation/Verification section on page 6. - Page 15 TABLE 4 — METHODS FOR CLEANING STAINLESS STEEL TASK Routine Cleaning Soap, ammonia or detergent and water Stubborn Spots and Stains, Revere Ware, Goddard’s, Twinkle, Caked-on Splatter, and other or Cameo stainless steel cleaner or Light Discolorations Soft Scrub cleaner Household cleansers, such as Old Dutch, Bon Ami, Ajax, Comet Heat Tint or Heavy Discoloration...
- Page 16 Copyright 2006 Carrier Corporation Manufacturer reserves the right to discontinue, or change at any time, specifications or designs without notice and without incurring obligations. Printed in Mexico 6-06 79BC560002-01_C...
Need help?
Do you have a question about the Miracool 1300L and is the answer not in the manual?
Questions and answers