
Related Manuals for Struers Secotom-60


Summary of Contents for Struers Secotom-60
- Page 1 Secotom-60 Instruction Manual 16857025-04 Manual No.: Revision 2022.01.18 Date of Release...
-
Page 3: Table Of Contents
Secotom-60 Instruction Manual Table of Contents Page Intended use ............. 2 Safety Precautions ........... 4 Icons and Typography ..........6 User’s Guide ............. 8 Reference Guide............. 64 Secotom-20/-60, Pre-Installation Checklist ..... 89 Declaration of Conformity ........98... -
Page 4: Intended Use
The machine is only to be operated by skilled/trained personnel. The machine is only designed to be used with Struers consumables specially designed for this purpose and this type of machine. The machine is for use in a professional working environment (e.g. - Page 5 The contents of this manual are the property of Struers. Reproduction of any part of this manual without the written permission of Struers is not allowed. All rights reserved. © Struers 2019.
-
Page 6: Safety Precautions
Secotom-60 Instruction Manual Secotom-60 Safety Precautions Read carefully before use Ignoring this information and mishandling of the equipment can lead to severe bodily injuries and material damage. The machine must be installed in compliance with local safety regulations. All functions on the machine and any connected equipment must be in working order. - Page 7 The equipment is designed for use with consumables supplied by Struers. If subjected to misuse, improper installation, alteration, neglect, accident or improper repair, Struers will accept no responsibility for damage(s) to the user or the equipment. Dismantling of any part of the equipment, during service or repair, should always be performed by a qualified technician (electromechanical, electronic, mechanical, pneumatic, etc.).
-
Page 8: Icons And Typography
Secotom-60 Instruction Manual Icons and Typography Struers uses the following icons and typographical conventions. A list of the Safety Messages used in this manual can be found in the chapter on Cautionary Statements Always consult the Instruction Manual for information on the potential hazards marked by the icons fixed to the machine. - Page 9 Secotom-60 Instruction Manual General Messages NOTE: indicates a risk of damage to property, or the need to proceed with special care. HINT: indicates additional information and tips. Colour Inside Logo The 'colour inside' logo on the cover page of this Instruction Manual indicates that it contains colours which are considered to be useful for the correct understanding of its contents.
-
Page 10: User's Guide
Secotom-60 Instruction Manual User’s Guide Table of Contents Page 1. Getting Started ........... 11 Device Description ................ 11 Checking the Contents of the Packing Box ........12 Unpacking Secotom ..............12 Placing Secotom ................13 Recommended workbench dimensions ........13 Getting Acquainted with Secotom .......... - Page 11 Secotom-60 Instruction Manual 2. Basic Operation........... 29 Front Panel ................... 29 Reading the Display ..............30 Manoeuvring in the Menu Structure ........31 Acoustic Signals ..............31 Standby Mode ................ 31 Software Settings ................32 Zero Position ................34 Changing the Language ............34 Editing Numeric Values ............
- Page 12 Secotom-60 Instruction Manual 3. Maintenance ..........49 General Cleaning ................49 Daily Inspection ................49 Checking the Guard ............... 49 Checking the Safety Lock ............49 Daily Maintenance ................ 50 Weekly ..................51 Cleaning the Cutting Chamber ..........51 Checking the Cooling Fluid Tank ..........52 Tube for Water-free Cooling Fluid ..........
-
Page 13: Getting Started
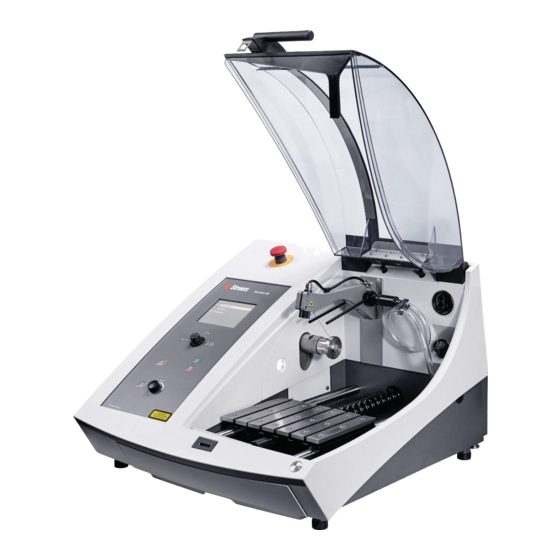
Instruction Manual 1. Getting Started Device Description Secotom-60 is an automatic cut-off machine for cutting the majority of solid and stable (non-explosive) materials. It has a motorized Y- table and recirculation cooling tank. The height-adjustment of the cut- off wheel is done manually. -
Page 14: Checking The Contents Of The Packing Box
Secotom-60 Instruction Manual The packing box contains the following parts: Checking the Contents of the Packing Box Secotom-60 Mains cables Triangle key for safety lock release Support pin Socket spanner 17 mm Hose for connection to exhaust, 51 mm dia., 1.5 m Hose clamp, 40-60 mm dia. -
Page 15: Placing Secotom
Secotom-60 Instruction Manual CRUSHING HAZARD Take care of your fingers when handling the machine. Wear safety shoes when handling heavy machinery. HINT: Store the packing crate, bolts and brackets for use whenever Secotom is transported/re-located. Failure to use the original packaging and fittings could cause severe damage to the machine and will void the warranty. -
Page 16: Getting Acquainted With Secotom
Secotom-60 Instruction Manual Getting Acquainted Please familiarise yourself with the location and names of all with Secotom the Secotom components: MAIN SWITCH The main switch is located at the rear of Machine. EMERGENCY STOP The Emergency Stop is located on the front of the machine. -
Page 17: Front Of Secotom
Secotom-60 Instruction Manual Front of Secotom Emergency Stop Hold-to-run button Front Panel (details in section Cooling fluid tank Basic Operation) Guard Rear of Secotom Flange for Exhaust Service socket Type Plate Hinges ... -
Page 18: Inside The Chamber
Secotom-60 Instruction Manual Inside the Chamber Cut-off wheel spindle Flushing Hose Line laser Exhaust Cooling nozzles Electrical connection socket Cutting table Drain... -
Page 19: Safety Lock
Secotom-60 Instruction Manual Safety Lock NOTE: The guard on Secotom can only be opened when the machine is connected to a power supply and the main power switch is on. To open the guard if the power is not connected: ... -
Page 20: Supplying Power
Secotom-60 Instruction Manual Supplying Power ELECTRICAL HAZARD Switch the power off when installing electrical equipment. The machine must be earthed (grounded). Check that the mains voltage corresponds to the voltage stated on the type plate on the side of the machine. Incorrect voltage may result in damage to the electrical circuit. -
Page 21: Filling The Recirculation Tank With Cooling Fluid
With the tank in position under the chamber. Fill the tank by slowly pouring a 4% solution of Struers additive, Cooli Additive: 190ml Cooli Additive and 4.5 l water through the hole in the base of the chamber. -
Page 22: Optimising Cooling
(percentage stated on the container of the Struers Additive, Cooli Additive). • Remember to add Struers Additive each time you refill with water. See the hint on a page 19. It is recommended to change the cooling fluid at least •... - Page 23 Secotom-60 Instruction Manual Insert the support pin into the hole on the cut-off wheel spindle. Use the socket spanner 17 mm to loosen the flange screw. Remove the outer flange. NOTE: The tolerance between the spindle and inner flange is very small which means that the two surfaces must be absolutely clean.
-
Page 24: Hold-To-Run Button
Secotom-60 Instruction Manual Press the hold-to-run button while operating the joystick to position the Hold-to-run button cutting table while the guard is open. Hold-to-run button Height-adjustment of The distance between the cut-off wheel spindle and the cutting table the Cut-off Wheel can be adjusted to suit the cut-off wheel and compensate for wear caused by the cutting process. -
Page 25: Cutting Table
Secotom-60 Instruction Manual The Secotom is fitted with a moving cutting table. Cutting Table 1 mm thick cut-off wheels are positioned in the middle of the Y-table cutting groove. Thicker cut-off wheels will be positioned slightly to the right. Thinner cut-off wheels will be positioned slightly to the left. -
Page 26: Line Laser
Secotom-60 Instruction Manual The laser beam indicates the position of the cut for precise placement Line Laser of the workpiece. The laser is automatically activated when Secotom is powered ON. The laser automatically turns OFF when Secotom is in Standby. -
Page 27: Quick-Clamping And Spring Clamp Devices
Secotom-60 Instruction Manual Quick-clamping and Position the back stop and the clamping device as shown in Spring Clamp Devices the illustration. Tighten the nuts to secure. Place the stand on the cutting table. (The Fixed stand can also be... -
Page 28: Electrical Connections In The Cutting Chamber
If for some reason you have a problem with a connection, do not attempt to change the connections in the clamping tool plugs or connection socket. Contact Struers Service for information. A pop-up on the display confirms that the accessory is now connected. -
Page 29: Flushing Hose
Secotom-60 Instruction Manual The Secotom comes complete with a flushing system. This enables Flushing Hose the cutting chamber to be rinsed clean of any debris discarded during the cutting process. Flushing is operated through the Front Panel button and hold-to-run button. -
Page 30: Debris Collection
Connection to an External Struers recommends the use of an exhaust system as workpieces may Exhaust System emit harmful gases when cut. -
Page 31: Basic Operation
Secotom-60 Instruction Manual 2. Basic Operation Front Panel Function Multifunction knob. Turn Turn knob to move the cursor or to adjust Push settings. knob Push knob to select (ENTER) Starts the cutting START process. Leaves the present menu or aborts functions/changes. -
Page 32: Reading The Display
Secotom-60 Instruction Manual The display on the Front Panel provides different levels of status Reading the Display information. For example, when the machine is switched on, the display informs you about the physical configuration of the Secotom and the version of software that is installed: When operating the Secotom, this display is the user-interface to Secotom software. -
Page 33: Manoeuvring In The Menu Structure
Secotom-60 Instruction Manual To select items in the menu: Manoeuvring in the Menu Structure Turn knob to select a menu, method group or a parameter. Push knob to open or activate the selection. Press Esc to return to the Main menu. -
Page 34: Software Settings
Secotom-60 Instruction Manual Software Settings When switching Secotom on for the first time, the Select language screen will appear (to change the language after this, refer to Changing the Language). Turn knob to select the language you prefer. Push knob to accept the language. - Page 35 Secotom-60 Instruction Manual You will now be prompted to set the time. Turn knob to select and to adjust the settings. Push knob to accept the settings. When Date and Time have been set, turn knob to select Save and Exit.
-
Page 36: Zero Position
Secotom-60 Instruction Manual start-up, or if reference Zero Position Zero position is calibrated after each 5 positions have been lost. Turn the knob to select Configuration. Changing the Language Push knob to activate the Select language pop-up menu. Turn knob to select the language you prefer. -
Page 37: Editing Numeric Values
Secotom-60 Instruction Manual Editing Numeric Values Turn knob to select the value to be changed, e.g. Wheel speed: Push knob to edit the value. A scroll box appears around the value. Turn knob to increase or decrease the numeric value. -
Page 38: Editing Alphanumeric Values
Secotom-60 Instruction Manual Editing Alphanumeric Turn knob to select the alphanumeric value to be changed, Values e.g. Return position Push knob to edit the value. A pop-up menu appears. Turn knob to select the correct choice. Push knob to accept the new selection and to continue or to return to the previous screen. -
Page 39: Main Menu
Secotom-60 Instruction Manual The Main menu is the highest level in the menu structure. From this Main menu menu, you can enter the Cutting methods, Maintenance and Configuration menus. Positioning The Positioning menu is displayed when the joystick is moved, and... -
Page 40: Cutting Methods
Secotom-60 Instruction Manual Secotom-60 has ten cutting methods. Cutting methods Selected cut-off wheel and cutting length are displayed in the overview. Cutting Method Parameters Cut-off wheel Rotation speed Feed speed Cut Length Return position Cutting mode... -
Page 41: Editing Cutting Methods
Secotom-60 Instruction Manual Editing Cutting methods: Turn knob to select the cutting method to be edited. Push knob to edit the method. Turn knob to select the Cut-off wheel. Push knob to select a cut-off wheel from the menu. Recommended rotation speed (rpm) will also be visible in the cutting menu. -
Page 42: Return Position
Secotom-60 Instruction Manual There are 3 options for the position the cut-off wheel will return to after Return position the cutting process is complete: Start position: Cutting table returns to the start position. Zero position: Cutting table returns to zero position. -
Page 43: Excicut
Secotom-60 Instruction Manual ExciCut is a function used when cutting extremely hard materials. ExciCut NOTE: Using ExciCut on other materials can result in uneven specimens or broken cut-off wheel ExciCut works by the cut-off wheel moving up and down as the cutting table moves forward. -
Page 44: Optifeed
Secotom-60 Instruction Manual OptiFeed If the motor becomes overloaded during cutting (motor load > 150 %), the OptiFeed function will automatically reduce the feed speed. When the overload has been reduced, the feed speed will be increased to the pre-set level. -
Page 45: Configuration Menu
Secotom-60 Instruction Manual Configuration Menu The Configuration menu contains the parameters which apply to all methods. Select Configure, a list over user defined cut-off wheels will appear: Creating a User Defined Cut-off Wheel in the Database Turn knob to select New wheel. - Page 46 Secotom-60 Instruction Manual Push knob and enter a name for the wheel using the text editor. Use the knob to select then input the text desired. (Press Esc to abort the changes, and preserve the original setting, press Esc twice to return to the Main menu.) Input the parameters for the wheel.
-
Page 47: Automatic X-Table
Secotom-60 Instruction Manual When an Automatic X-table is connected, MultiCut cutting Automatic X-table mode will appear on the cutting method screen. (optional accessory) MultiCut With MultiCut mode set to ON, MultiCut setup will appear on the screen. Select MultiCut setup, a popup screen will appear to enter the width of the specimens to be cut. -
Page 48: Initial Cut
Secotom-60 Instruction Manual Set to Yes to make an initial cut, before cutting the specimens Initial cut: that you need. This cuts a scrap piece, which you will not use. For example: if the workpiece has an uneven edge that would make it unsuitable as a first specimen. -
Page 49: Rotary Stand
Secotom-60 Instruction Manual Rotary stand When a rotary stand is connected a read out for the chuck mode will (optional accessory) appear and the Positioning screen will show the X-position. X-position can be reset for easy cutting of a specific width. -
Page 50: Starting The Cutting Process
Secotom-60 Instruction Manual Secure the workpiece on the cutting table. Starting the Cutting Position the cutting table in the correct place. Process Ensure that the cooling fluid nozzles are lowered into position. Close the guard (the machine cannot be started before the guard is down). -
Page 51: Maintenance
The maintenance procedures described in this section must be carried out by skilled or instructed persons. To ensure a longer lifetime for your Secotom Struers strongly General Cleaning recommends daily cleaning of the cutting chamber. -
Page 52: Daily Maintenance
Secotom-60 Instruction Manual Daily Maintenance Clean all accessible surfaces with a soft, damp cloth. NOTE: Do not use a dry cloth as the surfaces are not scratch resistant. Grease and oil can be removed with ethanol or isopropanol. NOTE: Never use acetone, benzol or similar solvents. -
Page 53: Weekly
Clean painted surfaces, and the Front Panel with a soft damp cloth and common household detergents. For heavy duty cleaning, use Struers Cleaner (Cat. No. 49900027). Clean the guard with a soft damp cloth and a common household anti-static window cleaning agent. -
Page 54: Checking The Cooling Fluid Tank
Fluid Tank Replace the cooling fluid if it appears dirty (build up of cutting debris). Remember to add Struers additive, Cooli Additive. To check the concentration of additive, use a refractometer. Please see the instructions for use on the label. -
Page 55: Monthly
Struers additive, Cooli Additive: 190ml Cooli Additive and 4.5 l water through the hole in the base of the chamber. For water-sensitive materials, use Struers Water-Free Cooling Fluid. NOTE: Take care not to overfill the tank! NOTE: Flush the Recirculation cooling system with clean water if Secotom is not to be used over longer periods of time. -
Page 56: Yearly
(electromechanical, electronic, mechanic, pneumatic etc.) Emergency Stop Start a cutting process. Activate Emergency stop. If cutting does not stop, press STOP and contact Struers Service. Activate Emergency stop. Press START . If cutting starts, press STOP and contact Struers Service. -
Page 57: Safety Lock
Safety lock Start a cutting process. Try to open the guard – do NOT use force. If it opens, press STOP and contact Struers Service. Open the guard. Press START . If cutting starts, press STOP and contact Struers Service. -
Page 58: Maintenance Of Clamping Devices
Secotom-60 Instruction Manual Maintenance of NOTE: Clamping Devices It is recommended to thoroughly clean and lubricate the Quick Clamping Device and Vertical Quick Clamping Device at regular intervals. Maintenance of The stainless-steel bands (available as spare parts) should be Cutting Tables replaced if damaged or worn. -
Page 59: Dressing Diamond And Cbn Cut - Off Wheels
Secotom-60 Instruction Manual A newly dressed cut-off wheel will give an optimum cut. A badly Dressing Diamond and maintained and dressed cut-off wheel demands a higher cutting CBN Cut - off Wheels pressure that will result in more frictional heat. -
Page 60: Changing Cooling Pump Tubes
Secotom-60 Instruction Manual To exchange the tube: Changing Cooling Pump Tubes Remove the four screws on the protection plate on the rear of the machine. Remove the three screws on the cover on the cooling pump. - Page 61 Secotom-60 Instruction Manual Remove the tube from the pump axle. Pump axle Hose clamp Loosen the hose clamp and carefully remove the tube ends from the connectors. Attach the new tube to the connectors and tighten the hose clamp (the hose clamp should be on the end of the tube that directs water into the cutting chamber, as this will have the greatest pressure –...
-
Page 62: Cautionary Statements
The guard must be replaced after a lifetime of 2 years . Other safety critical components are to be replaced after a maximum lifetime of 20 years. Contact Struers Service for information. CRUSHING HAZARD Take care of your fingers when handling the machine. Wear safety shoes when handling heavy machinery. - Page 63 Secotom-60 Instruction Manual ELECTRICAL HAZARD Switch the power off when installing electrical equipment. The machine must be earthed (grounded). Check that the mains voltage corresponds to the voltage stated on the type plate on the side of the machine. Incorrect voltage may result in damage to the electrical circuit.
-
Page 64: Transport And Storage
Secotom-60 Instruction Manual 5. Transport and Storage NOTE: Store the packing crate, foam packaging, bolts and fittings for future use. Failure to use the original packaging and fittings could cause severe damage to the tester and will void the warranty. -
Page 65: Disposal
Secotom-60 Instruction Manual 6. Disposal Equipment marked with a WEEE symbol contain electrical and electronic components and must not be disposed of as general waste. Please contact your local authorities for information on the correct method of disposal in accordance with national legislation. -
Page 66: Reference Guide
Secotom-60 Instruction Manual Reference Guide Table of Contents Page 1. Struers Knowledge ........65 2. Accessories and Consumables ......66 Accessories .................. 66 Consumables ................66 Cut-off Wheels ................ 66 Other consumables ..............66 3. Trouble-Shooting ......... 67 4. Service ............. 75 Service Check ................ -
Page 67: Struers Knowledge
Secotom-60 Instruction Manual 1. Struers Knowledge Materialographic cutting is where most microstructure analysis begins. A good understanding of the cutting process can help to select suitable clamping and cutting methods and thereby ensure the high-quality cut. Minimizing cutting artefacts will help the remaining materialographic process and act as a good base for efficient and high-quality preparation. -
Page 68: Accessories And Consumables
Other products (e.g. coolants) may contain aggressive solvents, which dissolve e.g. rubber seals. The warranty may not cover damaged machine parts (e.g. seals and tubes), where the damage can be directly related to the use of non-Struers consumables. Please refer to the Selection Guide in the... -
Page 69: Trouble-Shooting
If error remains, contact Testing. Please try to restart the Struers Service. machine. If problem persists, The machine will not start. please contact Struers technical support. #110 Machine found a problem A critical error is detected Re-start. during Power ON Self... - Page 70 Please wait until motor temperature decreases before continuing cutting. #126 Main motor cannot start. Switch Secotom off and then Process halted! on. If this does not help, contact Struers Service. Please try to restart the machine if problem occurs after next start.
- Page 71 Cutting Try to restart cutting process. process. Alarm register: xxxx If this does not help, contact Error register: xxxx Struers Service and quote the Alarm and Error register values. #128 Open safety lock detected. Sensors register that the...
- Page 72 Explanation Action Required Errors #001 SMM not present! Struers Memory Module is Re-start. not correctly connected to If error remains, contact Struers Service. machine. #002 Inverter communication Machine is not able to Re-start. failed! communicate with If error remains, contact Struers Service.
- Page 73 Mains voltage is lower than Check that the mains voltage 180V. corresponds to the voltage stated on the type plate on the rear of the machine. Re-start. If error remains, contact Struers Service. #002 Z-motor communication Communication with the Z- Re-start. failed...
- Page 74 Incorrect clamping Support the workpiece and clamp it of the workpiece. on both sides. e.g. Struers’ Specimen Holder CATAL, which is designed for clamping small, long workpieces on both sides. Cutting quality differs. Inadequate cooling. Check the positioning of the cooling fluid nozzles.
- Page 75 The nut must be tightened properly. Incorrect clamping Support the workpiece and clamp it of the workpiece. on both sides. e.g. Struers’ Specimen Holder CATAL, which is designed for clamping small, long workpieces on both sides. Cut-off wheel is too hard. Select another wheel.
- Page 76 Clamp the workpiece on both clamped. the workpiece during cutting. sides of the cut-off wheel so that the cut stays open. e.g. Struers’ Specimen Holder CATAL, which is designed for clamping small, long workpieces on both sides. The workpiece is brittle.
-
Page 77: Service
Go to the Maintenance menu and select: Service information. Various topics can be selected for information on the condition of the different components. Service information can also be used in cooperation with Struers Service for remote diagnostics of the equipment. Service information is read-only information, machine settings cannot be changed or modified. -
Page 78: Service Check
Struers recommends that a regular service check be carried out after Service Check every 1,500 hours of use. NOTE: Servicing may only be performed by a Struers engineer or a qualified technician (electromechanical, electronic, mechanical, pneumatic, etc.). Contact Struers Service for information. -
Page 79: Spare Parts And Diagrams
16850044 Contactor Omron J7KNA_12_01_24VS Struers' Cat. nos. are listed in the Spare Parts list. WARNING The guard must be replaced after a lifetime of 2 years. Other safety critical components are to be replaced after a maximum lifetime of 20 years. -
Page 80: Spare Parts List
Instruction Manual NOTE: Replacement of Safety critical components can only be performed by a Struers engineer or a qualified technician (electromechanical, electronic, mechanical, pneumatic, etc.). Safety critical components may only be replaced by components with at least the same safety level. -
Page 81: Circuits And Diagrams
Secotom-60 Instruction Manual Circuits and Diagrams ........16853050B Block Diagram, Secotom-20/-60 Circuit Diagram, Secotom-20/-60 (4 pages) ..... 16853100E Water Diagram, Secotom ......... 16851005A See the following pages. - Page 82 BUTTON PCB TEMPERATURE MONITOR HEART BEAT INDICATOR PCB VE RS ION IDE NTIFICA TION VOLTAGE MONITORS 24V-2 output Las er Secotom-60 only Speed monitor unit Speed monitor unit Output, 24VDC / 500m A Working (24V-1 chain) CONN. FOR INITIA L...
- Page 83 2 x 0,75 mm² cable 5 x AWG28 X102:1-6 Matrix Keyboard X8-8 X12-1 BU190 START STOP WATER X8-3 CAN-LOW X12-5 GN/W H CONN. FOR STRUERS TYPE INFO X12-7 BU191 MEMORY MODULE Sec.-20 X8-4 X12-8 OG/W H X8-7 Sec.-60 Secotom-60 only X12-9 X8-2...
- Page 84 OUTP UT X = 3, Y = 2 0,5mm² CONTROL X = 3, Y = 2 CONTROL COMP. COMP. BU144 Frequency = 32Hz Frequency = 32Hz Secotom-60 only Q1 Q2 Q1 Q2 BU116 BU160 BU117 BU137 BU137 BU134 BU136 BU118 BU119 YS1.2...
- Page 85 Accessories for SECOTOM 20/60 Original drawing is 15993100 This list is for information only. SECOTOM 6 - has no accessories AUTO X-TABLE X112 2 x 0,5mm² Gearmotor PWM 1 X110 PWM 2 3 x 0,25mm² Pot. IN 1 kOhm cable 7 x 0,75mm² ROTATION STAND X111 Address...
- Page 86 Magnetic switch SS1.1 YS1.2 FILTER Safety relay Safety relay Safe Torque Off function Speed monitor unit Speed monitor unit I6- ENABLE Secotom-60 only I5- FEEDBACK I6- ENABLE Frequency Inverter XPE3 Secotom-60...1500W Door Guard Secotom-20...1100W Lock BASE To K2.1 5 PLATE K1.4...
- Page 87 Cooling nozzles Cleaning pistol Absorber Outlet back to reservoir Pump Secotom Secotom chassis sink Build in reservoir Cooling medium 2018-11-07 Release 2018-11-07 Crea. date Appr. date Revision Revision description Draw. Init Appr. Init yyyy-mm-dd yyyy-mm-dd Material: Scale: Format: Tolerance: DS/ISO 2768- Weight : Description: Rev:...
-
Page 88: Legal And Regulatory
Pursuant to Part 15.21 of the FCC Rules, any changes or modifications to this product not expressly approved by Struers ApS could cause harmful radio interference and void the user’s authority to operate the equipment. -
Page 89: Technical Data
Secotom-60 Instruction Manual 7. Technical Data Subject Specifications Cutting Motor 1,100 W Cutting Power 1.1 kW 1.5 kW Cut-off wheels ø75 mm (3") - 203 mm (8") Output axle Rotational speed: 300 - 5,000 rpm (in steps of 100 rpm) Diameter: 12.7 / 22 mm (0.5 / 0.86") - Page 90 Cut-off wheel monitoring and EN ISO 13849-1, Cat. 3, PLd speed limitation Axis speed Monitoring - Vertical EN ISO 13849-1, Cat. 3, PLd axis movement Secotom-60 only Exhaust Dimension 50 mm / 2" dia. Minimum capacity: 30 m /h / 1,060 ft at 0 mm / 0"...
-
Page 91: Secotom-20/-60, Pre-Installation Checklist
, PH2 and H4 Required Accessories and Consumables (ordered separately) (Please refer to the Secotom Brochure and the Struers Consumables Catalogue for details of the range available). Recommended Exhaust system: 30 m /h / 1,060 ft /h at 0 mm/0" water gauge... - Page 92 Height of table (H) follows local preferences. To facilitate easy access for service technicians, allow sufficient spacearound the machine. HINT: A table unit designed for Struers’ table top machines is available as an accessory Cat. No. 06266101. Recommended Space Front: Recommended space at the front: 100 cm / 40”.
- Page 93 Secotom-20/-60, Pre-Installation Checklist Dimensions Secotom-20/-60 has equal outer diamensions. The following illustrations are of Secotom-60. Front Side Centre of Gravity...
- Page 94 Secotom-20/-60, Pre-Installation Checklist Lifting NOTE: Do not lift Secotom using the light grey body. Remove the recirculation tank before lifting Secotom. Always lift from underneath the machine. A crane and 2 lifting straps are required to lift the machine off With a crane the shipment pallet.
- Page 95 - 2-phase connections. If the plug supplied on this cable is not approved in your country, then the plug must be replaced with an approved plug. Electrical data Secotom-20 Secotom-60 Voltage / 200-240 V / 50-60 Hz frequency Power inlet...
- Page 96 EN60204-1, Stop Category 0 Y-Table movement EN ISO 13849-1, Cat. 3, PL d Cut-off wheel monitoring EN ISO 13849-1, Cat. 3, PL d and speed limitation Axis speed Monitoring - EN ISO 13849-1, Cat. 3, PL d Vertical axis movement (Secotom-60 only)
- Page 97 Secotom-20/-60, Pre-Installation Checklist Water Supply Required Option Cooling fluid is supplied from the integrated recirculation unit (capacity 4.75 l / 1.25 gallon). A kit for connection to an external recirculation unit is available as an optional accessory. Water outlet – Drain ...
- Page 98 The use of Struers consumables is recommended. Other products (e.g. coolants) may contain aggressive solvents, which dissolve e.g. rubber seals. The warranty may not cover damaged machine parts (e.g. seals and tubes), where the damage can be directly related to the use of non-Struers consumables.
-
Page 100: Declaration Of Conformity
Declaration of Conformity 16857901 C EU / UE / EL / EC / EE / ES / EÚ / AB Manufacturer Struers ApS Pederstrupvej 84 제조사 DK-2750 Ballerup, Denmark 적합성 선언서 Secotom-60 Name / / 제품명 Secotom-60 Model / / 모델... - Page 102 Pederstrupvej 84 DK-2750 Ballerup Denmark...
Need help?
Do you have a question about the Secotom-60 and is the answer not in the manual?
Questions and answers