Table of Contents
Advertisement
Quick Links
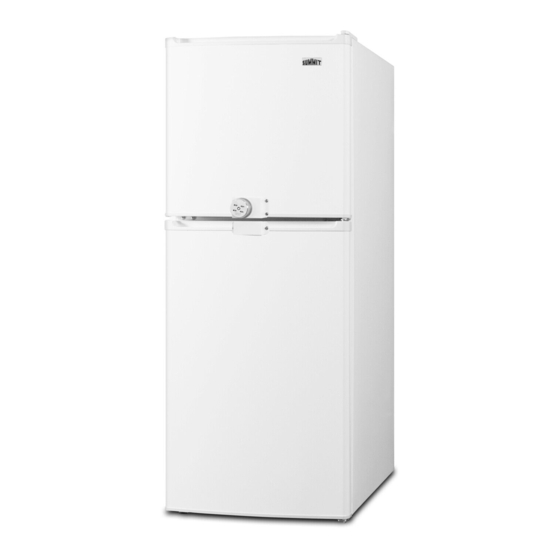
FF711ESLLF2
Product Features:
CEE Tier II qualified
Thin-line design
LLF2 lock
Frost-free operation
Reversible doors
Adjustable shelves
Clear crisper drawer
Interior light
Door storage
SUMMIT APPLIANCE DIVISION, FELIX STORCH, INC. | ISO 9001:2015 Certified
770 Garrison Avenue Bronx, NY 10474 USA TEL 718-893-3900 FAX 844-478-8799
Efficient design meets CEE Tier II specifications, using 25% less energy than DOE standards
require for this product category
Slim width under 19" for an easy fit in space-challenged settings
Combination lock with key override secures both sections
No-frost convenience for reduced user maintenance
Keep your options flexible with reversible doors that are easy to switch when your
arrangement changes
Rearrange refrigerator space to accommodate all sizes or remove shelves for simple cleanup
Get the longest life and best taste out of produce by storing greens in a bottom crisper
Automatically illuminates when you open the door
Store tall bottles and condiments right on the door for convenient access
46" x 18.75" x 23" (H x W x D)
Two-door refrigerator-freezer in slim 18" width, with
combination lock to secure both doors
Highlights:
Combination lock secures both refrigerator and freezer
sections
Two-door design for convenience and efficiency
Slim width is ideal for space-challenged locations
info@summitappliance.com
www.summitappliance.com
Advertisement
Table of Contents

Related Manuals for Summit FF711ES


Summary of Contents for Summit FF711ES
- Page 1 Automatically illuminates when you open the door Door storage Store tall bottles and condiments right on the door for convenient access SUMMIT APPLIANCE DIVISION, FELIX STORCH, INC. | ISO 9001:2015 Certified 770 Garrison Avenue Bronx, NY 10474 USA TEL 718-893-3900 FAX 844-478-8799 info@summitappliance.com...
- Page 2 13.5" (34 cm) Freezer - Interior Width 17.88" (45 cm) Freezer - Interior Depth 12.5" (32 cm) SUMMIT APPLIANCE DIVISION, FELIX STORCH, INC. | ISO 9001:2015 Certified 770 Garrison Avenue Bronx, NY 10474 USA TEL 718-893-3900 FAX 844-478-8799 info@summitappliance.com www.summitappliance.com...
- Page 3 U.S. Government Federal law prohibits removal of this label before consumer purchase. Refrigerator-Freezer Felix Storch, Inc. • Automatic Defrost Model FF711ESLLF2 Capacity: 4.8 Cubic Feet • Top-Mounted Freezer • No through-the-door ice Compare ONLY to other labels with yellow numbers. Labels with yellow numbers are based on the same test procedures.
- Page 4 COMPACT REFRIGERATOR-FREEZER Model: FF711ES User Manual BEFORE USE, PLEASE READ AND FOLLOW ALL SAFETY RULES AND OPERATING INSTRUCTIONS Felix Storch, Inc. An ISO 9001:2015 registered company 770 Garrison Ave Bronx, New York 10474 www.summitappliance.com...
-
Page 5: Table Of Contents
TABLE OF CONTENTS Important Safeguards Location of Parts Installing your Refrigerator Test Run Reversing the Door Swing Temperature Control Removing Ice Cubes from the Tray Cleaning and Care Troubleshooting Limited Warranty... -
Page 6: Important Safeguards
IMPORTANT SAFEGUARDS Before the appliance is used, it must be properly positioned and installed as described in this manual, so please read the manual carefully. To reduce the risk of fire, electrical shock, or injury when using the appliance, follow basic precautions, including the following: •... - Page 7 • Use two or more people to move and install the appliance. Failure to do so can result in back or other injury. • To ensure proper ventilation for your appliance. The front of the unit must be completely unobstructed. Choose a well-ventilated area with temperature above 60°F (16°C) and below 90°F (32°C).
-
Page 8: Location Of Parts
LOCATION OF PARTS No. Part Name Description 1. Discharge Outlet Since cold air flows through this outlet into the refrigerator, be sure to avoid blocking it with stored food. 2. Freezer Shelf 3. Temperature Control 4. Plastic coated Shelves 5. Suction Inlet Air that circulates throughout the refrigerator flows through this opening to regulate the temperature inside the refrigerator. -
Page 9: Installing Your Refrigerator
TEST RUN Before using the refrigerator, clean it and make a test run to see if the following are completed. If not, check the electricity supply. If the cause of trouble cannot be located, contact your Summit dealer. 1. Plug the AC cord into an electrical outlet of 115 volt, 60Hz, set FRIDGE CONTROL to "COLDEST", and let the refrigerator operate... -
Page 10: Reversing The Door Swing
REVERSING THE DOOR SWING Refer to the disassembly diagram, and change the door hinges in the following procedure. The numbers in the diagram indicate the procedure order in the instructions. 1. Remove the hinge cap by twisting it off. 2. Remove the upper hexagonal head screws. The top hinge and the freezer door can now be removed. -
Page 11: Temperature Control
11. Attach the shaft to the hinge bottom. Attach the refrigerator door to the shaft. 12. Rotate the middle hinge 180 . Attach it to the refrigerator door and secure it with a screw. (Do not tighten the screws completely.) 13. -
Page 12: Removing Ice Cubes From The Tray
REMOVING CUBES FROM THE ICE TRAY • The ice cube tray is flexible. Twist the tray to remove ice cubes. • Do not use boiling water or a metal instrument such as a knife or screw driver to remove ice cubes from the tray. -
Page 13: Troubleshooting
Shelves, bins, or baskets are out of position. If your appliance shows other symptoms than those described above, or if you have checked all items listed as the cause and the problem still exists, then call SUMMIT® Customer Service at 1-800-932-4267. - Page 14 NOTES...
-
Page 15: Limited Warranty
LIMITED WARRANTY ONE-YEAR LIMITED WARRANTY unit Within the 48 contiguous United States, for one year from the date of purchase, when this is operated and maintained according to instructions attached to or furnished with the product, warrantor will pay for factory- specified parts and repair labor to correct defects in materials or workmanship. - Page 16 LLF2 Combination Cam Lock Instructions PARTS housing barrel digit wheel reset button screwdriver or other tool LLF2 combination lock installed Fig. 1 I. Manufacturer’s combination The manufacturer has set the combination code at 0-0-0-0. II. Resetting the combination Randomize the digit wheels a.
Need help?
Do you have a question about the FF711ES and is the answer not in the manual?
Questions and answers