Table of Contents
Advertisement
Quick Links
Advertisement
Table of Contents

Related Manuals for Garmin NUVIFONE M10


Summary of Contents for Garmin NUVIFONE M10
- Page 1 nüvifone ™ owner’s manual...
- Page 2 © 2010 Garmin Ltd. or its subsidiaries and ASUSTeK Computer, Inc. Garmin International, Inc. Garmin (Europe) Ltd. 1200 East 151 Street, Liberty House Olathe, Kansas 66062, Hounsdown Business Park, Southampton, Hampshire, Tel. (913) 397.8200 or SO40 9LR UK (800) 800.1020 Tel.
-
Page 3: Register Your Product
Introduction The nüvifone M10 is a multi- ™ media mobile phone with integrated navigation and services. Get Support Go to www.garminasus.com in-country and regional support information. Register Your Product Register your product at www.garminasus.com to help us better support you. Keep the original sales receipt, or a photocopy, in a safe place. -
Page 4: Table Of Contents
Table of Contents Table of Contents Introduction ...i Get Support ... Register Your Product... Update the Software ... nüMaps Guarantee ™ Additional Maps ... Get Started ...7 nüvifone Device Features ... Setting Up the Device ... Turn On Your nüvifone ... Mount the nüvifone in Your Vehicle ... - Page 5 Copy from Contacts to Your SIM Card... Copy Items from Your SIM Card to Contacts... Add Items to Your SIM Card ... Search for Locations Set Your Home Location ... Find an Address... Go! Page Options ... Find a Nearby Location ... Learn About Locations ...
- Page 6 Table of Contents Use the White Pages Phone Directory ... View GeoNews ... Send and Receive Messages...50 Send an SMS/Text Message ... Send a Multimedia Message (MMS) . Create a Voice MMS Message ... Send a Location Message ... Read Messages... Set Up an E-mail Account...
- Page 7 Change Media Gallery Settings ... Play a Video Stream ... Organize Your Life ...74 Use the Calendar... Check Flight Status ... Check the Weather ... View Stock Information ... Use Tasks ... Use the Alarms ... Add a World Clock ... Use the Count-down Timer ...
- Page 8 Table of Contents Adjust Your Regional Settings ... Lock the Phone with a Password ... Change the Power Settings ... Configure Your Phone Network Profile... Adjust the Navigation Settings... Remove Programs... View Device Information ... Restore the Default Settings... Appendix ...105 Reset the nüvifone...
-
Page 9: Get Started
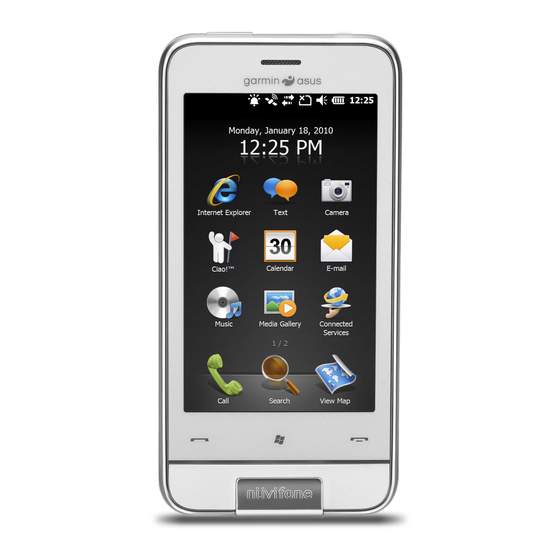
Get Started Get Started WARNING See “Important Safety and Product Information” beginning on page 110 product warnings and other important information. Download the latest owner’s manual at www.garminasus.com/M10. nüvifone Device Features Headphone Power key connector Volume Micro-USB keys connector for power computer Camera lens... -
Page 10: Setting Up The Device
Get Started Setting Up the Device WARNING This product contains a lithium-ion battery. To prevent the possibility of personal injury or product damage caused by battery exposure to extreme heat, remove the device from the vehicle when exiting or store it out of direct sunlight. -
Page 11: Install The Battery
3. Close the card holder. 4. Slide the card holder toward the center of the device to lock it. Install the microSD Card You can use an optional microSD card to hold more data. 1. Slide the microSD card holder toward the top edge of the device and lift up. -
Page 12: Replace The Battery Cover
Get Started Replace the Battery Cover Slide the battery cover onto the back of the device until it clicks. Charge the Battery Notice Your nüvifone will not charge if it has exceeded the maximum charging temperature of 122°F (50°C). If the nüvifone is mounted in the windshield, remove it from the mount and place it somewhere out of direct sunlight. -
Page 13: Turn On Your Nüvifone
Turn On Your nüvifone Press and hold the Power on the nüvifone. Mount the nüvifone in Your Vehicle The vehicle mount and power cable are available in some nüvifone packages. To purchase accessories, go to www.garminasus.com/M10. 1. Plug the vehicle power cable into the power connector on the side of the cradle. -
Page 14: Get To Know Your Nüvifone
Get to Know Your nüvifone Get to Know Your nüvifone Use the Home Screen ➊ ➌ ➍ ➎ ➊ Status bar. Tap to view the device status and notifications, and to search for locations. ➋ Current date and time, based on the network. -
Page 15: Use The Keys
Use the Keys Press to open the phone. Press to send a call. Press to open the Start menu. Press and hold to close or switch applications. Press to end a phone call. When not on a phone call, press to open the Home screen. -
Page 16: Use The On-Screen Keyboard
Get to Know Your nüvifone Use the On-screen Keyboard 1. When available, tap keyboard. 2. Tap the keys to enter data. 3. Tap to close the keyboard. Use the Stylus The stylus is a pen-like device. To remove the stylus, pull it out of the lower-right corner of your nüvifone. -
Page 17: View The Status
View the Status 1. Tap the status bar along the top of the screen. 2. From the slider menu at the top of the screen, select Status, Search, or Notification. 3. Tap an item to update it or view more information about it. Adjust the Volume 1. -
Page 18: Acquire Gps Satellite Signals
Get to Know Your nüvifone Acquire GPS Satellite Signals Your nüvifone must acquire GPS (Global Positioning System) satellite signals to navigate. The nüvifone automatically attempts to acquire satellite signals. To acquire satellite signals more quickly, take your nüvifone outside to an area free from tall obstructions. -
Page 19: Status Bar Icons
Status Bar Icons The icons along the top of the screen indicate the status of various system items. You can tap some of the icons to access more information. Type Call status General Packet Radio Service (GPRS) connection status* * This icon depends on your location and mobile service provider. - Page 20 Get to Know Your nüvifone Messaging status Battery status Signal status ActiveSync ® connection status New messages Multiple messages; tap the icon to view all messages. Battery fully charged Battery partially charged Battery charging Battery is very low No cellular phone service No signal Number of bars indicate signal strength Phone off...
- Page 21 Sound status Wi-Fi status ® Bluetooth technology headset connection Roaming service Mode status Speakerphone status Alarm status Timer status SIM card status Location Search GPS status nüvifone M10 Owner’s Manual Sound on Sound off Wi-Fi is available Wi-Fi connected Bluetooth stereo headset connected Roaming service.
-
Page 22: Use The Phone
Use the Phone Use the Phone Open the Phone Application Use one of the following methods to open the phone application: • Press the key. • From the Home screen, tap Call. Dial a Number 1. Press the key. 2. Tap to open the keypad. -
Page 23: Use In-Call Options
Use In-Call Options While you are in a call, the following options appear: • Speaker—activate the speakerphone. • Mute—mute the audio input. • Hold—place the current call on hold. • Add—place a new call. The first call is placed on hold. •... -
Page 24: Receive A Call
Use the Phone Receive a Call When there in an incoming phone call, the Incoming Call page appears. Select an option: • Tap Answer to answer the call. • Tap Ignore to reject the call or send the call to voice mail, if voice mail is set up. -
Page 25: Call Voice Mail
Call Voice Mail 1. Press the key. 2. Tap 3. Touch and hold 1. Place a Conference Call Note: Not all mobile phone networks support conference call. Contact your service provider for details. 1. Place a call to the first phone number. -
Page 26: View Call History
Use the Phone View Call History 1. Press the key. 2. Tap , if necessary. 3. Tap a number or a contact in the list to view your call history for that number or contact. 4. If a call in the list is marked with , tap the call to view the notes associated with that call. -
Page 27: Manage Your Contacts
Manage Your Contacts Add a Contact 1. Press the key. 2. Tap > > 3. Tap an option. 4. Tap an item to enter the information. Done when finished. 5. Tap to save the contact. Call a Contact 1. Press the key. -
Page 28: Navigate To A Contact
Manage Your Contacts Navigate to a Contact 1. Press the key. TIP: You can also tap Contacts. 2. Tap 3. Select a contact. 4. Tap Go!. Add a Contact to Favorites You can include up to 18 contacts in favorites. 1. -
Page 29: Copy Items From Your Sim Card To Contacts
Copy Items from Your SIM Card to Contacts 1. Press the key. 2. Tap Settings > Applications > Phone and Contacts Manager. 3. Select the SIM card contacts that you want to copy to your contacts, or tap Menu > Select 4. -
Page 30: Search For Locations
Search for Locations Search for Locations The Search menu provides several different categories you can use to search for locations. Note: Depending on the version of the built-in map data on your device, the button names and the order of steps could be slightly different than the following procedures. -
Page 31: Go! Page Options
Go! Page Options After you find a location, an informational page appears, displaying the address and the phone number (if known) of the location. ➊ ➋ ➌ ➊ Tap to dial the phone number of the location, if available. ➋ Tap to view the location on the map. -
Page 32: Send A Found Location
Search for Locations Send a Found Location You can find a location and send it to people using messaging or e-mail. 1. Find a location. 2. On the information page, tap Send Location. 3. Tap an account. 4. To attach a map of your location, tap Yes. -
Page 33: Find A Location Using Local Search
Find by Category 1. From the Home screen, tap > Points of Interest. 2. Tap a category. 3. Tap a subcategory or Categories. A list of items near your current location appears. 4. To narrow the search, tap the data entry field along the top of the screen, enter the text, and tap Done. -
Page 34: Find Favorites
Search for Locations Find Favorites 1. From the Home screen, tap > Favorites. 2. To search by name, tap the box at the top, enter all or part of the name, and tap Done. 3. Tap the item you want. Save a Found Location 1. -
Page 35: Find Cities
Browsing the Map • Touch and drag to view different parts of the map. • Tap and to zoom in and out. • Tap anywhere on the map. An arrow points to the location. • Tap for more options. • As you zoom out, the map changes to a digital elevation map showing the contours of the area. -
Page 36: Find Intersections
Search for Locations Find Intersections 1. From the Home screen, tap > Intersection. 2. If necessary, select the state, country, or province. 3. To search all cities, tap Cities. You can also tap enter all or part of the name, and then tap the city. -
Page 37: Follow Your Route
Follow Your Route After you select a location and tap Go!, your nüvifone creates a route to the location. Your route is marked with a magenta line. As you travel, your nüvifone guides you to your destination with voice prompts, arrows on the map, and directions at the top of the map. -
Page 38: View The Route Details
Follow Your Route View the Route Details When you are navigating a route, you can view all of the turns for your entire route and the distance between turns. Use one of the following methods to open the route details: •... -
Page 39: Junction View
Junction View When available for your route, the map displays a view of the upcoming junction and in which lane you should be driving. Tap the turn bubble on the map to view the junction instead of the next turn. View the Trip Computer The trip computer displays your current speed and provides helpful statistics... -
Page 40: Take A Detour
Follow Your Route Take a Detour 1. While navigating a route, tap 2. Tap Detour. If the route you are currently taking is the only reasonable option, the nüvifone might not calculate a detour. Stop the Route 1. While navigating a route, tap 2. -
Page 41: About Traffic
About Traffic This service may be available as a paid Connected Services subscription, and is not available in all areas. A data connection is required for this feature. Note: Garmin and ASUS are not responsible for the accuracy of the traffic information. - Page 42 Follow Your Route If a non-severe traffic delay occurs on your route, the traffic icon shows how much time the delay has added to your route. This time is already included in your estimated arrival time. Manually Avoid Traffic on Your Route 1.
-
Page 43: Use The Navigation Tools
Use the Navigation Tools Browse the Map 1. Use one of the following methods to open the Browse Map: • Press the key, and tap > Browse Map. • Tap View Map, and then tap anywhere on the map. 2. Drag to move the map. nüvifone M10 Owner’s Manual 3. -
Page 44: Work With Favorites
Use the Navigation Tools Work with Favorites Save a Location as a Favorite 1. Find the item you want to mark as a favorite. 2. On the Go! page, tap Favorites. Save My Current Location 1. From the Home screen, tap Map. -
Page 45: Navigate A Saved Route
Add Points to a Saved Route 1. Press the key. 2. Tap Tools > Manage My Data Routes. 3. Tap a route. 4. Tap > Edit/Review 5. Tap Add Start Point Point. 6. Select a method to add an intermediate point. 7. -
Page 46: Edit Avoidances
Use the Navigation Tools Simulate a Route If the GPS is off, you can simulate driving a route. 1. Press the key. 2. Tap Settings > Navigation > GPS Status > > GPS. 3. Find a destination and tap Go!. 4. -
Page 47: Work With Tracks
Work with Tracks Record a Track You can record the path you travel (called a “track”) and view it as a dotted line on the map. 1. Press the key. 2. Tap Tools > Manage My Data Tracks. 3. Tap >... -
Page 48: Use Connected Services
Use Connected Services Use Connected Services About Connected Services Use Connected Services to search for location-relevant information such as live weather data, flight status, and photos. You can also access local search using the Internet. Not all services are available in all areas. -
Page 49: Find Local Events
Find Local Events Search for upcoming events, such as art shows and sporting events. This service may be available as a paid Connected Services subscription in your area. A data connection is required for this feature. 1. From the Home screen, tap Connected Services. -
Page 50: Find Parking
Use Connected Services Find Parking This service may be available as a paid Connected Services subscription in your area. A data connection is required for this feature. 1. From the Home screen, tap Points of Interest > Services > Connected 2. -
Page 51: View Geonews
Find by Name 1. From the Home screen, tap Connected Services. 2. Tap White Pages > 3. Enter the last name, and tap Done. 4. Enter the first name (optional), and tap Done. 5. Enter the postal code, if necessary. 6. -
Page 52: Send And Receive Messages
Send Messages Send and Receive Messages Your regular messaging fees apply when sending and receiving messages. Send an SMS/Text Message 1. From the Home screen, tap Text. 2. Tap > > Text 3. Enter a recipient, or tap Recipient to select from your Contacts list. -
Page 53: Create A Voice Mms Message
Create a Voice MMS Message 1. From the Home screen, tap Text. 2. Tap > > Voice 3. Enter a recipient. 4. Tap Record to record the voice message. 5. Tap Stop to stop recording the voice message. 6. Tap Send to send the message. -
Page 54: Read Messages
Send Messages You can also send location messages when you view a contact, when you finish a phone call, or when you find a location. Read Messages A number appears on the Text icon showing the number of unread messages in your inbox. 1. -
Page 55: Set Up An E-Mail Account
Delete Messages 1. From the Home screen, tap Text. 2. Tap a message. > Delete. The message is 3. Tap moved to the Deleted Items folder. To recover a deleted message, move the message back from the Deleted Items folder. To empty the Deleted Items folder, tap tools empty Deleted... -
Page 56: Send An E-Mail Message
Send Messages Send an E-mail Message 1. From the Home screen, tap E-mail. 2. Tap > New. 3. Enter an e-mail address in the To field, or tap > Add Recipient to select from your Contacts list. Separate multiple e-mail addresses with a semicolon (;). -
Page 57: Connect With Friends
Connect with Friends Use Ciao! ™ A data connection is required for this feature. Ciao! is not available in all areas. Ciao! periodically sends your location to our partner networks and downloads the most recent location of your friends. This application only submits your location when you tell it to, unless you enable automatic updates. -
Page 58: Join Ciao
Connect with Friends Join Ciao! Before you join Ciao! for the first time, you must register your device. 1. Press the key. 2. Tap Ciao!. 3. Read and accept the registration information. 4. Tap a type of location update, Manual or Automatic. -
Page 59: View Friends
Update your Status 1. Press the key. 2. Tap Ciao! > My Details Status. 3. Enter a new status message, and tap Done. Send a Location Update 1. Press the key. 2. Tap Ciao! > My Details Update. To change how you update your location information, tap Updates, and select an option. -
Page 60: Remove A Friend
Connect with Friends Remove an Invitation If a friend is marked Invited, you have invited the friend, but the friend has not accepted or declined the invitation. 1. Press the key. 2. Tap Ciao!. 3. Tap an invited friend in the list. 4. -
Page 61: Connect With Friends On Facebook
Connect with Friends on Facebook ™ Facebook is not available in all areas. Before using Facebook, you need to create a Facebook account. Tap and follow the on-screen directions to create an account, if necessary. Sign In to Facebook 1. From the Home screen, tap Facebook. -
Page 62: Use The Browser
Use the Browser Use the Browser Search the Internet 1. From the Home screen, tap Explorer. 2. Tap the tab, if necessary. 3. Enter a search term or a URL, and 4. Tap the Web site you want to open. Look Up a Term in a Wiki Web Site 1. -
Page 63: Adjust The Web Page View
Adjust the Web Page View 1. From the Home screen, tap Explorer. 2. Tap > 3. Tap View. 4. Select a view: • Mobile—display Web pages designed for viewing on mobile devices. • Desktop—display Web pages as they appear when using a desktop computer. -
Page 64: Read The News
Read the News Read the News Use Newstation Newstation delivers breaking news and headline news to your device by retrieving the most current news from various Internet news sources. Your device must be connected to the Internet to use Newstation. Automatically Update Articles 1. -
Page 65: Create A New Category
Create a New Category 1. Press the key. 2. Tap Newstation. Menu Category. 3. Tap > 4. Enter a category name. Add a Channel 1. Press the key. 2. Tap Newstation. 3. Tap a category. 4. Tap Menu > Channel. 5. -
Page 66: Set Up Sms Cell Broadcast
Read the News Set Up SMS Cell Broadcast If SMS Cell Broadcast is supported by your service provider and region, you can receive text messages broadcast to multiple subscribers in the area. 1. Press the key. 2. Tap Settings > Personal 3. -
Page 67: Play Music
Play Music The music player supports the following file types: • MP3 • WMA • AAC/AAC+ • WAV The music library automatically includes all songs you have saved in all of the following locations: • My Documents\My Music • My Storage\My Music •... -
Page 68: Use The Headset To Control Playback
Play Music Use the Headset to Control Playback 1. Plug the headset into the headset jack on top of the phone. 2. From the Home screen, tap > , and play a song. 3. If you are listening to music in the background while you are using another application, press the headset button once to begin... -
Page 69: Take And View Pictures And Videos
Take and View Pictures and Videos Note: Remove the plastic film from the camera lens before using the camera. Take a Picture 1. From the Home screen, tap Camera. 2. Aim the viewfinder. 3. Tap to take a picture. Take a Picture with GPS Information 1. -
Page 70: Change The Camera And Video Settings
Take and View Pictures and Videos Change the Camera and Video Settings 1. From the Home screen, tap Camera. 2. Tap for more options. —adjust the exposure. —adjust the White Balance. Select a setting, such as Sunny or Cloudy, to achieve the color that you want in your photos. -
Page 71: Copy Pictures And Videos To Your Device
• Preview Time—select a length of time to preview the pictures you take prior to saving them. • Recording Format—select a video recording format: MP4, 3GP, or H264. • Recording with Audio—select to record video with or without audio. Save To—select the location •... -
Page 72: View Pictures
Take and View Pictures and Videos View Pictures 1. From the Home screen, tap Gallery. 2. From the slider menu at the top of the screen, select a category, if necessary. 3. Drag vertically to view additional pictures, if necessary. 4. -
Page 73: Play A Video
Play a Video 1. From the Home screen, tap Gallery. 2. From the slider menu at the top of the screen, select a category, if necessary. 3. Tap a video. 4. Tap 5. Tap the screen to view the video controls. -
Page 74: Change Media Gallery Settings
Take and View Pictures and Videos Change Media Gallery Settings 1. Press the key. 2. Tap Settings > Applications Media Gallery. 3. Select an item to change. Play a Video Stream 1. Press the key. 2. Tap Streaming Player Connect with tracking history 3. - Page 75 MPEG-4 EULA This product is licensed under the MPEG-4 Visual Patent Portfolio License for the personal and non- commercial use of a consumer for (i) encoding video in compliance with the MPEG-4 visual standard (“MPEG- 4 Video”) and/or (ii) decoding MPEG-4 video that was encoded by a consumer engaged in a personal and non-commercial activity and/or...
-
Page 76: Organize Your Life
Organize Your Life Organize Your Life Synchronize your phone with your computer to keep your task list and calendar up-to-date in both locations. Use the Calendar Use the calendar to schedule appointments. If you use Microsoft Office Outlook on your computer, ®... -
Page 77: Check Flight Status
Navigate to an Appointment You can create a route to an appointment in your calendar. 1. From your calendar, tap an appointment. 2. Tap Menu > Location 3. Select an option to find the appointment location. 4. Tap the location. 5. -
Page 78: Check The Weather
Organize Your Life Check the Weather A data connection is required for this feature. 1. Press the key. 2. Tap Weather. Weather data for your current location appears. 3. Select an option: • To view details, tap a day. • To show weather for a different location, tap >... -
Page 79: Use Tasks
Use Tasks The task list is your “things to do” list. If you use Microsoft Office Outlook on your computer, you can synchronize tasks between your phone and computer. See page Create a Task 1. Press the key. 2. Tap Tasks >... -
Page 80: Add A World Clock
Organize Your Life Edit an Alarm 1. Press the key. 2. Tap Clock > 3. Tap next to the alarm you want to edit. 4. Edit the alarm as needed. 5. Tap Done to save the changes. Delete an Alarm 1. -
Page 81: Use The Count-Down Timer
Use the Count-down Timer 1. Press the key. 2. Tap Clock > 3. Tap the arrows to set the timer. 4. Tap Ringtone, select a ringtone, and tap NOTE: You must have the system volume turned on to hear the timer ringtone. -
Page 82: Use The Calculator
Organize Your Life Use the Calculator 1. Press the key. 2. Tap Calculator. 3. Tap the calculator to perform the calculation. Type a Note 1. Press the key. 2. Tap Notes > > 3. Use the keyboard to type your note. 4. -
Page 83: Download Applications
Download Applications Use the Windows Marketplace to ® download and install applications. 1. Press the key. 2. Tap Marketplace. 3. Follow the on-screen instructions. Access Your nüvifone Data Using Your Computer 1. Press the key. 2. Tap Microsoft My Phone. 3. -
Page 84: Backup And Restore Files
Organize Your Life Backup and Restore Files Notice Some system functions may be suspended or terminated during the backup process or the restore process. When finished, restart your device to revive suspended functions. Backup Note: If you enter a password when you create the backup file, you will need the password to restore the backup file. -
Page 85: Synchronize Your Nüvifone
Synchronize Your nüvifone You can synchronize contents and transfer data between your device and your computer using Microsoft ActiveSync on Windows XP operating systems. During synchronization, ActiveSync compares the data in your device with the data in your computer or Exchange Server, and updates all data with recent changes. -
Page 86: Synchronize Using The Usb Cable
Synchronize Your nüvifone Synchronize Using the USB Cable 1. Install ActiveSync on your computer. 2. Connect the micro-USB plug to the micro-USB connector on the side of the device. 3. Connect the other end of the USB cable to your computer. 4. -
Page 87: Enable The Usb Connection Mode Page
Enable the USB Connection Mode Page The USB Connection Mode page allows you to select a USB connection mode when you connect your device to your computer using a USB cable. 1. Press the key. 2. Tap Settings > Connections Setting. -
Page 88: Synchronize With An Exchange Server
Synchronize Your nüvifone Synchronize with an Exchange Server ActiveSync can also synchronize over a wireless or mobile network with Microsoft Exchange Server, which allows you to sync your e-mail messages. Your mobile phone service or company must be running Microsoft Exchange Server with Exchange ActiveSync. -
Page 89: Connect With Other Devices
Connect with Other Devices About Bluetooth Bluetooth wireless technology establishes a wireless connection between devices, such as a computer with Bluetooth technology and the nüvifone. To pair and connect, both devices must be turned on and be within 10 meters of each other. With Bluetooth enabled in your device, you can synchronize, transfer files, and share services. - Page 90 Connect with Other Devices Add a Bluetooth Device The first time you use two devices together, you must “pair” them by establishing a relationship using a PIN/passkey. 1. Enable the Bluetooth component and Find Me/Discoverable/Visible mode on the device to which you are connecting.
-
Page 91: Use Internet Sharing
Send Files You can send files to another device using Bluetooth wireless technology. 1. Pair and connect the nüvifone with the device you want to exchange files with. 2. Press the key. 3. Tap File Explorer. 4. Select the file, and tap Beam File. -
Page 92: Manage Wireless Connections
Connect with Other Devices Manage Wireless Connections 1. Press the key. 2. Tap Settings > Wireless Wireless Manager shows the connection status of your device. 3. Tap an option to enable or disable it. The icon is yellow when enabled. Change Connection Settings 1. -
Page 93: Set Up A Wi-Fi Connection
Set Up a Wi-Fi Connection 1. Press the key. 2. Tap Settings > Wireless Manager > Wi-Fi. 3. Move to a Wi-Fi hot spot. Enable Wi-Fi Sharing With Wi-Fi Sharing on, you can share your network connection with others, making your device a Wi-Fi router. 1. -
Page 94: Customize Your Nüvifone
Customize Your nüvifone Customize Your nüvifone Adjust the Screen Settings Adjust the Brightness 1. Press the key. 2. Tap Settings > System Brightness. 3. Adjust the brightness for when the device is running on battery power and on external power. Adjust the Backlight Timeout 1. -
Page 95: Access The System Volume
Adjust the Color Mode 1. Press the key. 2. Tap Settings > Navigation Mode. 3. Select (light background), Night (dark background), or Auto. Access the System Volume You can change the sound levels for customized profiles, ring tones, ring types, system events, notifications, screen taps, and hardware buttons. -
Page 96: Customize The Phone Settings
Customize Your nüvifone Edit the Home Screen Shortcuts You can include up to 45 shortcuts on the Home screen. 1. Touch and drag any icon in the middle section of the Home screen for two seconds. 2. Drag an icon to a new location or to the trash can. - Page 97 Change the Advanced Sound Settings 1. Press the key. 2. Tap Settings > Sound Advanced. 3. From the slider menu at the top of the screen, select Sounds. 4. Select the events for which you want to enable sounds. 5. Tap OK. Change Notifications You can assign sounds and notification messages to certain events, such as...
-
Page 98: Adjust Your Regional Settings
Customize Your nüvifone 5. Select how long the device will wait before answering the call. 6. Tap OK. Activate Connection Alert 1. Press the key. 2. Tap Settings > Personal 3. From the slider menu at the top of the screen, select Call 4. -
Page 99: Lock The Phone With A Password
Lock the Phone with a Password 1. Press the key. 2. Tap Settings > Personal 3. Select the check box next to Prompt if phone unused select the length of time. 4. Select a Password Type. 5. Enter the password and enter it again to confirm. -
Page 100: Configure Your Phone Network Profile
Customize Your nüvifone Configure Your Phone Network Profile If the network settings for your phone service provider are not detected when you install the SIM card, you can select the network. GPRS, WAP, and MMS settings are also configured by the Network Setting. -
Page 101: Adjust The Navigation Settings
Adjust the Navigation Settings Adjust the Map Settings 1. Press the key. 2. Tap Settings > Navigation 3. Tap a setting to adjust it. • Detail—adjust the amount of detail shown on the map. Showing more detail may cause the map to redraw slower. •... - Page 102 Customize Your nüvifone • Off–Route Recalculation— select how the nüvifone notifies you when you are off your route. • Route Preference—select a preference for calculating your route. • Turn Preview—select to show a brief preview of upcoming turns. Avoidance Setup—select the •...
- Page 103 Change the Location Format and Map Datum 1. Press the key. 2. Tap> Settings > Navigation General. 3. Tap a setting to adjust it. • Location Format—select a format for the coordinates that matches your paper map. Select User UTM Grid to enter the coordinate information.
-
Page 104: Change The Gps Settings
Customize Your nüvifone Change the GPS Settings 1. Press the key. 2. Tap Settings > Navigation 3. Tap a setting to adjust it. • Auto Update—select how the nüvifone automatically updates the GPS information. • Update When Sync—select whether the nüvifone automatically updates the GPS information when you sync the nüvifone to your computer. -
Page 105: Remove Programs
Turn Safe Mode On and Off 1. Press the key. 2. Tap Settings > Navigation General > Safe Mode. 3. Tap Enabled to turn on safe mode. When your vehicle is moving, safe mode disables all functions that require significant operator attention and could become a distraction while driving. -
Page 106: Restore The Default Settings
Customize Your nüvifone View Navigation Information View the navigation software version and the software unit ID. 1. Press the key. 2. Tap Settings > Navigation About. View System Information View Microsoft system information. 1. Press the key. 2. Tap Settings >... -
Page 107: Appendix
Appendix Reset the nüvifone If the nüvifone stops functioning, turn off the nüvifone, and then turn on the nüvifone. If this does not help, remove the battery cover. Using the stylus, press the Reset button (see page nüvifone should restart and operate normally. -
Page 108: Change The Fuse In The Vehicle Power Cable
Appendix tIP: To avoid losing your customized settings, replace the battery within five minutes of removing it from your device. Contact your local waste disposal department for information on properly disposing of the battery and the device. Change the Fuse in the Vehicle Power Cable Notice When replacing the fuse, do not lose... -
Page 109: Mount On Your Dashboard
Mount on Your Dashboard A mounting disk is included in some nüvifone packages. Use the mounting disk to mount your device to the dashboard and to comply with certain state and local regulations. Never mount the device in a location that obstructs the driver’s view of the road. -
Page 110: Care For Your Device
Appendix Care for Your Device • Avoid dropping your device and operating it in high-shock and high- vibration environments. • Do not expose the device to water. Contact with water can cause this device to malfunction. • Do not store the device where prolonged exposure to extreme temperatures can occur, because it can cause permanent damage. - Page 111 AC Charger operating temperature Range: from 32°F to 122°F (from 0°C to 50°C) Power/PC Connector: micro-USB Headphone Connector: 3.5 mm Battery type: HiTech rechargeable, user-replaceable, SBP-23 lithium-ion battery (1500 mA) Standby time: 300 to 600 hours* talk time: 4 to 8 hours* * Depending on network environment and phone usage.
-
Page 112: Important Safety And Product Information
Important Safety and Product Information Important Safety and Product Information For updates to the safety and product information, see the most recent owner’s manual at www.garminasus.com/M10. WARNING Failure to avoid the following potentially hazardous situations could result in an accident or collision resulting in death or serious injury. - Page 113 and always be fully aware of all driving conditions. Minimize the amount of time spent viewing the device screen while driving, and use voice prompts when possible. • Do not send text messages, input destinations, change settings, or access any functions requiring prolonged use of the device controls while driving.
- Page 114 Important Safety and Product Information box. • Do not puncture or incinerate the device or battery. • When storing the device for an extended time, store within the following temperature range: from -4°F to 158°F (from -20°C to 70°C). • Do not operate the device outside of the following temperature range: from 5°F to 104°F (from -15°C to 40°C).
- Page 115 information is either not available or is prohibitively expensive. Avoid Hearing Damage You can permanently damage your ears and lose hearing if you listen to the device, earbuds, or headphones at high volume. The volume is typically too loud if you cannot hear people speaking around you.
-
Page 116: Radio Frequency Exposure
Important Safety and Product Information Pacemakers and Other Medical Devices Studies have shown that there may be a potential interaction between mobile devices and normal pacemaker operation. The pacemaker industry recommends that people with pacemakers follow these guidelines to minimize any risk of interference with pacemaker operation: •... - Page 117 worn operation, this phone has been tested and meets the FCC RF exposure guidelines for use with an accessory that contains no metal and the positions the handset a minimum of 1.5 cm from the body. Use of other accessories may not ensure compliance with FCC RF exposure guidelines.
-
Page 118: Fcc Compliance
Important Safety and Product Information Declaration of Conformity Hereby, Garmin, declares that this product is in compliance with the essential requirements and other relevant provisions of Directive 1999/5/EC. To view the full Declaration of Conformity, go to www.garminasus.com/declaration -of-conformity. Equipment Use This device is for use worldwide, including the following countries: FCC Compliance... - Page 119 this equipment does cause harmful interference to radio or television reception, which can be determined by turning the equipment off and on, the user is encouraged to try to correct the interference by one of the following measures: • Reorient or relocate the receiving antenna.
-
Page 120: Troubleshooting
Troubleshoot Issues Issue Press the Device will not Make sure the GPS has enough time to initialize. When the acquire satellite GPS is turned on for the first time, it may take a few minutes signals. to initialize. If you have traveled more than 600 miles with the GPS receiver turned off, set your location on the map. -
Page 121: Index
Index Symbols 2D map view ActiveSync Bluetooth technology install additional maps address Adobe PDF alarms align the screen appointment make navigate to save local event as save movie time as view audio settings auto zoom map avoid edit custom avoidances nüvifone M10 Owner’s Manual road types specific areas... - Page 122 Index favorites navigate to convert currency coordinates cradle currency, convert custom POIs settings default camera input mode restore all settings delete all settings and favorites all user data call history Favorites message picture video detour device information digital elevation map e-mail emergency assistance End key...
- Page 123 icons Internet share connection with computer intersections, find JPEG junction view keyboard lithium-ion battery 105, local events local search location-based service location format location information change update method send updates location messages lock the phone 15, nüvifone M10 Owner’s Manual make a phone call additional browse 32,...
- Page 124 Index phone 20–24 receive a call settings 94–104 sound settings picture effects file types quality take view play music position icon Power key PowerPoint profile proximity points settings recalculate route register i, remove the mount reply to message reset maximum speed odometer trip computer resolution, photo...
- Page 125 address by category change the search area favorites location options near a different city near a different location near your route points of interest spell name send e-mail file found location text your location Send key settings audio Connected Services phone 94–104 route...
- Page 126 Index USB cable 10, 83, 84, USB Connection Mode user data, delete vehicle icon vehicle type vibrate 15, vibrate ringer video file types play play a stream play stream record 67, 67–73 voice mail voice note voice prompt volume Volume keys wallpaper weather 76–82...
- Page 128 For the latest free software updates (excluding map data) throughout the life of your nüvifone, visit www.garminasus.com. July 2010 Part Number 190-01153-00 Rev. C Printed in China...
Need help?
Do you have a question about the NUVIFONE M10 and is the answer not in the manual?
Questions and answers