Table of Contents
Advertisement
Advertisement
Table of Contents

Subscribe to Our Youtube Channel
Related Manuals for E-Lux Sierra Classic


Summary of Contents for E-Lux Sierra Classic
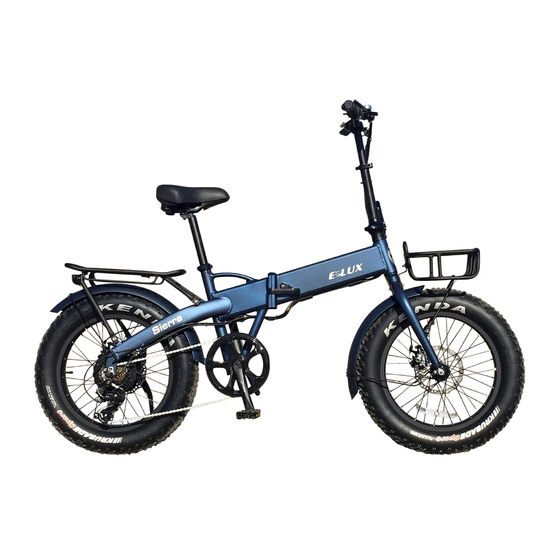
- Page 3 Sierra-GT Folding Bike Owner’s Manual www.EluxBikes.com...
- Page 4 Dear New E-Lux Owner, Thank you so much for purchasing your new E-Lux Sierra GT we welcome you to a world of new possibilities! With your new electric bike you will be able ride farther, faster and easier than ever before on a bicycle which equates to Fun, Fun and more Fun! All while travelling for less than half a cent a mile - it’s not only good for your wallet but it’s good...
-
Page 5: Table Of Contents
Appearance and Care ................31 Commonly Asked Questions ..............31 Technical Assistance ................32 Important! Read Before Riding! .............. 33 One Year Limited Warranty (Battery Three Years) ......... 34 Recording Your E-Lux Bike Information ..........38 P a g e... -
Page 6: Carton/Box Contents
E-Lux. Assembly E-Lux suggests taking your electric bike to a professional bike technician for assembly. This can be done for a nominal fee at your local bike shop. If you are comfortable assembling it on your own then please refer to the directions below. - Page 7 1. Remove the packing and tape from around bicycle. 2. Carefully cut the zip ties holding the handlebars to the frame. 3. Place bike upright on wheels and kickstand. 4. Apply a small amount of grease inside of the gooseneck tube as well as the threads and slider on stem of gooseneck.
- Page 8 7. CAUTION – When installing pedals there are two separate pedals for the left and right sides of the bike. They have different thread patterns and it is important to be sure each is installed on the correct side of the bike to avoid stripping the threads.
- Page 9 10. LEFT PEDAL – Facing the bike from the kickstand side, place remaining pedal on the kickstand side of bike and tighten by turning counter clockwise (top of wrench turning towards the front of bike as noted in the picture below.) Tighten pedal very tight.
-
Page 10: Understanding The Display And Display Settings
Understanding the Display and Display Settings To power the bike on tap the power button. To backlight display and turn on front and rear lights, tap the power button a second time. P a g e... - Page 11 The following pictures describe the data on the display: (change images below: remove back, also speed, not mph, bike power level, pedal assist level, battery voltage P a g e...
- Page 12 Briefly pressing the set button will alter the data displayed at the bottom of the screen from trip to time riding and then finally to odometer. Tap the set button to change indicator from odometer to trip 1, trip 2 and time riding.
- Page 13 The USB port is located on the bottom of power display. Remove the rubber cover and insert USB cord. It works automatically. Caution large modern phones can draw more power than the USB can put out. Only use it for lights or other lower-powered devices. There are two indicators for power.
- Page 14 Holding the set key down for 4 seconds, (then release button) will place the display into the first of 5 setting modes. Use the plus and minus keys to adjust the settings in each mode. Briefly pressing the set key again will cycle to the next setting mode. Please do not adjust settings while riding.
- Page 15 Set Mode 1 – Allows you to reset the trip odometer by briefly pressing minus key. Set Mode 2 – Indicates bike top speed. You can limit the top speed here. Set to 62 to open bike up for top speed. Set Mode 3 –...
- Page 16 Hold set button down for 5 seconds to return to the home screen. This also turns the headlight off. P a g e...
- Page 17 In operating mode the volt indicator will display 53.5 volts when the battery is fully charged. At 42 volts you will almost be out of power. 15 | P a g e...
-
Page 18: Folding Your Sierra
Folding Your Sierra Your new E-Lux Sierra has three folding features that minimize the space required to store and travel with your bike. The body folds in half, the pedals fold in and the handlebars fold down. Below are instructions and pictures for each of the three folds. - Page 19 2. To fold the Sierra body, lift the safety lever above the latch and then pull the latch out (towards you). Now the body of the bike is ready to fold. The bike folds in half as pictured below as pictured below. 17 | P a g e...
- Page 20 3. To fold the handlebars, pull the safety latch down and gently pull the handlebars down to the right side of the bike. P a g e...
-
Page 21: Battery Care And Charging
Battery Care and Charging Your E-Lux Bike comes with a 48 Volt 10.5 amp hour lithium battery and charger. Please be aware of the following: 1. Only use the charger provided with your battery. Using a different charger may result in overheating, fire or an explosion damaging your battery and everything around it. - Page 22 4. To charge the battery plug the charger into the wall outlet first and then into the port located on the side of the battery. 5. Continue charging until the red light turns green indicating a full charge or the display shows the battery is full. (Approx. 4-8hours.) P a g e...
-
Page 23: Battery Removal
6. To avoid shortening its lifespan, always recharge your battery before becomes completely discharged. Completely discharging the battery reduces the number of recharge cycles and reduces it’s capacity. It can also ruin the battery. It is ok to charge the battery after every ride. 7. - Page 24 After the battery is unlocked, simply pull the battery out using the silver removal latch. P a g e...
-
Page 25: Battery Life
After much use its charge holding capacity will decrease and eventually not hold enough charge even for shorter trips. At this point you should contact E-Lux Bikes or your dealer to order a new battery. Battery Trouble Shooting 1. -
Page 26: Before Your First Ride
Before Your First Ride…. There are a few things you will need to know before your first ride. Follow these quick steps and you will be on the road in no time…. 1. ADJUST THE SEAT – Pull the seat clamp handle out from the seat post to release pressure allowing you to raise or lower the seat. - Page 27 4. UNDERSTAND THE POWER/THROTTLE CONTROL – Your E-Lux bike can be used in 3 modes. Pedal only, throttle only and pedal assist. You can use the power button on the top left of the display to turn on and off the power to the bike.
- Page 28 “+” and “-“ keys to adjust the PAS level. As you pedal the motor will assist you as you ride. E-Lux suggests starting at a lower setting of 1 – 3 until you are used to this feature. Reminder: touch the brakes to shut off power.
-
Page 29: Stopping The Motor
Stopping the Motor A. The left and right brake levers have a built-in feature that will stop the electric motor any time they are squeezed. B. In throttle only mode releasing the throttle will stop the motor as well. C. While in pedal assist mode stop pedaling and release the throttle or squeeze the brake handle to stop the motor. -
Page 30: Brakes
Setting 5 – 20 mph Brakes Your E-Lux Bike is equipped with front and rear disc brakes. 1. Pulling the left brake lever in will apply brakes to the front wheel. Pulling the right lever in will apply brakes to the rear wheel. -
Page 31: Gears
Gears Your E-Lux bike is equipped with a 7 speed Shimano Gear System. The shifter is located on the right-hand side of the handlebars. Lower gear numbers are used for climbing hills and slower speeds. Upper gears are used for flatter surfaces and faster speeds. Be sure you are pedaling while changing gears. -
Page 32: Tires
Repairing the Rear Tire Your E-Lux Electric Bike has a powerful electric motor that is located in the rear hub of the bicycle. If removal of the rear tire is necessary you must first disconnect the power cable that runs to the hub. -
Page 33: Appearance And Care
3. Avoid storing your E-Lux Bike in direct sunlight as well as areas that are damp or wet. Commonly Asked Questions Do I need a driver’s license to ride my E-Lux Bike? No because it is considered a bicycle. Federal and most State laws require that you wear a helmet. -
Page 34: Technical Assistance
What is the cost per mile to ride my E-Lux Bike? – Using the averages above it costs about a half a penny per mile! That works out to about 1200 MPG! All while reducing your carbon foot print every time... -
Page 35: Important! Read Before Riding
2. Always wear a helmet. 3. E-Lux bikes are designed for one passenger only. Do not operate bicycle with more than one passenger on board. 4. Do not open the battery or battery charger. If you notice anything unusual while charging please unplug the charger and contact E-Lux. -
Page 36: One Year Limited Warranty (Battery Three Years)
One Year Limited Warranty (Battery Three Years) E-LUX, LLC (“E-LUX”) warrants that all new E-LUX Electric Bikes (“Bicycle”) and components therein are warranted to the original retail purchaser (“Purchaser”) against manufacturing defects in materials and/or workmanship for a period of one (1) year from the date of original retail purchase. - Page 37 (or its designee) to repair the Bicycle, or if Purchaser uses a replacement part not authorized by E-LUX, E-LUX will not be liable for any damage, failure or loss caused by the use of such unauthorized service or parts. If the purchaser has a valid warranty claim as set forth in the Procedures and Terms and Conditions (the “PTC”), this limited warranty includes...
- Page 38 E-LUX or its authorized agents. All warranties are void if the Bicycle is used for any purpose other than the reasonable intended use of the Bicycle.
- Page 39 Procedures: Warranty work must be performed by E-LUX or an authorized agent of E-LUX. Proof of purchase must be provided. The original retail Purchaser must contact an E-LUX representative or the authorized agent from whom the Bicycle was purchased. If E-LUX or the authorized...
-
Page 40: Recording Your E-Lux Bike Information
Recording Your E-Lux Bike Information Model: E-Lux Sierra Classic or Sierra GT Serial Number: ____________________________________ Color: ___________________________________________ Date of Purchase:__________________________________ Dealer’s Name:____________________________________ Dealer’s Ph#:_____________________________________ Dealer’s Email:____________________________________ P a g e... - Page 41 Notes: 39 | P a g e...
Need help?
Do you have a question about the Sierra Classic and is the answer not in the manual?
Questions and answers