Table of Contents
Advertisement
Quick Links
EZ-GUIDE
SYSTEM QUICk REFERENCE CARD
Connecting the System
To power
Power cable
(P/N 65168)
Turning the Lightbar On and Off
To turn on the EZ-Guide 250 lightbar, press the function button.
To turn off the lightbar, press and hold the function button. A 5 second countdown appears
onscreen. If you stop holding the button during the countdown, the shutdown aborts.
C
WarNiNG:
Verify that the power connection is reliable. if the lightbar loses power
unexpectedly, data loss may occur. The most reliable connection method is directly to the battery.
To avoid data loss, always use the Off button
options, please contact your local reseller.
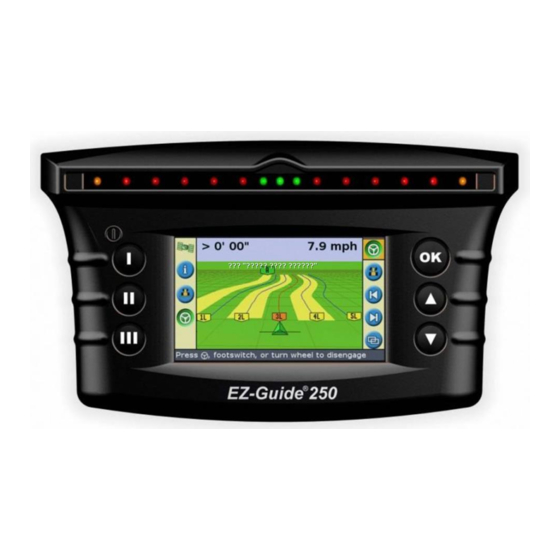
Lightbar Layout
Function
buttons
C
WarNiNG:
Keep the lightbar dry. Moisture may cause electrical damage and will
void the warranty.
250 LIGHTBAR GUIDANCE
®
EZ-Guide
®
250 lightbar
to turn off the lightbar. For alternate cabling
Tip bar
Vehicle icon
Swath lines
Patch antenna
(P/N 56237-91)
Offline guidance
LEDs
Action buttons
Coverage logging
and overlap
Advertisement
Table of Contents

Related Manuals for EZ-Guide 250


Summary of Contents for EZ-Guide 250
- Page 1 EZ-GUIDE 250 LIGHTBAR GUIDANCE ® SYSTEM QUICk REFERENCE CARD Connecting the System EZ-Guide ® 250 lightbar To power Patch antenna (P/N 56237-91) Power cable (P/N 65168) Turning the Lightbar On and Off To turn on the EZ-Guide 250 lightbar, press the function button. To turn off the lightbar, press and hold the function button. A 5 second countdown appears onscreen. If you stop holding the button during the countdown, the shutdown aborts. WarNiNG: Verify that the power connection is reliable. if the lightbar loses power unexpectedly, data loss may occur.
- Page 2 System Icons Function (left side) Action (right side) Field (right side) Icon Description Icon Description Icon Description Display information tabs Reset guidance Set Point A and set Point B Nudge guidance line left Display built-in help Start and finish headland and right Turn on or off coverage Shift to here...
- Page 3 Guidance Patterns AB Line Map a straight AB line for guidance. Set the A point at the start of the line and the B point at the end. Set the A point to create the line. The heading of the AB Line equals the manually entered heading (defaults to previous AB heading).
- Page 4 Curves There are two types of curves: Identical and Adaptive. Adaptive curves With identical curves, guidance is based on the initial curve. Any deviations are ignored. Set the A point, drive the curve, and then set the B point. With adaptive curves, guidance is always based on the last pass.
- Page 5 Map Screens Plan View Perspective View By default, the view automatically switches to the perspective view when you enter a field. To set the view so it switches when you engage an autosteering system or for manual view control, in Advanced mode select Configuration / System / Display / View. Mapping To configure mapping options, including warning To enter mapping mode, select the icon zone distance, recording position, deleting and press OK. Mapping is only available in features, select Configuration / Mapping.
- Page 6 • change settings when you move the lightbar between vehicles for different applications To save, load or delete a system configuration, select Configuration / Data Management / Save/Load Configurations. For more information, refer to the EZ-Guide 250 Lightbar Product CD. © 2007–2009. Trimble Navigation Limited. All rights reserved. Trimble, Ag GPS EZ Boom, EZ-Guide, and EZ-Steer are trademarks of *92020-82* Trimble Navigation Limited, registered in the United States and in other countries.
Need help?
Do you have a question about the 250 and is the answer not in the manual?
Questions and answers