Table of Contents
Advertisement
Advertisement
Table of Contents

Related Manuals for Sonicware LIVEN BASS&BEATS


Summary of Contents for Sonicware LIVEN BASS&BEATS
- Page 1 User's Manual LVN-030-UM-01-EN...
- Page 2 SONICWARE will bear no responsibility for any errors depicted in this docu- ment. SONICWARE will bear no responsibility for any losses resulting from the use of this information, functions or per- formance, regardless of contracts, lack of caution or other conduct.
- Page 3 Remove the batteries when they will not be used for a long time. If a leak occurs, thoroughly wipe the battery compartment and battery terminals to remove the leaked fluid. • Do not open the case and disassemble or modify the product. •...
-
Page 4: Table Of Contents
Contents Setting the ducking function ……………………………………………………17 Preparing to play ……………………………………………………………………… 6 Names of parts ……………………………………………………………………… 6 Turning the effect on/off …………………………………………………………17 Names of parts Setting the effect type ……………………………………………………………17 (When the drum track is selected / during drum kit editing) …………… 6 Changing the effect amount ………………………………………………………18 Connecting ……………………………………………………………………………... - Page 5 Contents Changing and checking the assigned parameters …………………………34 Importing wavetable waveforms …………………………………………………35 Exporting wavetable waveforms …………………………………………………35 Editing drum kits …………………………………………………………………… 36 Drum kit editing panel overlay ……………………………………………………36 Activating drum kit editing mode ………………………………………………36 Drum kit editing procedures ………………………………………………………36 Clearing kits ……………………………………………………………………………37 Copying kits ……………………………………………………………………………37 Selecting instrument sounds ……………………………………………………37 Setting the pitches of instruments ……………………………………………37...
-
Page 6: Preparing To Play
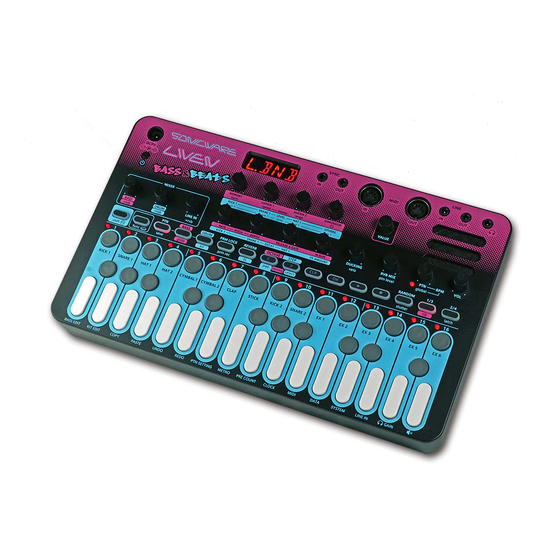
Preparing to play Names of parts DC9V Display SYNC SYNC MIDI MIDI LINE LINE Headphone POWER switch jack jack SYNC SYNC LINE LINE MIDI MIDI DC9V Speaker MEMORY ASSIGN 1 ASSIGN 2 DIMENSION VALUE VALUE bank speed sweep range KICK SNARE LEVEL OTHERS... -
Page 7: Preparing For Startup
Preparing to play Preparing for startup ① Connect an AC adapter that conforms to the speci- • If a parameter being shown is the same as the orig- fications (9V output, 1 A or more, EIAJ-03 standard, inal, a dot will appear at the bottom right of the dis- 1.7mm inner diameter, 4.75mm outer diameter, cen- play. -
Page 8: Common Operations For Bass And Drums
Common operations for bass and drums This section explains basic operations. • This changes it in a range of 0–100%. Adjusting the overall volume Changing the track swing amount ① Turn the VOL knob. ① While pressing , press PTN BASS or DRUM and select SWNG. -
Page 9: Copying Tracks
Common operations for bass and drums 5. All ASSIGN settings 6. Machine gun 7. All LFO settings 8. RELEASE & GATE 9. DIMENSION • The following parameter changes of the drum track will be cleared. 1. All level settings 2. All time settings 3. -
Page 10: Bass Track Settings
Bass track settings This section explains bass track sound settings. • The parameter is shown on the display. • The adjustment range is 0–127. Selecting the bass track • See "Assigning modulator outputs to parameters" ① Press on p.33 for details about parameter assignment. The first 16 steps of the bass track sequence are shown by the step LEDs. -
Page 11: Changing The Sweep Speed
Bass track settings mode, overlapping notes are not retriggered. • When the drum track is selected, the button • The sweep amount is shown on the display. will light green when set to MONO or orange when • The sweep amount can be set to 1–11 semitones set to LEGATO. -
Page 12: Changing Note Playback Probability
Bass track settings Changing note playback probability ① While pressing , turn the knob to set the probability. • The probability is shown on the display. • The adjustment range is 25–100. • This changes it in a range of 25–100%. •... -
Page 13: Drum Track Settings
Drum track settings Adjusting instrument pitches This section explains drum track sound settings. ① While pressing , turn the tune kick 1, snare 1, hat 1, hat 2, ex 1, ex 2, ex 3 and ex 4 knobs to adjust their pitches. Selecting the drum track ①... -
Page 14: Changing The Drum Track Length
Drum track settings Changing the drum track length ① While pressing , press PTN DRUM, and select LEN. ② Turn the VALUE knob to change the length. • The length (in number of steps) is shown on the dis- play. •... -
Page 15: Pattern Playback And Settings
Pattern playback and settings This section explains pattern playback and settings. • The pattern number is shown on the display. • If a pattern is selected during playback, the se- quencer will complete playing the current pattern before switching to the new pattern. Pattern playback ①... -
Page 16: Looping Chain Playback
Pattern playback and settings • Stutter mode cannot be used during chain playback. to activate stutter playback. (Random mode can be used.) • RANDOM mode: The sequence will be played back Looping chain playback in a random order according to the RND STEP set- ①... -
Page 17: Setting The Bpm Mode
Pattern playback and settings will blink in time with the set tempo. ② Select ON or OFF. • When the tempo is shown on the display, the VALUE knob can be turned to change it in 0.1-beat increments. • ON or OFF will appear on the display. Setting the BPM mode Setting the ducking function ①... -
Page 18: Changing The Effect Amount
Pattern playback and settings Insert effects: I.DLY, CRSH, DIST, LPF, HPF, ISO, selection. TLT.F ③ Press Send effects: CHRS, FLNG, S.DLY, HALL, ROOM, ④ Input the name. M.RVB • Use to move the input position left and Changing the effect amount right. - Page 19 Pattern playback and settings Examples of synchronization connections with exter- MIDI/SYNC synchronization of nal devices e x t e r n a l d e v i c e u s i n g L I V E N Example 1: External device synchronizes with LIVEN BASS&BEATS clock as master BASS&BEATS acting as master (Example 1)
-
Page 20: Sequencer
Sequencer This section explains how to input sequences and make • When SOUND LOCK is active, playing keyboard settings for them. keys will overwrite notes on steps. (See "Locking played bass sounds to steps (sound locking)" on p.23) • Notes cannot be tied from the last page to the first Bass step recording page. -
Page 21: Drum Step Recording (Pad Mode)
Sequencer • COPY will appear on the display. Drum step recording (pad mode) ④ Select the step you want to paste. ① Select the drum track and enable pad mode. ⑤ While pressing , press PASTE. ② Press (lights red). Step LEDs light for step with input notes. -
Page 22: Directly Inputting Bass Notes On Steps
Sequencer desired input times. ③ When the drum track is selected, instruments will ③ Press and hold the button for the step that you want sound as they are played. to add a note to. ④ Play a note on the keyboard. •... -
Page 23: Recording Bass And Drum Parameter Operations In Real Time
Sequencer ② Press (lights green). ⑤ Play the keyboard to record the note and parameter lock data for the current sound. ③ Press the pad button for the instrument you want to record. ④ Use to select the page. • Locking works the same way when step recording. •... -
Page 24: Clearing Parameter Locks
Sequencer The key lights green when on and orange • When recording instruments ( lit red), only notes when both parameter and sound locking are on. When will be cleared. neither are on, it is unlit. • When recording parameters ( lit red), only When parameter locking is on, parameters will be parameter data will be cleared. -
Page 25: Editing Bass Patch Memory Parameters
Editing bass patch memory parameters Bass patch memory editing panel overlay Module buttons Page button Noise Filter module module module module module This section explains how to edit bass patch memory pa- ③ Turn the VALUE knob to select the patch memory. rameters. -
Page 26: Clearing Patch Memories
Editing bass patch memory parameters lected by pressing a step button. • When is pressed, the bank name is shown • The save location can also be selected by pressing on the display for two seconds. a step button. • The volume-type VALUE knob can also be turned •... -
Page 27: Changing Oscillator Pitches
Editing bass patch memory parameters ④ Turn the VALUE knob to set the position. ed into 128 equal parts.) • Both the encoder-type and volume-type VALUE knobs can be used. • The position will appear on the display. • The adjustment range is 0–127. Setting oscillator levels •... -
Page 28: Setting Oscillator Shaper Types
Editing bass patch memory parameters 3. POST FILTER (PST.F on display) • Both the encoder-type and volume-type Adjusting oscillator shapers VALUE knobs can be used. ① Press the button for the oscillator that will have its oscillator adjusted. ② Press , and select page 2. -
Page 29: Setting Oscillator Unison Detuning
Editing bass patch memory parameters Setting oscillator unison detuning Setting the unison width ① Press the button for the oscillator that will have uni- ① Turn the DIMENSION knobs for OSC 1 and OSC 2. son detuning adjusted. ② Press , and select page 2. -
Page 30: Setting The Filter Type
Editing bass patch memory parameters ④ Turn the VALUE knob to set the frequency. • The setting value is shown on the display. • The parameter is shown on the display. ③ Turn the VALUE knob to set the level. •... -
Page 31: Selecting Lfo Shapes
Editing bass patch memory parameters Selecting LFO shapes ① Press the button for an LFO to choose it for shape • The setting value is shown on the display. selection. ② Press , and select PAGE 1. The PAGE LED will become unlit. ④... -
Page 32: Synchronizing Lfos With The Bpm
Editing bass patch memory parameters Setting starting phases of LFOs ④ Turn the VALUE knob to set the delay time. ① Press the button for an LFO to choose it for starting phase setting. ② Press , and select page 2. •... -
Page 33: Setting Envelope Curves
Editing bass patch memory parameters Setting envelope curves Setting envelope starting delay times ① Press the button for an envelope to choose it for ① Press the button for an envelope to choose it for de- curve setting. lay time setting. ②... -
Page 34: Changing The Memory Level
Editing bass patch memory parameters Changing and checking the voice mode ① While pressing , press to select the voice • The connected value is shown on the display. mode. • "----" appears for parameters that cannot be connect- • The parameters that cannot be connected are OSC OUTPUT →... -
Page 35: Importing Wavetable Waveforms
Editing bass patch memory parameters Importing wavetable waveforms ① Use a MIDI cable to connect the MIDI IN with a MIDI device or another LIVEN Bass&Beats MIDI OUT. ② While pressing , press to select WT.IM. ③ Turn the VALUE knob to select the destination for saving the imported wavetable waveforms, and press ④... -
Page 36: Editing Drum Kits
Editing drum kits Drum kit editing panel overlay Group buttons Instrument buttons This section explains how to create and edit drum kits. ④ Press to enable kit editing. Use the included drum kit editing panel overlay when ed- iting. Drum kit editing procedures This chapter starts by explaining how to activate drum ①... -
Page 37: Clearing Kits
Editing drum kits Muting instruments ④ Press ⑤ Input the name. (The character at the current posi- ① While pressing , press the instrument button. tion blinks.) This mutes the instrument. • Use to move the input position left and •... -
Page 38: Setting The Length Of Individual Instruments Sounds
Editing drum kits Setting the length of individual instru- ② Turn the PAN knob to set the panning. ments sounds ① Press the button for an instrument to select it for length setting. • The panning is shown on the display. ②... -
Page 39: Setting Kit Levels
Editing drum kits RESONANCE (0–127) (0.1–10) 2. MID 1: FREQ (0–127) (300–1500 Hz) • Press the instrument buttons/pad keys to check GAIN ( − 63 – 63) ( − 24 – +24 dB) sounds. 3. MID 2: FREQ (0–127) (1000–4000 Hz) •... -
Page 40: External Input Settings
External input settings This section explains adjustments related to external in- put. Changing the LINE IN gain ① Turn the LINE IN knob to change the input gain. • The gain is shown on the display. • The adjustment range is MUTE, 1 - 127. •... -
Page 41: Midi Settings
MIDI settings Turning control change transmission on/ This section explains settings related to MIDI. ① Press MIDI, and select TX.CC. Explanations assume that the function setting state has been enabled. ② Turn the VALUE knob to turn this ON/OFF. Press and hold to enable the function setting state. -
Page 42: Turning Active Sensing Reception On/Off
MIDI settings Turning active sensing reception on/off ① Press MIDI, and select RX.AS. ② Turn the VALUE knob to select ON or OFF. • ON/OFF will appear on the display. Setting the program change channel ① Press MIDI CH, and select PC.CH. ②... -
Page 43: Saving, Loading And Editing User Data
Saving, loading and editing user data This section explains ways to save and load user data. • Regardless of data transmission status, can be User data can be exported and imported via MIDI. Con- pressed to cancel. nect a device that can transmit and receive data by MIDI •... -
Page 44: Importing Patch Memory/Kit Banks
Saving, loading and editing user data Importing patch memory/kit banks ④ Start transmitting data from the transmitting device. ① Activate an editing mode and select the bank to be ⑤ When SAVE appears on the display after transmis- used as the import destination. (See ① – ② in "Acti- sion completes, press vating bass patch memory editing mode"... -
Page 45: System Settings
System settings This section explains settings related to the system. • The master tuning setting (in cents) will be shown Explanations assume that the function setting state has on the display. been enabled. • The adjustment range is − 75 – +75. Press and hold to enable the function setting state. -
Page 46: Setting Sync In Polarity
To restore the wavetable data, download it rameter value. (If the parameter value is lower than from the SONICWARE website and import it. the knob setting, they light to appear to be flowing left. If the value is higher, they appear to be flowing right. -
Page 47: Updating The Firmware
System settings Updating the firmware ① While pressing , press and hold the POWER switch. • The LIVEN BASS&BEATS will start up, and UPDT will appear on the display. ② Transmit the firmware from the transmitting device (Sys.Ex). • The step LEDs will light to show the progress (100% when step LED 16 is reached). -
Page 48: Appendix
Appendix Figure 1. Sound architecture...
Need help?
Do you have a question about the LIVEN BASS&BEATS and is the answer not in the manual?
Questions and answers