Table of Contents
Advertisement
Quick Links
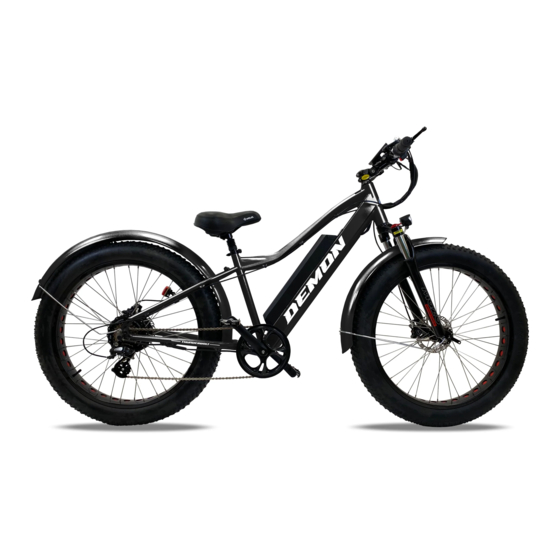
First of all, we would like to thank you for
choosing the THUNDERBOLT SL electric bike.
We warmly welcome you to our Demon
Powersports family. We wish you enjoy the
numerous kilometers and happy moments with
your new bike.
After the initial shipment we have made many
improvements and modifications for the
THUNDERBOLT SL
including:
*Suspended seat post - Takes the shock out of the big
bumps, without the cost or complexity of suspension.
*Adjustable handlebar stem- Provides up to 1 1/2" of
rise and reach adjustment, for fully customizable riding
position.
*Upgraded Shimano derailleur- Rigid cast aluminum
construction gives smoother, more precise shifting.
*New gearing, with taller top gear for relaxed touring,
plus a lower low gear for tight, technical riding.
1
Advertisement
Table of Contents

Related Manuals for Demon Powersport DEMON E-BIKES THUNDERBOLT SL


Summary of Contents for Demon Powersport DEMON E-BIKES THUNDERBOLT SL
-
Page 1: Welcome
*Suspended seat post - Takes the shock out of the big First of all, we would like to thank you for bumps, without the cost or complexity of suspension. choosing the THUNDERBOLT SL electric bike. *Adjustable handlebar stem- Provides up to 1 1/2” of We warmly welcome you to our Demon rise and reach adjustment, for fully customizable riding Powersports family. -
Page 2: Table Of Contents
Welcome Important Contact Us Assembly Instructions Unboxing Parts Handle bar Pedal Seat Post How To Install Front Fenders & Lights Battery Charging Tips Operation Display Features TFT Screen Instructions Error Code Definition ... -
Page 3: Important
IMPORTANT PLEASE NOTE: THIS MANUAL IS NOT INTENDED Electric Bikes can be dangerous to use. The user or AS A DETAILED USER, SERVICE, REPAIR OR consumer assumes all risk of personal injuries, damage, MAINTENANCE MANUAL. PLEASE SEEK or failure of the bicycle or system and all other losses or ASSISTANCE FROM A QUALIFIED TECHNICIAN damages to themselves and others and to any property FOR SERVICE, REPAIRS OR MAINTENANCE. -
Page 4: Assembly Instructions
ASSEMBLY INSTRUCTIONS 3) If necessary, align the stem with the front wheel and tighten the top stem bolt enough to hold the stem in place. Once the handlebars are aligned and Your bike has been pre-assembled and requires the top bolts is slightly secured, firmly tighten the 2 only a few simple steps to get it ready for you to side bolts on the stem. -
Page 5: Seat Post
4) Using the 15mm wrench provided in the toolkit, or down to adjust it. Move the clamp handle inward toward the seat post so it is held tight by the clamp. attach, and tighten the pedals. PLEASE NOTE – The pedals are marked “L”... -
Page 6: How To Install Front Fenders & Lights
HOW TO INSTALL FRONT FENDERS & LIGHTS 1) Install the headlight, the two small nut spacers Provided to go between the headlight bracket and the forks, to space out the bracket and allow free movement for the headlight plug without binding. You may have to pull a little extra wire for the 3) Use above piece ad put it together with whole headlight through the tie wrap to ensure enough play... - Page 7 5) Find a hole underneath a front suspension. 7) Install the taillight, screw goes in from right to left on the bracket, and the taillight sides on the bracket and locks into place from top down. 6) Install a fender into a hole located underneath a front suspension.
-
Page 8: Battery Charging Tips
experience unusual sounds or odors coming from the BATTERY CHARGING charger or the battery, unplug charger immediately and Included with your new TUNDERBOLT-SL is a lithium ion contact Demon Powersports customer service. battery, along with a charger, which plugs into a standard household electric receptacle. -
Page 9: Display
DISPLAY Features Suitable for low temperature, Max -20℃. High-contrast 3.2inch IPS colorful matrix screen. Ergonomic external button design, easy to operate. Speed display: AVG SPEED, MAX SPEED, and SPEED (Real-time). Kilometer / Mile: Can be set according to customers’ habits. -
Page 10: Tft Screen Instructions
TFT Screen Instructions Power On/Off Press and hold Power button for 1 second can turn on/off the display. The Display can automatically shut down when there is no operate & ride for X minutes (X could be0~9). *If the display has been set password power on, you need to input the right password before start. - Page 11 Speed & Mileage mode switch Walking mode (6km) Short press POWER button can change the speed and Press and hold DOWN button for 2 second can get into walking mode, out of the mode when releases the button. mileage mode, TRIP→ODO→RANGE→TRIP→TIME→MAX SPEED→AVG SPEED **If there is no operation for 5 seconds, display will return Speed (Real-...
- Page 12 Press Up / Down button to switch between System: Parameter setting Metric / Imperial. Double press POWER button (press interval less than 0.3 second) can get into setting menus, press UP/DOWN buttons to change the parameter setting, press POWER button can switch to next item.
- Page 13 Press UP/DOWN button to change the auto power Press UP/DOWN button to change the battery Auto off: Battery Ind: off time, from 1 to 9, the number represent time (minutes) indicator, Voltage / Percentage / OFF. to shut down, default value is 5 minutes. *Accurate percentage needs communication with battery.
- Page 14 Press UP/DOWN button to change the Power Pow Ind: indicator, Power / Current. * This data represents power output of the battery (not motor). Press POWER button get into the password Start password: setting menu. If you had set Start input ON, you must input right password before power on, password is accorded to your setting.
-
Page 15: Error Code Definition
You need to input the right password before start with 30 Error Code Definition seconds, display will power off automatically if the 850C can show warning message, icon shows on the screen, and password was wrong. show error code at the bottom of the screen, error code from 01~25, definition see the table below. -
Page 16: Warning And Safety
WARNINGS AND SAFETY Local laws may prohibit the use of high-speed electric bicycles on bike paths or trails. Be sure you are familiar with the laws in your area. Even if legal, it is usually not safe to You should check the operation of your brake inhibitor ride at high speed on paths or trails around other users.
Need help?
Do you have a question about the DEMON E-BIKES THUNDERBOLT SL and is the answer not in the manual?
Questions and answers