Table of Contents
Advertisement
Quick Links
Advertisement
Table of Contents

Related Manuals for Fluke SPOT Light


Summary of Contents for Fluke SPOT Light
- Page 1 SPOT Light SpO2 Functional Tester PN 4151274 February 2012 | Rev. 2, 1/22 © 2012-2022 Fluke Corporation. All rights reserved. Printed in USA. Specifications are subject to change without notice. All product names are trademarks of their respective companies.
- Page 3 Fluke Biomedical. This warranty covers the original purchaser only and is not transferable. The warranty does not apply if the product has been damaged by accident or misuse or has been serviced or modified by anyone other than an authorized Fluke Biomedical service facility.
- Page 4 Copyright Release Fluke Biomedical agrees to a limited copyright release that allows you to reproduce manuals and other printed materials for use in service training programs and other technical publications. If you would like other reproductions or distributions, submit a written request to Fluke Biomedical.
- Page 5 Fluke Biomedical, we recommend using United Parcel Service, Federal Express, or Air Parcel Post. We also recommend that you insure your shipment for its actual replacement cost. Fluke Biomedical will not be responsible for lost shipments or instruments that are received in damaged condition due to improper packaging or handling.
- Page 6 Restrictions and Liabilities Information in this document is subject to change and does not represent a commitment by Fluke Biomedical. Changes made to the information in this document will be incorporated in new editions of the publication. No responsibility is assumed by Fluke Biomedical for the use or reliability of software or equipment that is not supplied by Fluke Biomedical, or by its affiliated dealers.
-
Page 7: Table Of Contents
Table of Contents Title Page Introduction ........................1 Intended Use ........................2 Safety Information ......................2 Unpack the Product ......................3 Instrument Familiarization ....................4 Accessories ........................5 How to Turn On the Product ................... 6 How to Use the Product ....................6 SpO2 Sensor Placement ................... - Page 8 SPOT Light Users Manual Battery Removal ....................13 General Specifications ....................14 Detailed Specifications ....................14 Oximeter SpO Optical Emitter and Detector ............14...
- Page 9 List of Tables Table Title Page Symbols ..........................2 Product Controls and Connections ..................4 Standard Accessories ......................5 Optional Accessories ......................5 Test Parameters ........................8...
- Page 10 SPOT Light Users Manual...
- Page 11 List of Figures Figure Title Page Product Controls and Connections ..................4 Power-Up Screen ........................6 Main Screen .......................... 6 Oximeter Sensor Placement ....................7 SpO2 Parameter Change ...................... 9 External Battery Charging Connections ................12 Battery Removal ........................13...
- Page 12 SPOT Light Users Manual...
-
Page 13: Introduction
Product. Table 1 is a list of the symbols used on the Product and in The Fluke Biomedical SPOT Light SpO2 Functional this manual. Tester (the Product) is a compact, portable, functional tester used to measure the performance of SpO2... -
Page 14: Intended Use
Warning Do not dispose of this product as To prevent possible electrical shock, fire, or unsorted municipal waste. Go to Fluke’s personal injury, follow these guidelines: website for recycling information. Do not connect the Product to a patient •... -
Page 15: Unpack The Product
Carefully unpack all items from the box and check that you have these items: Do not use the Product if it operates • incorrectly. • SPOT Light Users Manual • Use only current probes, test leads, and • • Carrying Case adapters supplied with the Product. -
Page 16: Instrument Familiarization
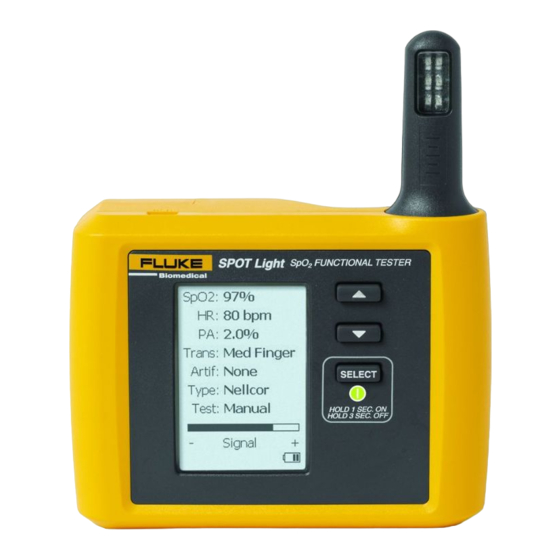
SPOT Light Users Manual Instrument Familiarization Table 2. Product Controls and Connections Table 2 is a list of Product controls and connections Item Description shown in Figure 1. SpO2 Artificial Finger Scroll Up and Down Buttons Select Button LCD Display Mini B USB Device Port (Service use only) gvh003.png... -
Page 17: Accessories
SpO2 Functional Tester Accessories Accessories Available Product accessories are shown in Table 3 and 4. Table 3. Standard Accessories Item Fluke Biomedical Part Number SPOT Light Users Manual 4151274 AC/DC Power Supply 4766589 284174 Schuko 769422 769455 AC Power Cord... -
Page 18: How To Turn On The Product
SPOT Light Users Manual How to Turn On the Product Push for one second to turn on the Product. The screen shown in Figure 2 is the power-up screen. Push and hold for 3 seconds to turn off the Product. - Page 19 SpO2 Functional Tester How to Use the Product gvh006.png Figure 4. Oximeter Sensor Placement...
-
Page 20: How To Set Test Parameters
SPOT Light Users Manual Put the sensor with the LEDs on the bottom of the Table 5. Test Parameters artificial finger. While you put the sensor on the artifact Parameter Values* finger, monitor the signal indicator along the bottom of the Product display. -
Page 21: How To Set Custom Tests
SpO2 Functional Tester How to Set Custom Tests As one example, to change the SpO2 value to 98 %: Push . The highlight moves back to SpO2: and the value stays set at 98 %. Push or to move the highlight to SpO2: in the display. -
Page 22: Maintenance
• clean the Product. power outlet before the Product. Connect factory supplied three- • Use only Fluke approved power adapters • conductor mains power cord to a to charge the battery. grounded power outlet. Do not short the battery terminals •... -
Page 23: How To Clean The Product
SpO2 Functional Tester Maintenance How to Clean the Product lower-right corner of the display. With the AC/DC power supply removed from the Product, the battery icon shows Caution the charge level. Do not put fluid onto the Product surface. The battery can be charged while it is in or out of the Fluid seepage into the electrical circuitry Product. - Page 24 SPOT Light Users Manual gvh002.png Figure 6. External Battery Charger Connections...
-
Page 25: Battery Removal
SpO2 Functional Tester Maintenance Battery Removal The battery pack is easy to remove and replace. To remove the battery pack: Push down on the battery pack latch as shown in Figure 7. Pull the battery pack from the Product. gvh023.png Figure 7. -
Page 26: General Specifications
SPOT Light Users Manual General Specifications Temperature Operating ............10 °C to 40 °C (50 °F to 104 °F) Storage ............... -20 °C to +60 °C (-4 °F to +140 °F) Humidity ..............10 % to 90 % non-condensing Altitude ..............3,000 m (9,843 ft) Size (W x H x D) ............. - Page 27 Size ..............2.5 % of transmission Rate ..............20 BrPM Ambient Light Frequency ........50 Hz and 60 Hz Compatible Manufacturer Products With manufacturer R-curve ......... Nellcor, Masimo, Nonin, and Nihon Kohden With Fluke Biomedical R-curve ......Mindray, GE-Ohmeda, Philips/HP, and BCI...
- Page 28 SPOT Light Users Manual...
Need help?
Do you have a question about the SPOT Light and is the answer not in the manual?
Questions and answers