Table of Contents
Advertisement
Quick Links
Advertisement
Table of Contents

Related Manuals for DG Technologies VSI NxGen


Summary of Contents for DG Technologies VSI NxGen
- Page 1 VSI NxGen User Manual Protected by DG Technologies Document Revision: 1.1 33604 West Eight Mile Road Document Date: January 2022 Farmington Hills, MI 48335 Copyright: 2022 DG Technologies Phone (248) 888-2000 Fax (248) 888-9977 https://www.dgtech.com...
- Page 2 Permission is granted to copy any or all portions of this manual, provided that such copies are for use with the VSI NxGen product and that “© 2021 DG Technologies.”, (herein referred to as “Dearborn Group”, “DG Technologies”, or “DG”), remains on all copies.
-
Page 3: Table Of Contents
DG Data Recorder ....................20 DG Diagnostics ......................22 VSI NxGen Firmware Update ..................23 Launch the VSI NxGen Firmware Update Programs Manually ....... 23 Appendix A. Technical Support and Return Merchandise ....24 Appendix B. Warranty Information and Limitation Statements ..25... - Page 4 Appendix C. List of Acronyms Used in this Document ...... 27...
-
Page 5: Introduction
Introduction How it works: A PC is connected to the VSI NxGen using the USB Cable and then to the vehicle network through the OBD II J1962 16 pin connector. The VSI NxGen provides the translation interface between the PC and the vehicle electronic network. -
Page 6: Vsi Nxgen Hardware Specifications
There are limited uses for the 12V DC power jack. It may be used for benchtop programming. WARNING The VSI NxGen SHOULD NOT be powered via the 12V DC power jack and the supplied OBD II cable simultaneously. Connecting to multiple power sources may cause damage to the hardware. -
Page 7: Powering The Hardware
Figure 1 - VSI NxGen Front & Sides External Connections DB-25 This is the connector where the OBDII cable connects and powers the VSI NxGen from the vehicle connection. Auxiliary Power This is an external power port required for some older Hyundai/Kia vehicles and is provided per the SAE J2534 specification. -
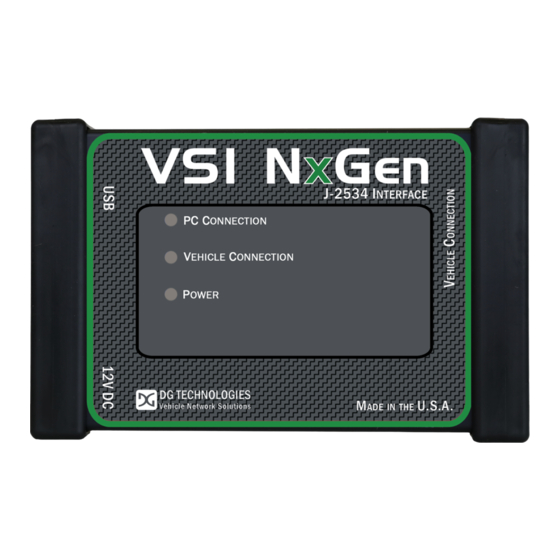
Page 8: Status Indicators
Status Indicators The VSI NxGen has three status LEDs that indicate activity of the following functions: • PC Connection – Indicates that the VSI NxGen has established a connection to the PC, and if the link is active”. • Vehicle Connection – Indicates that the vehicle network connection is established / active. -
Page 9: Software Installation
Only the Windows 10 & 11 operating system is supported by the VSI NxGen. The installation for the VSI NxGen includes files that are specific to this tool (found at https://www.dgtech.com/downloads/). Most of the utility programs that DG distributes can be used by multiple DG tools and are distributed via DG Tech Utilities install, which is included with the VSI NxGen software installation. - Page 10 3. Select Install. Note: The installation process is 2-fold. First, DG Utilities will install, then the VSI NxGen will install. Figure 3 - Installation Welcome 4. After all the software requirements have been met, the InstallShield Wizard for DGTech VSI NxGen will now be displayed.
- Page 11 Figure 5 - DG Tech Utilities Select Finish 6. Select Finish when the installation of DG Tech Utilities is complete. Figure 6 - DGTech VSI NxGen Installation Select Next > 7. Select Next > to install DG Tech VSI NxGen.
- Page 12 Figure 7 - DGTech VSI NxGen Installation Select Folder 8. Select Next > if you want to install VSI NxGen into the recommended destination folder. If you want to install the software into another folder, select Browse and choose the folder you want to use.
- Page 13 As an alternative to this you can call the number displayed on the screen to continue the process over the phone. Figure 9 - DG Tech VSI NxGen Finish Selection 10. Select Finish, when the installation of VSI NxGen is successful.
-
Page 14: Vsi Nxgen Configuration Utility
Standards and Protocols Supported). The VSI NxGen Configuration Utility will tell you what protocols, API versions, and Product Version are supported. You can also use the VSI NxGen Configuration Utility to get the current firmware version. Utility can be found in: Start ➔... -
Page 15: Hardware Connection To The Pc
IMPORTANT: the following sequence of connections must be followed, otherwise damage to vehicle or VSI NxGen may occur. Step 1: Connect the VSI NxGen to the OBD II cable). Note: Do not power unit from multiple sources. Step 2: Connect the VSI NxGen’s USB cable to the PC that the software was installed on and note that the Power LED is a solid Green and the PC Connection LED is a solid Red. - Page 16 Figure 12 – All Drivers Installed are up-to-date The above screen shows All drivers installed are up-to-date. NOTE: The 30-day default setting can be changed by selecting the Settings button. Figure 13 – Drivers are Out of Date If Drivers are out of date, this message box will be shown. Select OK.
-
Page 17: Dg Update - Drivers Out Of Date
DG Update – Drivers Out of Date In this example, the VSI-2534 drivers are out of date (Red). Only if updates are available will the Download button and progress bar appear on the screen. Select Download. Figure 14 - DG Update Main Update Screen Connect your PC to the Internet and click the Refresh button. -
Page 18: Advanced Settings - Setting Default Time Check For Updates
Click AVT on the desktop or from the start menu. If you have RP1210 and J2534 drivers installed on your computer you will see the AVT Launcher screen. Since the VSI NxGen does not support RP1210 you should always choose the Car / OBDII image if you are presented with this screen. - Page 19 Figure 20 - AVT OBDII Automated Test Run Test • Turn vehicle ignition to the key-on, engine-off (KOEO) position. Select Run Test. • Note: In the Device: dropdown, the VSI NxGen is selected. If using a different device, make the applicable selection.
-
Page 20: Dg Data Recorder
The Data Recorder selection can be found under DGTech Utilities from the desktop or from the start menu. Figure 23 – DG Data Recorder Configuration ➔ DGTech Utilities ➔ DG Data Recorder. • Go to: • Device being used, VSI NxGen, should be shown. If not, use drop-down arrow and select. Select OK. - Page 21 Figure 24 – DG Data Recorder Drop-Down Arrow • Indicator Table Indicator Definition Start Recording Pause Recording Stop Recording Figure 25 – DG Data Recorder Indicator Table • Make appropriate selections to Start, Pause and Stop recordings. • To view, print or email log file, the log file is found here: C:\DGTech\DGTech Utilities\Logs.
-
Page 22: Dg Diagnostics
Go to the next step. Figure 27 – Connection Screen • Ensure proper connections of VSI NxGen with PC and vehicle. Key is ON, Engine is OFF. • Using the tabs shown, choose and review available information. -
Page 23: Vsi Nxgen Firmware Update
Figure 28 - VSI NxGen Firmware Update Launch the VSI NxGen Firmware Update Programs Manually 1. Stop all applications that are using the VSI NxGen (if any) 2. Start the VSI NxGen Firmware Update program 3. Start ➔ DGTech VSI NxGen ➔ VSI NxGen Firmware Updater 4. -
Page 24: Appendix A. Technical Support And Return Merchandise
9 a.m. to 5 p.m. Eastern Time. You may also fax or e-mail your questions to us. For prompt assistance, please include your voice telephone number and the serial number. DG Technologies Technical Support Phone: 1-248-888-2000 Fax:... -
Page 25: Appendix B. Warranty Information And Limitation Statements
(2) years following date of shipment. Cables (both USB and vehicle) are warranted for 90 days. DG Technologies will, at its option, repair or replace, at no cost to the customer, products which prove to be defective during the warranty period, provided the defect or failure is not due to misuse, abuse, or alteration of the product. - Page 26 DG Technologies and any of its suppliers exceed the price paid for the device. The user assumes the entire risk and liability from the use of this device.
- Page 27 List of Acronyms Used in this Document Acronym Description Application Programming Interface Controller Area Network CAN FD Controller Area Network Flexible Data DG Technologies DoIP Diagnostics over IP DPDU API Diagnostic Protocol Data Application Programming Interface DW CAN Dual Wire Controller Area Network Class2 GM’s implementation of SAE J1850 Protocol...
Need help?
Do you have a question about the VSI NxGen and is the answer not in the manual?
Questions and answers