Advertisement
Quick Links
Yealink
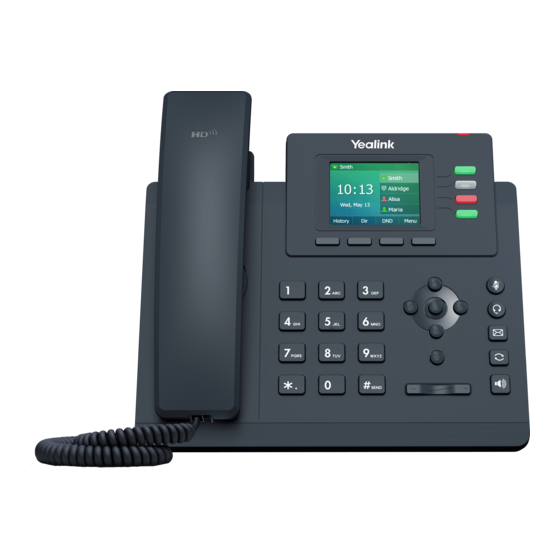
SIP-T33P/G
Before you use your phone
The IP phone package you received from us
includes: IP phone, handset, power adapter
and cables. Take the stand and snap it to the
phone from the back. Connect one end of the
twisted pair cable to the handset. The other
then into the phone to the jack marked with
the handset. Plug the Ethernet cable into the
phone into the socket marked internet. Plug
the other end into a modem, router, or switch
into the IP phone jack. If the switch does not
support Power over Ethernet (PoE), connect
the AC adapter to the phone and plug it into
an electrical outlet. Now check the phone
display. "Welcome Initializing - Please Wait"
should appear on the display. When your
abbreviated phone number appears after a
few minutes, everything is ready and you can
start calling.
1. Making a call
Start dialing, pick up the handset, or press
the Speaker key). Enter a phone number.
Confirm the selection by picking up the
handset, the OK navigation key or the # key).
To end the call, hang up or press the Speaker
key
2. Control function
The navigation buttons are used to move in
the menu. The OK button is used to confirm
the selection. The phone also has the
following key groups: Keys with occupancy
indicator (BLF function) and context-sensitive
keys. Buttons with occupancy indicator can
be set via the web portal portal-uc.gtsce.com.
Context-sensitive
buttons
change
function automatically according to the state
of the phone. The menu can be scrolled with
the navigation keys, or by direct dialing with a
number key, as each selection is numbered.
Navigační
tlačítka
Kontextová tlačítka
Číselník
Ovládání
hlasitosti
We have prepared a telephone directory of
your company for you directly on the phone.
Now prepare the data obtained during the
handover of the service, your telephone
number and password. Use the password to
log
in
to
Further in the manual we will talk about the
so-called sequence, which means calling up
the configuration menu with the context-
sensitive "Menu" button and pressing direct
dial 1-9.
That is: the sequence Menu-2-4-1 means
again.
successively pressing the MENU, 2, 4, 1 keys.
To return to the default state, use the
Back-Back-Back-Exit
button.
Hold Context-dependent button - the caller
hears music (music on hold).
Context-dependent button Transfer - to
transfer the call.
Menu Context-dependent button - used to
enter the phone's configuration menu.
their
Mute button - used to deactivate the
microphone. To reactivate, press the button.
for the second time.
Headset button - switches the sound of the
headset / microphone to the headset.
Message button - connects the phone to your
voicemail, settings: MENU-5-1-2.
Redial button - opens the list of recently
dialed numbers.
Speaker
Button
speakerphone.
The name is your phone number. Here you
can adapt the Virtual PBX service to your
needs. Help for all functions is available by
clicking on the "Help" button. For more
instructions, click on "Download".
portal-uc.gtsce.com.
3. Telephone contact list
As part of the virtual exchange service, two
telephone directories of the platform are
used: corporate, personal and external. The
company list contains all active users of the
company; external numbers (eg employee
mobile phones) cannot be stored in it. All
users have read-only. The personal address
Context-dependent
book is intended for the user's private
contacts. It is individual for each line. Add,
edit or delete personal list items either
directly in the phone menu or via the portal-
uc.gtsce.com portal. Any number can be
stored in the external directory, but for
administration it is necessary to log in to the
web
administrator. Other users have it read-only.
-
Used
to
activate
Indikace napájení
Tlačítka s
indikátorem obsazení
Funkční tlačítka
Hlasitý odposlech
portal
portal-uc.gtsce.com as
an
Advertisement

Summary of Contents for Yealink SIP-T33P/G
- Page 1 Yealink SIP-T33P/G Before you use your phone The IP phone package you received from us Navigační Indikace napájení includes: IP phone, handset, power adapter tlačítka and cables. Take the stand and snap it to the phone from the back. Connect one end of the Tlačítka s...
- Page 2 Yealink SIP-T33P/G 4. Using contact list 6. Redial 8. Redirection Press the "Address" context-dependent Press the (Redail) button twice. This dials the All types of forwarding can be found in MENU- button. The corresponding phonebook is last number dialed. 2-1-4- (1 to 3). To change, use the left or right loaded into the phone.


Need help?
Do you have a question about the SIP-T33P/G and is the answer not in the manual?
Questions and answers