
Related Manuals for Franklin Electric HMX-1


Summary of Contents for Franklin Electric HMX-1
- Page 1 INSTALLATION MANUAL HMX-1 Franklin Electric Co., Inc Water Treatment Division 12630 US 33 N. Churubusco, IN 46723 Ph. (260) 693-1972 Fax (260) 693-0602 HMX-1 Manual 211111...
-
Page 2: Table Of Contents
TABLE OF CONTENTS: SECTION I. INTRODUCTION AND LIABILITY..........3 SECTION II. SPECIFICATIONS..............3 SECTION III: PREPARATION.................4 Major System Components......................4 B. Tools Recommended for Installation..................4 C. Determine System Location......................4 D. Prepare the Area for Installation....................5 E. Prepare the Appliance for Installation..................5 SECTION IV. INSTALLATION STEPS............5 A. -
Page 3: Introduction And Liability
Must be potable** IMPORTANT: The HMX-1 may be installed on waters containing heavy metals listed in Section I.; however, the total heavy metal concentration of the incoming water supply must be less than or equal to 100.0 ppb. Installing this unit on water with greater than 100.0 ppb of heavy metals may result in harmful heavy metal bleed through in excess of the MCL established by... -
Page 4: Preparation
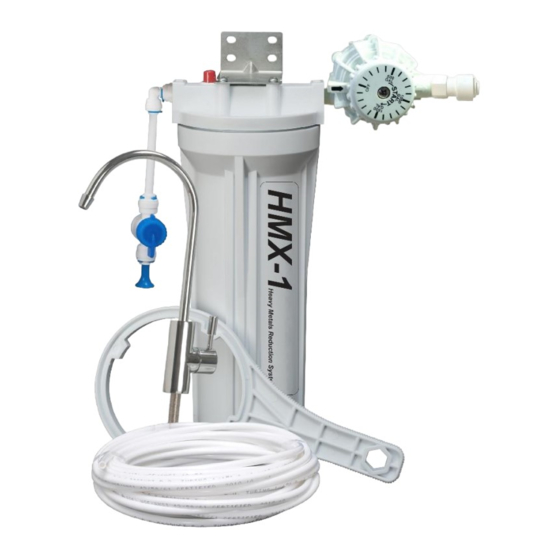
C. Determine System Location 1. A Heavy Metal Reduction assembly consisting of the aluminum bracket, screws, wrench, filter The HMX-1 system can be located under a sink or housing, installed HMRC10 filter, installed shut- in a basement depending on space availability and the customer’s preference. -
Page 5: Prepare The Area For Installation
If the sink already has a hole If a basement installation is called for, determine provided that can accommodate the HMX-1 faucet, where components will be located and how they will then no drilling is required and you can proceed to be mounted. -
Page 6: Mount The Faucet
PORCELAIN/ENAMEL/CERAMIC ON SHEET faucet. Ensure plastic insert is in tubing. METAL OR CAST IRON BASE: Push on firmly until it seats. d) Feed the threaded nipple through Recommended tools: sink/counter mounting hole and orient the • faucet as discussed with the customer. Variable speed drill •... -
Page 7: Automatic Water Meter
When routing tubing tightened enough so that there are no leaks and the between components, several guidelines should be meter is facing the front of the HMX-1 housing observed. assembly. This will allow for ease of setting the meter in gallons. -
Page 8: Start Up The System
SECTION V. OPERATION & page 3. MAINTENANCE A. Changing Filter NOTE: THIS HMX-1 SYSTEM CONTAINS A FILTER WHICH MUST BE REPLACED AT REGULAR INTERVALS TO MAINTAIN PROPER PERFORMANCE. USE ONLY FACTORY APPROVED FILTERS. Please see Page 3 for the recommended interval for changing the filters. -
Page 9: System Installation Drawing & Parts List
B. Installation Drawing & Parts List Part Number Description Feed Water Valve, 3/8"Mx1/2"Fx RO-FWV 1/4"Tube, w/1/2"Mx3/8"F Adapt. BV-101 Ball valve, ¼” tube X ¼” tube 4SE4 Stem elbow, ¼” tube X ¼” stem Male connector, ¼” tube X ¼” MNPT ½”... -
Page 10: For Systems Equipped With Quick Connect Fittings
C. For System Equipped with Quick Connect TO ATTACH TUBING... Fittings Your new HMX-1 Drinking Water Appliance may be outfitted with new generation of user-friendly quick connect push-in fittings. Proper use of the fittings is shown in the diagrams. It is important that the tubing selected for use with these connectors be of high quality exact size and roundness, and with no surface nicks or scratches. -
Page 11: Section Vi: Troubleshooting Guide
SECTION VI. TROUBLE SHOOTING GUIDE Problem Possible Cause Solution Low quantity of Product Feed Water Saddle Valve is Open Valve or unclog. Water from Treatment plugged or closed. System or Low Pressure Clogged filter. Replace filter. at the Dispensing Faucet Low water pressure Feed Water pressure must be above 20 psig. -
Page 12: Leak Stop Valve Compressed Pellet Replacement
Leak Stop Valve – Compressed Pellet Replacement 1) Pull the upper cover upward and separate it from the lower body. 2) Remove the expanded pellet from the retainer. 3) Replace the expanded pellet with the spare compressed pellet. 4) Seat the compressed pellet and retainer into the lower body. 5) Push the upper cover down until it snaps securely in place. -
Page 13: Limited Warranty
HEAVY METAL REDUCTION SYSTEM LIMITED WARRANTY What Does This Warranty Cover? This warranty covers any defects in materials and workmanship of the Heavy Metal Reduction System when installed and operated within recommended parameters, with the exceptions stated below. How Long Does The Coverage Last? The manufacturer will warrant its Heavy Metal Reduction System, for a period of one year from the date of purchase.
Need help?
Do you have a question about the HMX-1 and is the answer not in the manual?
Questions and answers