
Related Manuals for Ninglu IR761


Summary of Contents for Ninglu IR761
- Page 1 NINGLU IR761 Wind Repeater Operating & Installation Manual Edition 20170101 (Ver. 1.8) NANJING NINGLU TECHNOLOGY CO., LTD.
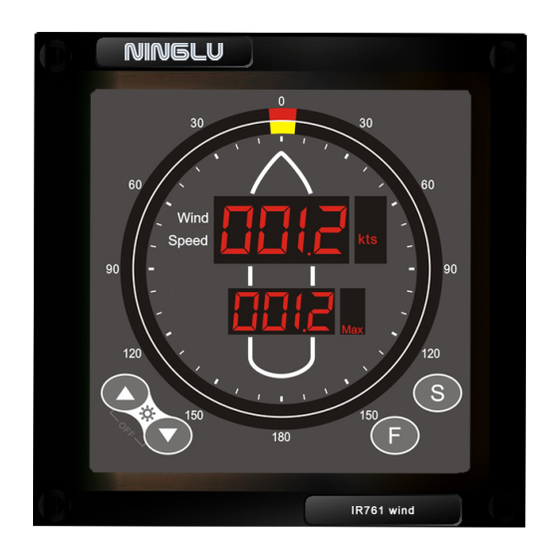
- Page 2 NTRODUCTION The IR761 wind repeater is a combined display for wind speed and direction. It receives NMEA0183 signal from a marine anemometer (talker), and displays the relative wind speed and direction, or true wind speed and direction. Its 144x144 Din size cabinet is suitable for panel (flush) mounting. Also the tabletop and wall mounting is available with the bracket.
- Page 3 Ture mode ○ The right light of second line shows: When the input sentence is “True” wind, please choose this mode. True Wind Speed Speed Unit ○ True wind direction...
- Page 4 FUNCTION Data input: RS422, NMEA0183 NMEA0183 format: ERR alarm: Shows “ERR” when repeater does not receive any signal or the signal is not a NMEA message. Incorrect alarm: Shows “- - --” when the message is incorrect data. Other message alarm: Shows “_ _ _”...
- Page 5 SPECIFICATION Measurement: L144mm W144mm H62mm Flush mounting window: L125mm W125mm Weight: 1.4kg Power & Voltage: 24V DC (20-32V) Consumption: 2W (24V) Environmental (according to IEC60945 for exposed equipment) Work temperature: -15°C - +55°C Storage temperature: -20°C - +70°C Humidity: 10%-90% relative humidity Compass safe distance: 85 cm Note:...
- Page 6 INSTALLATION The unit can be mounted in panel, table, wall or ceiling. 1. For tabletop mounting, wall or ceiling mounting use the supplied bracket. 2. For panel (flush) mounting, take off the bracket and take off the front frame. Cut a 125x125mm Din size square window in the panel, fix the inside 4 holes with tapping screws, and put on the front frame again.
Need help?
Do you have a question about the IR761 and is the answer not in the manual?
Questions and answers