Table of Contents
Advertisement
Available languages
Available languages
THANK YOU for purchasing a Farmex product.
READ THIS MANUAL carefully to learn how to operate and service your equip-
ment correctly. Failure to do so could result in personal injury or equipment
damage.
THIS MANUAL SHOULD BE CONSIDERED a permanent part of this equip-
ment and should remain with the unit when you sell it.
WRITE IDENTIFICATION NUMBERS in the Specifications section. Accurately
record all the numbers to help in tracing the equipment should it be stolen. Your
dealer also needs these numbers when you order parts. If this manual is kept
with the equipment, also file the identification numbers in a secure place away
from the unit.
WARRANTY is provided through AgraTronix for customers who operate and
maintain their equipment as described in this manual. The warranty is ex-
plained at the end of this section.
This warranty provides you with the assurance that AgraTronix will back its
products where defects appear within the warranty period. Should the equip-
ment be abused, or modified to change specifications, the warranty will
become void.
DHT-1
Digital Hay Tester
Operator's Manual
Introduction
1
Advertisement
Chapters
Table of Contents

Related Manuals for agratronix FARMEX DHT-1


Summary of Contents for agratronix FARMEX DHT-1
- Page 1 The warranty is ex- plained at the end of this section. This warranty provides you with the assurance that AgraTronix will back its products where defects appear within the warranty period. Should the equip- ment be abused, or modified to change specifications, the warranty will become void.
-
Page 2: Table Of Contents
Contents Page Safety ......................3 Operation Understanding Hay Conditions and Test Readings ........4 Hay Testing Guidelines ...................5 Operating Hay Tester (Moisture Test) .............7 Operating Hay Tester (Temperature Test) ............8 Troubleshooting Troubleshooting the Hay Tester ..............9 Service Replacing the 9-Volt Alkaline Battery ............10 Care, Maintenance and Storage ..............10 Specifications Hay Tester Features ..................11... -
Page 3: Safety
Safety Recognize Safety Information This is a safety-alert symbol. When you see this symbol on your tester or in this manual, be alert to the potential for personal injury. Follow recommended precautions and safe operating practices. Understand Signal Words A signal word – DANGER, WARNING or CAUTION –... -
Page 4: Operation
Operation Understanding Hay Conditions and Test Readings Many variables affect the accuracy of test readings. Understanding these variables can help to obtain accurate test readings. IMPORTANT: Because numerous vari- ables which affect test readings, the indicated moisture content should not be used as an absolute, quantita- tive measurement. -
Page 5: Hay Testing Guidelines
Operation Hay Testing Guidelines... - Page 6 Operation Hay Testing Guidelines, continued Windrow: Windrow moisture will vary greatly in different parts of the field. Thick, heavy sections of the windrow will contain much higher moisture hay than thin areas. Look for “humps” in the windrows. Check windrows at several locations by turning the windrow up on its side and selecting a handful of hay from the bottom.
-
Page 7: Operating Hay Tester (Moisture Test)
Operation Hay Testing Guidelines, continued IMPORTANT: Do not insert probe into the wound end of the bale. If in- serted from the wound end, probe tip can end up between the hay wraps and not have sufficient contact to produce an accurate test reading. For best results, insert probe into the outside radius of the bale at a 45˚... -
Page 8: Operating Hay Tester (Temperature Test)
Operation IMPORTANT: If one reading is over the recommended moisture content, do not bale. Low Moisture Readings (under 14.5%): Hay tester will not test below 14.5%. If a hay bale being tested is 12% moisture, the tester will still read at 14.5% (+/–0.3%). -
Page 9: Troubleshooting
Troubleshooting Troubleshooting the Hay Tester If tester fails to operate, follow these steps: 1. If no display appears when switches are pressed, check battery connec- tions. 2. If “LOWBAT” is displayed, replace battery with a new 9-volt alkaline battery. (See Replacing 9-Volt Alka- line Battery.) If tester displays inaccurate read- ings, or if readings are lower than... -
Page 10: Service
Service Replacing 9-Volt Alkaline Battery NOTE: “LOBAT” will display when a switch is pressed and battery needs replacement. 1. Remove battery door (A) from back of tester. 2. Attach leads (B) to 9-volt alkaline battery (C) terminals. 3. Attach battery door to tester. Displaying “LOBAT”... -
Page 11: Specifications
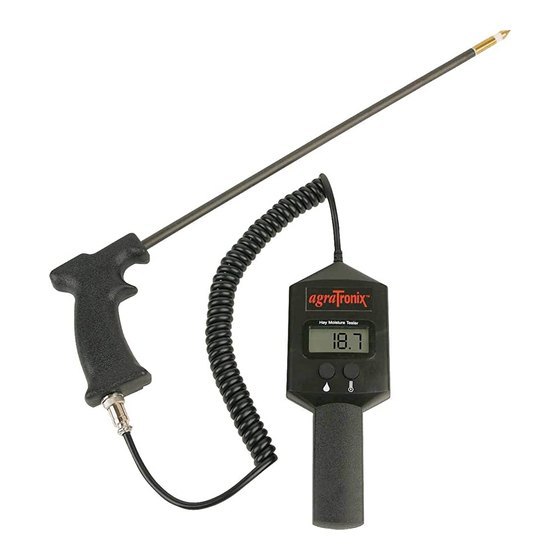
Specifications Hay Tester Features • 18 in. Probe with Gun-Type Grip (A). • DIGITAL Readout (B) for % Moisture and Temperature (˚F). (+/–1% accuracy throughout the normal test range of stored, baled hay.) • Temperature Range (C): 33˚ to 200˚F •... -
Page 12: Product Warranty
The foregoing warranty is exclusive and in lieu of all other warranties of merchantability, fitness for purpose and any other type, whether expressed or implied. AgraTronix neither assumes nor authorizes anyone to assume for it any other obligation or liability in connection with its prod- uct and will not be liable for consequential damages. - Page 13 Si ce livret est gardé avec le matériel, conserver une copie des numéros en lieu sûr. La GARANTIE est fournie par l’intermédiaire AgraTronix pour les clients qui utilisent et entretiennent leur matériel comme décrit dans ce livret. La garantie est expliquée à...
- Page 14 Table des matières Page Sécurité .......................15 Utilisation Évaluation de l’état du foin et des relevés des essais ........16 Consignes d’essais sur le foin ..............17 Utilisation du testeur de foin (essai d’humidité) ..........19 Utilisation du testeur de foin (essai de température) ........20 Dépannage Dépannage du testeur de foin ..............21 Entretien...
-
Page 15: Sécurité
Sécurité Signalisation des Informations de Sécurité Voici un symbole de mise en garde. Sa présence sur la machine ou dans le présent livret signale un risque de blessures. Suivre les précautions et procédures d’utilisation recommandées. Signification des Termes de Signalisation Un terme de signalisation –... -
Page 16: Utilisation
Utilisation Évaluation de l’État du Foin et des Relevés des Essais De nombreuses variables ont une in- fluence sur la précision des relevés d’essais. La compréhension de ces vari- ables peut permettre d’obtenir des rele- vés exacts. IMPORTANT: En raison des nom- breuses variables qui ont une influ- ence sur les relevés d’essais, la te- neur en humidité... -
Page 17: Consignes D'essais Sur Le Foin
Utilisation, continué Consignes d’Essais Sur le Foin... - Page 18 Utilisation, continué Consignes d’Essais Sur le Foin Andain: La teneur en himidité d’un andain peut varier de façon importante dans dif- férentes zones de la parcelle. Les sections épaisses et denses de l’andain contiennent davantage d’humidité que les sections minces. Rechercher les “bosses”...
-
Page 19: Utilisation Du Testeur De Foin (Essai D'humidité)
Utilisation, continué Balles cylindriques: Les relevés d’essais peuvent être pris n’importe où, sur la surface extérieure de la balle, en vérifiant que la pointe de la sonde est à l’intérieur de la couche externe, étant donné que celle-ci sèche en premier. IMPORTANT: Ne pas insérer la sonde dans l’extrémité... -
Page 20: Utilisation Du Testeur De Foin (Essai De Température)
Utilisation, continué IMPORTANT: Nous vous conseillons de procéder à des lectures en sondant au moins cinq (5) parties de l’andain ou de la balle de foin et d’utiliser la lecture la PLUS ÉLEVÉE comme point de repère. NE FAITES PAS LA MOYENNE DE TOUTES LES LECTURES. -
Page 21: Dépannage Du Testeur De Foin
Utilisation, continué foin, il vous faudra attendre 1 ou 2 minutes avant que la température ne se stabilise. L’interrupteur n’a pas besoin de rester enfoncé pendant ce temps. Contentez-vous de laisser la sonde dans la balle de foin et de vérifier périodiquement la lecture afin que l’embout en métal de la sonde capte la température de la balle. -
Page 22: Entretien
Entretien Remplacement de la Pile Alcaline de 9 Volts REMARQUE: “LOBAT” s’affiche lorsque l’interrupteur est enfoncé et que la pile doit être remplacée. 1. Retirez le couvercle de pile (A) situé à l’arrière de l’appareil. 2. Attachez les fils de sortie (B) aux bornes de la pile alcaline de 9 volts (C). 3. -
Page 23: Spécifications
Spécifications Caractéristique du Testeur de Foin • Sonde de 18 po équipée d’une poignée révolver (A). • Affichage NUMÉRIQUE (B) indiquant le % d’humidité et la température (˚F): (+/–1% d’exactitude dans la plage de tes- tage normal du foin en balle et stocké) •... -
Page 24: Garantie Du Produit Et Programme De Réfection
La garantie antérieure est exclusive et au lieu de toutes autres garanties de val- eur marchande, d’aptitude à l’emploi et de n’importe quel autre type, si exprimé ou implicite. AgraTronix ni n’assume ni autorise n’importe qui à assumer pour lui n’importe quel autre engagement ou la responsabilité en liaison avec son produit et ne sera pas responsable des dommages consécutifs.
Need help?
Do you have a question about the FARMEX DHT-1 and is the answer not in the manual?
Questions and answers