Advertisement
Quick Links
Advertisement

Related Manuals for APsystems ECU-C Zigbee


Summary of Contents for APsystems ECU-C Zigbee
- Page 1 English – Q1 2021 Caution: Features are unavailable to residential split phase...
- Page 2 Product Overview Installation ECU-C configuration ...
-
Page 3: Product Overview
Product Overview... - Page 4 Energy Communication Unit with advanced functions Features are not available on NA split phase Collection and transmission of inverter data Real time monitoring of each inverter Adapted to EU single or 3 phase Built-in WiFi Zigbee communication ...
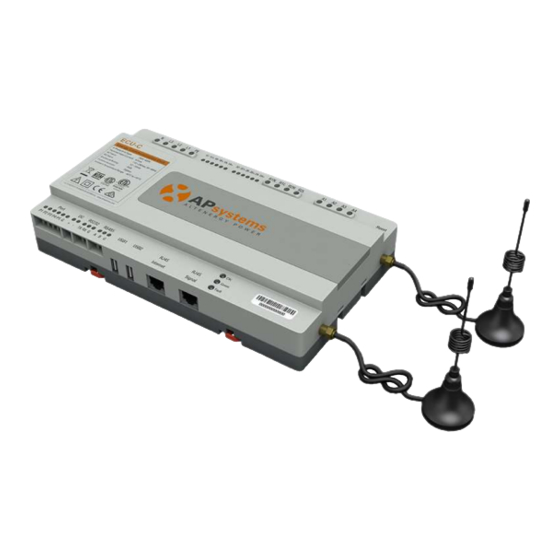
- Page 5 Consumption Redundant Power Interface CT(s) Energy NA 3 phase systems : Control Production Reset 208 or 277Y/480V CT(s) Button L1/L2/L3/N/PE WiFi antenna ZigBee antenna Network Status led Interface...
- Page 6 100 inverters per ECU ZigBee 50m max relay open field good signal...
- Page 7 Zigbee antenna of the ECU to a better location using extension cable for WiFi antenna 2.4GHz with SMA connectors male / female (not provided by APsystems) If the antenna is installed outside not protected from the rain change if for an appropriate version : WiFi antenna 2.4GHz outdoor...
- Page 8 Production Consumption 200A...
- Page 11 Antennas outside the box ECU-C AC distribution box PV AC box Router Internet...
- Page 12 Power interface wiring with Standard NA 208 or 277Y/480V – 60Hz (L1, L2, L3, N, PE) NA split phase PV systems 3 phase PV systems No CTs required – Features are unavailable for split N, L3, L2, L1, PE phase systems...
- Page 13 Install CT for ECU-C...
- Page 14 3 phase PV system 6 CTs Production Consumption L3 L2 L1 L3 L2 L1 Warning : Check phases are matching on ECU-C power port and CTs port...
- Page 15 Install CT for ECU-C Connector Connector...
- Page 16 Proprietary and confidential. Property of APsystems.
-
Page 17: Energy Metering
Energy Metering... - Page 18 Proprietary and confidential. Property of APsystems.
- Page 19 Connect ECU to the router through the Ethernet cable Make sure the connection between the ECU & the router is ok Power ECU, it will obtain automatically IP address from the router Ensure the router connects to the internet, then the ECU will connect to the internet.
- Page 20 Connect the ECU-R or the ECU-C to the router through WiFi -> set up through ECU configuration...
- Page 22 Download APsystems EMA Manager APP in your smartphone (utilize the ECU APP embedded in app) Connect your smartphone to ECU-R or ECU-C WiFi hot spot Open ECU App : 1 - ECU configuration 2 - System check up...
- Page 23 Enter “EMA Manager” in your smartphone Play Store, select APsystems EMA Manager and click “install” Or scan QR code in the Installation Manual And download ECU App...
- Page 25 Open Settings/connections/Wi-Fi in your smartphone select ECU hot spot for ECU-R : ECU_R_216000XXXXXX for ECU-C : ECU-WIFI_XXXX 216000XXXXXX = ECU-R ID XXXX = 4 last digits of ECU-C ID Warning : If your ECU has a button “AP” on the side of the casing, the Wifi hotspot is activated for 1 hour after the ECU is powered.
- Page 26 ECU-R : Enter password 88888888 ECU-C : no password then click “connect”...
- Page 27 Check your smartphone is connected to ECU hot spot...
-
Page 28: Ecu Configuration
1- ECU Configuration Proprietary and confidential. Property of APsystems. - Page 29 Open ECUAPP on your smartphone, and check on Home Page you are connected to the ECU then click “Settings”...
- Page 30 From the Settings Page click “Date, Time” then click “Sync phone time” and “OK”...
- Page 31 From Setting menu click "ID Management"...
- Page 32 It is a 12 digits ID located on the front of the ECU case. UID helps to identify each microinverter and his version : - starting with 501 or 502 -> YC1000 - starting with 406, 408 or 409 -> YC600 - starting with 801, 802 ->...
- Page 33 Select SCAN to enter inverter ID by camera Then, scan all inverter ID To speed up the process read barcodes on inverter map...
- Page 34 Inverter ID are displayed in the list check the box in order to select all inverters click “SYNC”...
- Page 35 Click “OK” and check ID registration in ECU is successful...
- Page 36 from Settings menu click “Grid Profile” then Click “Please Select” That setting may also be done remotely from EMA monitoring...
- Page 37 Select the right setting In the rolling menus Then click “OK” Selected grid profil is displayed, then click “Update”...
- Page 38 2 – System check up Proprietary and confidential. Property of APsystems.
- Page 39 Back to Home Page slide your finger from top to bottom screen to refresh data, Check number of inverter registered (2 then after about 2 minutes check ECU is connected to all inverters (here 2 out of 2)
- Page 40 Check if all Inverters and their PV modules are On the Producing. Homepage, tap on “Data” Verify the AC and Frequency.
- Page 41 If ECU is connected to the internet router via Ethernet cable click “LAN” in the Setting menu check setting is “Obtain an IP address automatically” and IP address is not 192.168.131.228...
- Page 42 In case wire connection via RJ45 port is not possible, you may connect ECU to the internet router through WiFi : From Settings menu click “WLAN” Select the right network...
- Page 43 Enter the Password click “SEND” Then it will display this message...
- Page 44 Close WLAN menu, then open it again check WiFi connection...
- Page 45 Lights up green -> ECU is powered Lights up green -> send data to EMA ECU-C is connected to internet and EMA monitoring...
- Page 46 THANK YOU! Proprietary and confidential. Property of APsystems.
Need help?
Do you have a question about the ECU-C Zigbee and is the answer not in the manual?
Questions and answers