Liberty Pumps 441 Installation Manual
Battery backup system
Hide thumbs
Also See for 441:
- Installation manual (48 pages) ,
- Supplemental instructions (4 pages) ,
- Installation manual (17 pages)
Table of Contents
Advertisement
Quick Links
Installation Manual
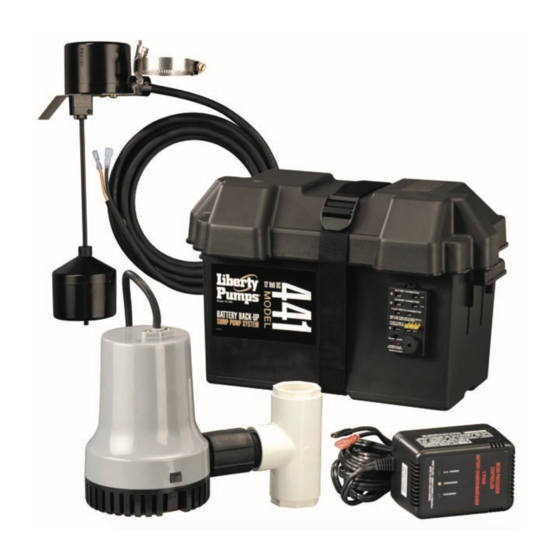
Model 441 Battery Backup System
7000 Apple Tree Avenue
Bergen, NY 14416
Phone: (800) 543-2550
Fax: (585) 494-1839
www.libertypumps.com
*Do not throw away or lose this manual.
©Copyright 2009 Liberty Pumps Inc. All rights reserved
IMPORTANT:
Prior to installation, record Model, Serial Number, and
Code Number from pump nameplate for future reference.
MODEL ________________________
SERIAL ______________________
CODE
______________________
INSTALLATION
DATE
_______________________
4414000B
1
Advertisement
Table of Contents
Troubleshooting

Subscribe to Our Youtube Channel
Related Manuals for Liberty Pumps 441


Summary of Contents for Liberty Pumps 441
- Page 1 Prior to installation, record Model, Serial Number, and Code Number from pump nameplate for future reference. MODEL ________________________ SERIAL ______________________ CODE ______________________ 7000 Apple Tree Avenue INSTALLATION Bergen, NY 14416 DATE _______________________ Phone: (800) 543-2550 Fax: (585) 494-1839 www.libertypumps.com ©Copyright 2009 Liberty Pumps Inc. All rights reserved...
-
Page 2: General Information - All Models
Risk of flooding. DO NOT run pump dry. To do so will damage seals and can cause leaking and property damage. • DO NOT use pumps in water over 140°F (60°C). • DO NOT use pumps in mud, sand, cement, oil or chemicals. ©Copyright 2009 Liberty Pumps Inc. All rights reserved... -
Page 3: Installation Of Pump
Personal injury and flood hazard. Do not turn the pump on until all the fittings are glued and the glue has dried. Loose fittings can unexpectedly disconnect from pipes and cause personal injury and flooding. ©Copyright 2009 Liberty Pumps Inc. All rights reserved... -
Page 4: Preparation For Installation
2. Separate the float switch cord plug from the sump pump cord plug. 3. Plug the pump power cord plug directly into the outlet Figure 2 - To bypass the float ©Copyright 2009 Liberty Pumps Inc. All rights reserved... -
Page 5: Installation
INSTALL BACKUP PUMP There are two ways to install the Battery Back-up Pump. Method A and Method B. See Figure 3 to determine which method to use. Both methods are acceptable. ©Copyright 2009 Liberty Pumps Inc. All rights reserved... - Page 6 13.5” at the bottom of the pit, and the minimum recommended depth Figure 6 – Method B installation diagram of the basin is 22”. ©Copyright 2009 Liberty Pumps Inc. All rights reserved...
- Page 7 2. Make the final adjustments. Make sure the pumps and the switches do not interfere with each other. Make sure there is plenty of room for the float switches to either swing or to move up and down from their “off” to their “on” positions. ©Copyright 2009 Liberty Pumps Inc. All rights reserved...
-
Page 8: Electrical Connections
Positive pump connection Negative lead from the pump Negative pump connection Figure 8 – Wiring Connections for Model 441 CHARGER/BATTERY INSTALLATION NOTICE: An alarm, located in the junction box, automatically sounds when the system runs if the alarm is in the “Enable”... - Page 9 Green/Yellow LEDs Alternately Flashing - System is in Error Mode (see Table II, Page 10) NOTICE: For more detailed information, see “Charger Operation” on page 10. Figure 9 – Model 441 Charger LED Panel TABLE II - Model 441 Charger Error Table (Green and Yellow LEDs will flash alternately) Error Description Possible Causes...
-
Page 10: Operation / Troubleshooting
• A built-in safety timer starts when the charger enters the Constant Current/Constant Voltage Charge stage (Yellow LED is continuously on). The 441 system has a 90 hour safety timer. • To reset the charger simply unplug it from the 120V outlet for 10 seconds and then plug it back in. -
Page 11: Battery Requirements
1. Improper float switch setting. Adjust distance between rubber stoppers on float rod to achieve desired pump cycle. 2. Main check valve located between discharge of primary pump and the Backup Sump Pump tee is not installed or is not working properly. Install or repair as required. ©Copyright 2009 Liberty Pumps Inc. All rights reserved... -
Page 12: Repair Parts
Charger Kit (includes wires, junction box) K001098 Battery Lead (††) K001120 Reducer Bushing (2) (†) 4413000 • Fittings Package K001099 † Included in Fittings Package. †† Included with Key No. 10. • Not illustrated. * Purchase locally. ©Copyright 2009 Liberty Pumps Inc. All rights reserved... -
Page 13: Year Limited Warranty
2 Year Limited Warranty Liberty Pumps, Inc. warrants that pumps of its manufacture are free from all factory defects in material and workmanship for a period of 2 years from the date of purchase. The date of purchase shall be determined by a dated sales receipt noting the model and serial number of the pump.
Need help?
Do you have a question about the 441 and is the answer not in the manual?
Questions and answers