
Related Manuals for Coby COBY TFDVD7052


Summary of Contents for Coby COBY TFDVD7052
- Page 1 TFDVD7052 7″ Widescreen TFT Portable Tablet DVD/CD/MP3 Player Instruction Manual Please read this manual carefully before operation.
-
Page 2: Precautions
CAUTION RISK OF ELECTRIC SHOCK DO NOT OPEN CAUTION: TO REDUCE THE RISK OF FIRE AND ELEC- TRIC SHOCK, DO NOT REMOVE THE COVER (OR BACK) OF THE UNIT. REFER SERVICING ONLY TO QUALIFIED SERVICE PERSONNEL. The lightning flash with arrowhead symbol within an equilateral triangle is intended to alert the user to the presence of uninsulated “dangerous voltage”... - Page 3 PRECAUTIONS Do not make any changes or modifications to the equipment unless otherwise specified in the manual. If such changes or modifications should be made, you could be required to stop operation of the equipment. For recycling or disposal information about this product, please contact your local authorities or the Electronics Industries Alliance: www.eiae.org.
-
Page 4: Important Safety Instructions
IMPORTANT SAFETY INSTRUCTIONS Read Instructions: All the safety and operating instructions should be read before the product is operated. Retain Instructions: The safety and operating instructions should be retained for future refer- ence. Heed Warnings: All warnings on the product and in the operating instructions should be adhered to. - Page 5 IMPORTANT SAFETY INSTRUCTIONS Outdoor Antenna Grounding: If an outside antenna is connected to the product, be sure the antenna system is grounded so as to provide some protection against voltage surges and built-up static charges. Article 810 of the National Electrical Code, ANS/NFPA 70 provides information with regard to proper grounding of the mast and supporting structure, grounding of the lead-in wire to an antenna-discharge unit, size of grounding conductors, location of antenna-discharge unit, connection to grounding electrodes, and requirements for the...
- Page 6 IMPORTANT SAFETY INSTRUCTIONS Replacement Parts: When replacement parts are required, be sure that your service techni- cian has used replacement parts specified by the manufacturer or have the same charac- teristics as the original part. Unauthorized substitutions may result in fire, electric shock, or other hazards.
-
Page 7: Table Of Contents
TABLE OF CONTENTS PRECAUTIONS ...2 IMPORTANT SAFETY INSTRUCTIONS ...4 TABLE OF CONTENTS ...7 PACKAGE CONTENTS ...9 ABOUT OPTICAL DISCS ...10 Disc Requirements...10 Disc Care and Maintenance ...10 Handling a Disc ...10 Cleaning a Disc ...10 LOCATION OF CONTROLS ... 11 Front View ... - Page 8 Clear ...20 Search ...20 DVD Mode...20 CD Mode ...20 LCD Mode ...21 Program Function ...21 DVD Program Mode ...21 CD Program Mode ...22 SETUP ...23 Language Setup ...23 Screen Setup ...23 Audio Setup ...24 Custom Setup ...24 SPECIFICATIONS ...25 TROUBLESHOOTING ...26 TABLE OF CONTENTS...
-
Page 9: Package Contents
PACKAGE CONTENTS Please make sure the following items are included in the package. If any items are missing, please contact your local dealer. Earphones Headrest Mounting Bag×1... -
Page 10: About Optical Discs
ABOUT OPTICAL DISCS Disc Requirements This DVD player supports playback of the following discs. Type DVD-Video Discs Audio Compact Discs (CDs) JPEG CDs This unit can play back CD-R and CD-RW discs that contain JPEG picture files. Discs not listed above are not supported by this unit (eg, PC CD-ROM, CD-Extra, CD-G, CD-I, etc.) Disc Care and Maintenance Optical discs (DVDs, CDs) contain high-density compressed data and need proper handling. -
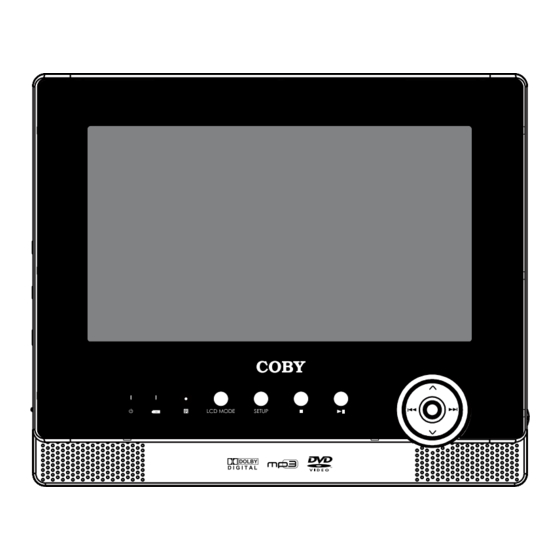
Page 11: Location Of Controls
LOCATION OF CONTROLS Front View Power on Indicator Charging Indicator For your reference: 1. Place a disc with the label side facing up in the CD compartment. 2. To start playback, press the PLAY/PAUSE button. (Some discs will start playback automatically). 3. -
Page 12: Back View
LOCATION OF CONTROLS LOCATION OF CONTROLS Back View Left View Right View Volume Dial Battery Compartment Using the Stand 1. Lift up the stand from the groove. 2. Support the unit agaist the stand. 3. Set the lock switch to “Lock”. Power Switch Set the power on/off. -
Page 13: Remote Control
LOCATION OF CONTROLS LOCATION OF CONTROLS Remote Control Title Power Menu Enter Direction buttons Mute Numeric buttons Clear Repeat A-B Repeat Audio Subtitle Mode Mute Clear Step Dispaly LCD Mode Setup Play/Pause Stop Zoom Prev./Nex/Skip Fast Forward/Reverse Step Slow Program Angle... -
Page 14: Battery Installation
LOCATION OF CONTROLS Battery Installation Headphone Connection Be sure that your unit is at low volume level before con- To Headphone Jack necting the headphones. Increase the volume gradually for your comfortable listening. CAUTION: Hearing experts advise against the constant use of per- sonal stereos played at high volume. -
Page 15: Connections
CONNECTIONS CONNECTIONS Audio & Video Connections AV Out - Output the AV Signal a). Connect the player to TV or the moniter by the RCA cable. b). Slide the AV switch to AV OUT. AV IN - Input the AV Signal a). -
Page 16: Power Connection
Power Connection Do not connect the power cord until all other connections have been made. Power is supplied through the provided appropriative power adapter, one end of which is connected to the DC IN jack on the main unit, another to wall outlet with AC100-240V. Note: a. -
Page 17: Basic Operations
BASIC OPERATIONS Open the disc compartment cover manually, load a disc with the label-side facing up. Close the disc compartment cover manually. If a single-sided disc is loaded upside-down, the player will display “NO DISC” or “Invalid Disc”. Slow/Step... -
Page 18: Menu Navigation
BASIC OPERATIONS you can use the numeric keypad to input data. Clear Wrong Regional Disc Wrong Password Wrong Disc... -
Page 19: Player Functions
PLAYER FUNCTIONS... -
Page 20: Repeat A-B Mode
PLAYER FUNCTIONS 100% In JPEG Mode Clear Search display the search bar shown below: 02/12 03/06 Current Title Total Chapters Total Titles Current Chapter _:__:__ In DVD mode, p numeric Play/Pause and playback. exit... -
Page 21: Lcd Mode
PLAYER FUNCTIONS Press the LCD Mode button once to display the LCD menu. • Press the Up/Down direction button to select the desired item, press the Left/Right direction button to adjust. • When the SCREEN is selected, press the Left/Right direction button to change the screen dimension as 16:9 or 4:3. -
Page 22: Cd Program Mode
CD Program Mode Load a CD and press the PROGRAM button. Press the DIRECTION buttons to select the Track and press the ENTER button to confirm. The programmed track will be listed in the left column. Repeat steps 1-2 until you have finished programming your selections or when you have programmed the maximum 20 tracks. -
Page 23: Setup
Various features of the player can be adjusted in the SETUP menu 1. Press the SETUP button to show the setup menu. 2. Press the direction buttons to select the desired item. 3. Press the ENTER button to confirm. Language Setup Language Setup Encoding Sets the Encoding Mode... -
Page 24: Audio Setup
Digital Out Downmix Custom Setup Parental Control Password Style Angle mark SETUP SETUP Lo/Ro,Lt/Rt Sets the style of the menus of the player. Sets the angle mark of the disc. SPDIF/RAW Lo/Ro Style1... -
Page 25: Specifications
SPECIFICATIONS SPECIFICATIONS 868g 907-FD70-51CT-00R... -
Page 26: Troubleshooting
If you have a problem with this unit, please read the troubleshooting guide below and check our website at www. cobyusa.com for Frequently Asked Questions (FAQs) and firmware updates. If these resources do not resolve the problem, please contact Technical Support. COBY Electronics Technical Support 150 Knowlton Way Savannah, GA 31407... - Page 27 TROUBLESHOOTING • Ensure that the TV and amplifier connections are secure and correct. • Try a different Audio track of the DVD by pressing AUDIO. • Ensure that the MUTE function of the TV, Amplifier, or Player is not engaged. The remote control doesn’t work.
- Page 28 COBY Electronics Corp. 56-65 Rust Street 1991 Marcus Avenue,Suite 301 Maspeth, NY 11378 Lake Success, NY 11042 www.cobyusa.com www.ecoby.com 7052CT...
Need help?
Do you have a question about the COBY TFDVD7052 and is the answer not in the manual?
Questions and answers