Table of Contents
Advertisement
Quick Links
Advertisement
Table of Contents

Related Manuals for Magnavox MM444BT


Summary of Contents for Magnavox MM444BT
- Page 2 The product as repuired by IEC 60825-1 second edition 2007-03. Complies with 21 CFR 1040.10 and 1040.11 except for deviations pursuant to Laser Notice No .50, dated Jane 24,2007 This equipment complies with FCC radiation exposure limits set forth for an uncontrolled environment.
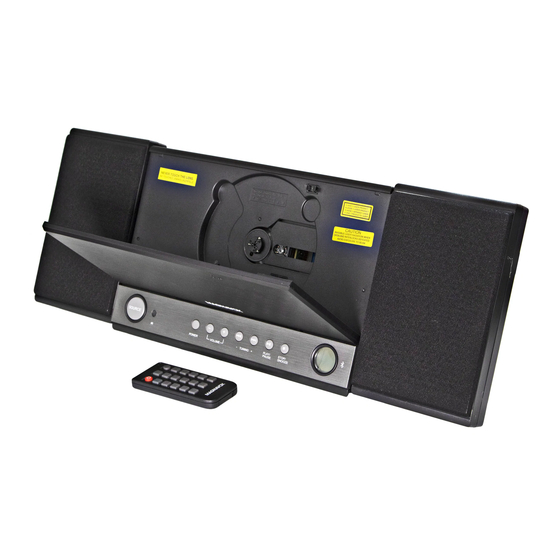
- Page 7 Welcome Congratulations on purchasing this Flat CD Micro System. You can now listen to your CD's, Bluetooth and FM radio. You should have CD Micro System Speakers Remote control Power adaptor...
- Page 8 Your Flat CD Micro System CD Door Open/Close Stop Function Volume Play/Pause Display Power / Remote Tuning Standby sensor AUX–IN socket Headphone socket Left speaker socket Right speaker socket DC 5V Power socket...
- Page 9 Hanging points Back–up batteries Stand FM Antenna included) Hanging points Speaker cables Speaker Stand...
-
Page 10: Preparing The Remote Control
Preparing the remote control IMPORTANT:The remote control will work within a 6m range; however, this may be impossible if there are obstacles between the unit and the control. If the remote control is used near other devices which generate infrared rays then it may not operate properly and may interfere with other devices. - Page 11 radio stations in FM condition radio stations in FM condition...
- Page 12 Fitting the back-up batteries(included) Backup batteries prevent your CD Micro System from losing all the saved information in the event of a power cut. It is recommended that you fit the batteries. Push the catch on the battery compartment cover in the direction of the arrow shown. You will now be able to lift the cover off.
- Page 13 Setting up your Flat CD Micro System Connecting the power Warning: Ensure your power supply voltage corresponds to the voltage printed on the underside of the unit. Slot the jack on the power adaptor into the power socketin the side of your Flat CD Micro System.
- Page 15 Positioning your Flat CD Micro System Wall mounted Attached speakers Separated speakers Separated speakers: Using this method the speakers can be separated and placed where you want them. You have already completed all assembly require see below to for how to use the stands. Attached speakers: You can attached the speakers to the sides of the Flat CD Micro System, see page 12.
-
Page 16: Attaching The Speakers
Attaching the speakers Place a small screwdriver against the bottom edge of the attachment tabs in the sides of the speakers, push them upwards and outwards until fully extended Slot the attachment tabs on the sides of the speakers into the slots in the sides of the Flat CD Micro System. -
Page 17: Wall Mounting
Wall mounting WARNING: Before attempting to fit the Flat CD Micro System to the wall, if you are in any way unsure about how or where to fit the Flat CD Micro System you should employ a qualified person to install the Flat CD Micro System. IMPORTANT: There are no fittings supplied with your Flat CD Micro System. - Page 18 Using your Flat CD Micro System Basic use Once the disk has been read, press "play/pause “button and CD player will start play track...
- Page 20 Using the BT (Bluetooth): The first time you use the unit or pair it to a new Bluetooth Device, pair it as follows: 1. Power on the unit from standby mode and enter to BT (Bluetooth) mode as previously instructed. “bt” will appear on the display and blink. 2.
-
Page 21: Troubleshooting
Troubleshooting Problems Solution Cause(s) The appliance is not correctly Ensure the plug is correctly fitted plugged in or the power is not No power and the power is turned on. turned on at the socket. Change the fuse in the plug. The fuse in the plug has blown. -
Page 22: Technical Specification
Technical Specification Power Source: DC 5, 1A, Center positive Clock Back Up: 2 x 1.5 “AA” battery (included) Power source of AC/DC AC 100-240V~50/60Hz 0.4A Adaptor: Output of the AC/DC Adaptor: DC 5V, 1A, Center positive Radio Band Coverage: FM 87.5 - 108 MHz Audio Power: 1.8W per Channel Impendence of Speakers:...
Need help?
Do you have a question about the MM444BT and is the answer not in the manual?
Questions and answers