
Subscribe to Our Youtube Channel
Related Manuals for Ausrv X11 2021


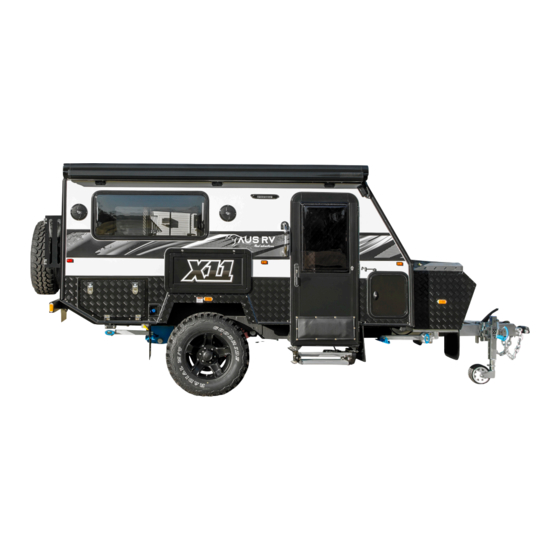
Summary of Contents for Ausrv X11 2021
- Page 1 OFFROAD HYBRID CARAVAN OWNER’S MANUAL EDITION: 2021 - Version 1 www.ausrv.com Phone: 833 632 8778 Copyright © AUSRV INC 2021 All Rights Reserved...
- Page 2 Your use of this Owner’s Manual does not constitute any right or license for you to use AUSRV’s or any other party’s service marks or trademarks, without the prior written permission of AUSRV or the applicable party.
- Page 3 TIRE SIZE: DEALER PH: DISCLAIMER: By receiving this handbook, you confirm there you have read and agree to all the terms and conditions and understood the use and maintenance care of AUSRV Campers and Caravans Inc. www.ausrv.com Ph: 833 872 8778...
-
Page 4: Table Of Contents
Tire Safety Information ............10 Trailer Specifications ............22 Steps for Determining Correct Load Limit - Trailer 10 AUSRV Contact Details and Stores ......22 Trailers 10,000 Pounds GVWR or less ....10 Using Your Trailer ..............23 Steps for Determining Load Limit -TOW VEHICLE 10 Opening and Closing the Roof ........ - Page 5 Solar Panels ..............38 Removing the access door ..........52 Sealants ................38 Closing the access door ........... 52 Canopy Lifting Mechanism (Pop Tops Only) ..39 Starting the Appliance ............. 53 Roof Skirt Elastic Cord ..........39 Inspections before each use .......... 53 Trailer Body Maintenance ..........
-
Page 6: General Safety Information
AUSRV trailers are manufactured using many third party supplied products which have separate manuals. These manual must be read in conjunction with this document and all instructions followed. If your trailer does not have additional... -
Page 7: Reporting Safety Defects
If you believe that your vehicle has a defect that could cause a crash or could cause injury or death, you should immediately inform the National Highway Traffic Safety Administration (NHTSA) in addition to notifying AUSRV. If NHTSA receives similar complaints, it may open an investigation, and if it finds that a safety defect exists in a group of vehicles, it may order a recall and remedy campaign. -
Page 8: Terminology & Abbreviations
Tow Vehicle and Trailer Combination. This includes whatever you add as payload (e.g. water, gas, equipment, and luggage), and total weight of the tow vehicle. The GTM Rating must not be exceeded. Caravans for illustration purposes only. www.ausrv.com Ph: 833 872 8778... -
Page 9: Secondary Escape
Toe can be measured in linear units, at the front or rear of the tire, or as an angular deflection. In the case of AUSRV products, the “toe in”... -
Page 10: Tire Safety Information
If your vehicle will be towing a trailer, load from your trailer will be transferred to your vehicle. Consult the tow vehicle’s manual to determine how this weight transfer reduces the available cargo and luggage capacity of your vehicle. www.ausrv.com Ph: 833 872 8778... -
Page 11: Tire Safety - Everything Rides On It
“maximum permissible inflation pressure” on the tire sidewall. This number is the greatest amount of air pressure that should ever be put in the tire under normal driving conditions. www.ausrv.com Ph: 833 872 8778... -
Page 12: Checking Tire Pressure
A wheel alignment adjusts the angles of the wheels so that they are positioned correctly relative to the vehicle’s frame. This adjustment maximizes the life of your tires. These adjustments require special equipment and should be performed by a qualified technician. www.ausrv.com Ph: 833 872 8778... -
Page 13: Tire Repair
This two- or three-digit number is the tire’s load index. It is a measurement of how much weight each tire can support. You may find this information in your owner’s manual. If not, contact a local tire dealer. Note: You may not find this information on all tires because it is not required by law. www.ausrv.com Ph: 833 872 8778... -
Page 14: Treadwear Number Utqgs Information
Excessive speed, underinflation or excessive loading, either separately or in combination, can cause heat build-up and possible tire failure. From highest to lowest, a tire’s resistance to heat is graded as “A”, “B”, or “C”. www.ausrv.com Ph: 833 872 8778... -
Page 15: Additional Information On Light Truck Tires
Make sure your tire valves have valve caps. • Check tire pressure before going on a long trip. • Do not overload your vehicle. Check the Tire Information and Loading Placard or User’s Manual for the maximum recommended load for the vehicle. www.ausrv.com Ph: 833 872 8778... -
Page 16: Propane Safety
Flexible hoses are used between the Propane Gas Cylinder and regulator as well as between your slide-out kitchen cooker (if fitted) and the gas bayonet. These flexible hoses are easily accessible and shall be inspected regularly. www.ausrv.com Ph: 833 872 8778... -
Page 17: Propane Cylinder Safety
Close cylinder valves when appliances are not in use or while refueling is in progress. • Ensure cylinder valves are closed to prevent the unintended release of gas from a cylinder. 45˚ Discharge Cylinder relief valve Camper 45˚ Discharge www.ausrv.com Ph: 833 872 8778... -
Page 18: Gas Appliance Safety
Internal gas appliances have an isolation valve fitted to the gas line. During travel these should be turned to the off position where practical and always turn the valve on the active gas bottle off when towing. www.ausrv.com Ph: 833 872 8778... -
Page 19: Electrical Safety
The battery area/compartment is designed for the use of non-ventilated batteries only. Do NOT plate a battery that requires venting into this area/compartment Vented batteries can release poisonous and flammable gas that could lead to a fire or explosion causing serious injury or death. www.ausrv.com Ph: 833 872 8778... -
Page 20: General Safety
Always follow the Maintenance schedule contained in this manual. More extreme conditions may warrant more frequent maintenance in particular, water crossings, exposure to saltwater environments and extended travel over rough terrain. www.ausrv.com Ph: 833 872 8778... -
Page 21: Jacking Your Trailer
• Never cover permanent vents in the roof or pop top skirt or annex. • When using a generator, the generator must be placed where carbon monoxide fumes cannot enter the trailer. Carbon Monoxide Detector www.ausrv.com Ph: 833 872 8778... -
Page 22: Trailer Specifications
19” Digital ready TV FULL ANNEX Included BATTERY 2 x 100ah AGM *All weights do not include gas bottles AUSRV Contact Details and Stores CALIFORNIA ARIZONA Los Angeles 3908 East Broadway Rd. 8420 Kass Dr. Suite 100 Phoenix, AZ 85040... -
Page 23: Using Your Trailer
Lower the rear roof section using the lever handle. Lower the front section using lever handle. Check that no part of the roof skirt is caught between the roof and trailer seals. Lock each corner with over center latches and pins. www.ausrv.com Ph: 833 872 8778... -
Page 24: Connecting To The Tow Vehicle
The long distance between the axle center and the point of attachment can be quite long further exacerbating the effect putting stress on components. Using a shock absorbing hitch will reduce the effect considerably. www.ausrv.com Ph: 833 872 8778... -
Page 25: Connecting The Hitch
Connecting the Hitch Here is a short guide on how to safely use your coupling to couple and uncouple the trailer from the towing vehicle. Make sure the handbrake is applied prior to coupling and uncoupling. www.ausrv.com Ph: 833 872 8778... - Page 26 Test if the dust cover is connected to the bump cover by applying a slight upward force to the dust cover, it shouldn’t separate. This procedure should be applied if you are uncoupling or coupling up. www.ausrv.com Ph: 833 872 8778...
- Page 27 Offer up the tow pin to the coupling making sure the tow pin cover is removed and there is no visible debris on it. Locking plate should be in unlocked position as shown. Lower the coupling onto the tow pin. www.ausrv.com Ph: 833 872 8778...
- Page 28 1. Verify the pin is correctly through the mechanism and assemble the cap. If the cap will not fit check the locking mechanism is in the correct locked orientation. Detail view of pin through locking mechanism. www.ausrv.com Ph: 833 872 8778...
- Page 29 Push down the button 1 and push the locking mechanism back 2. When the locking mechanism is all the way back release the button while holding the mechanism to ensure it does not spring back to the locked position. STEP 2 Lift the coupling up off the tow pin. www.ausrv.com Ph: 833 872 8778...
-
Page 30: Connecting Wiring
Chains should be crossed over and connected with suitable rated shackles. Ensure they are connected in a way to prevent them dragging on the road but not too tight as to restrict the articulation of the vehicle and trailer combination. www.ausrv.com Ph: 833 872 8778... -
Page 31: Connecting The Breakaway
• The tow vehicle should supply a maintenance charge to the trailer batteries while towing to ensure peak battery capacity for the breakaway system www.ausrv.com Ph: 833 872 8778... -
Page 32: Loading Your Trailer
Extinguisher is properly mounted and within date. • Extinguisher charge gauge is in green. Brakes & Breakaway System • Brakes operate correctly when both operated by manual control and via pedal. Lights • Ensure all trailer lights are functioning www.ausrv.com Ph: 833 872 8778... -
Page 33: Operating Trailer Features
Using the Slide Out Kitchen Before sliding out kitchen, retract pad bolts and lock in retracted position When kitchen is extended release the support leg by pressing the slide bolt release button. Extend support leg and secure locking screws. www.ausrv.com Ph: 833 872 8778... -
Page 34: 12 Volt Electrical System
External LED Lights: These lights are switch via the panel inside the main entry and on some models, the passenger side lights may be switched from inside the side storage area nearest the light. www.ausrv.com Ph: 833 872 8778... -
Page 35: Towing Your Trailer
The below list identifies common items that should be done each day before traveling. • Check wheel nut torque using a torque wrench to correct torque setting. • Check hitch connection and operation. • Inspect tires for damage and inflation. www.ausrv.com Ph: 833 872 8778... -
Page 36: Correct Wiring Of Tow Vehicle
The Anderson plug can be connected to the tow vehicle start battery on the vehicle and should include the following to protect the start battery. 50 amp relay to stop power supply when vehicle is not running. 50 amp fuse or circuit breaker at the battery www.ausrv.com Ph: 833 872 8778... -
Page 37: Choosing A Camp Site
During periods of rain the awning on trailers must be set to ensure water cannot collect on top. The water must always evacuate the awning to prevent damage. The illustration below sets out correct set up for rain on travel trailers indicat- ed by green arrow. www.ausrv.com Ph: 833 872 8778... -
Page 38: Care And Maintenance Of The Trailer
When used in these areas the product should be thoroughly washed after use and unpainted metal surfaces should be coated in a suitable protectant. Lanotec lanolin spray, Inox or similar are recommended. www.ausrv.com Ph: 833 872 8778... -
Page 39: Solar Panels
Regular inspection and replacement when necessary is part of the maintenance schedule. The illustrations below show the correct tension marked by a green tick and incorrect shown by the red cross www.ausrv.com Ph: 833 872 8778... -
Page 40: Trailer Body Maintenance
Flush system thoroughly to remove all residue of antifreeze. Winter Storage Storing your trailer unused through winter requires maintenance, particularly the batteries. Ensure the batteries are regularly charged and conditioned during storage, at least monthly. www.ausrv.com Ph: 833 872 8778... -
Page 41: Mechanical Maintenance
Magnets and shoes must be changed when they become worn or scored to avoid inefficient vehicle braking. Brake Lubrication This should only be done by qualified persons. CAUTION Do not get grease or oil on the brake linings, drums, or magnets. www.ausrv.com Ph: 833 872 8778... -
Page 42: Magnets
It is important to replace both shoes on each brake and both brakes of the same axle. This is necessary to retain the “balance” of your brakes. Be sure to replace your shoes only with genuine AUSRV parts available from our outlets. -
Page 43: Handbrake
D in a clockwise direction. Once adjusted re-tighten lock nuts and test. Always ensure that wheels turn freely when handbrake is off. Overtightened cables can cause brakes to drag and damage the brake linings. www.ausrv.com Ph: 833 872 8778... -
Page 44: Hitch
Flush with clean water if locking mechanism does not open fully due to dirt ingress. Ball Bearing Slides To lubricate and protect from corrosion the ball bearing slides should be lubricated with a small amount of general purpose grease every 6 months. www.ausrv.com Ph: 833 872 8778... -
Page 45: Plumbing And Toilet
Waste Holding Tank: The recommended product for the waste holding tank on Thetford toilet systems is Aqua Kem Blue or Aqua Kem Green for better environmental performance. Flush Water Tank: Only suitable for AUSRV models that have a toilet flush tank. Thetford recommend “Aqua Rinse” ***Do not add to main water tanks! *** Grey Water Tank: Tank Freshener www.ausrv.com... -
Page 46: Truma Aquago Hot Water System
For your own safety it is absolutely necessary to have the complete gas installation regularly checked by an expert (at least every 2 years). The vehicle owner is always responsible for arranging the gas inspection. www.ausrv.com Ph: 833 872 8778... -
Page 47: Safe Operation
Shut OFF the appliance when refueling or pumping gas, in multi-story car parks, in garages or on ferries. • To avoid damage, make sure no spray water enters the appliance when cleaning the RV, e.g., do not spray directly into the openings/ ventilation grille. www.ausrv.com Ph: 833 872 8778... -
Page 48: Safe Handling Of Malfunctions
If there is a failure of the flue fan, the gas supply to the burner is switched off. Monitoring of hot water temperature A water over temperature switch avoids excessively high water temperatures in case of a fault. www.ausrv.com Ph: 833 872 8778... -
Page 49: Operating Instructions
102 °F (39 °C) in “COMFORT” mode and 41 °F (5 °C) in “ECO” mode. NOTICE Risk of damage in frost conditions. Refer to “Operation in frost conditions” www.ausrv.com Ph: 833 872 8778... -
Page 50: Pressure Relief Valve
The appliance is equipped with a pressure relief valve (Fig. 3) that complies with the standard for Relief Valves for Hot Water Supply Systems, ANSI Z21.22 4: Pressure relief valve 4a: Lever in “Valve closed during operation” position 4b: Lever in “open” position www.ausrv.com Ph: 833 872 8778... -
Page 51: Access Door
Do not try to remove the access door in Position ‘1’. Position ‘1’ is the • maximum opening width of the access door. Only remove the access door in Position ‘2’. • Open the access door to Position ‘1’ www.ausrv.com Ph: 833 872 8778... -
Page 52: Removing The Access Door
If removed, insert the access door into the cover plate. Make sure that the webbing is not pinched between the access door and the cover plate. Press the access door against the cover plate. Turn the turn lock clockwise into the horizontal position. www.ausrv.com Ph: 833 872 8778... -
Page 53: Starting The Appliance
Keep the appliance free of foreign objects, e.g., leaves, animals, spiderwebs, and keep the area around free of snow and ice. The appliance will not function properly if the intake air or exhaust terminal is obstructed. www.ausrv.com Ph: 833 872 8778... -
Page 54: Operating Procedures
• Test the temperature of the water before placing a child in the bath or shower. • Do not leave a child or an infirm person in the bath unsupervised. www.ausrv.com Ph: 833 872 8778... - Page 55 Water temperature at the outlet is approximately 120 °F (49 °C). AquaGo comfort / AquaGo comfort plus • The appliance is now ready for using the control panel inside your vehicle. Refer to “Operating modes (control panel)” on page 56. www.ausrv.com Ph: 833 872 8778...
-
Page 56: Operating Modes (Control Panel)
Only AquaGo comfort / AquaGo comfort plus. See “Decalcification” on page 62. Clean For safety reasons, after 30 seconds the decalcification process cannot be stopped until the system has been rinsed in accordance with the instructions. See “Interrupting decalcification” on page 67. www.ausrv.com Ph: 833 872 8778... -
Page 57: Operating In Frost Conditions
An electric antifreeze kit is available as an accessory (ask your dealer). With this kit, the appliance can be kept frost-free while you are driving or if there is no gas supply (to ambient temperatures of -4 °F (-20 °C)). The electric antifreeze kit includes detailed instructions. www.ausrv.com Ph: 833 872 8778... -
Page 58: Winterizing
Danger of crushing/pinching of fingers when the Easy Drain Lever is closed! Never put fingers between the Easy Drain Lever and latch. • Close the Easy Drain Lever and the access door. Once the water has been drained, the appliance is protected against freezing conditions. www.ausrv.com Ph: 833 872 8778... -
Page 59: Winterizing The Rv With A Winterizing Fluid
Turn OFF the electrical power supply and the LP gas supply before starting maintenance and repair work. • Allow the appliance to cool down. • Never actuate the pressure relief valve as long as the appliance is still hot. www.ausrv.com Ph: 833 872 8778... -
Page 60: Draining The Water And Cleaning The Water Inlet Filter
Open all hot water faucets and wait for cold water. This will ensure that hot water is removed from the appliance before draining. Turn OFF the water supply or switch OFF the water pump. 6. Leave the hot water faucets open in order to depressurize and vent the water system. www.ausrv.com Ph: 833 872 8778... - Page 61 Easy Drain Lever until it is locked by the latch. You can hear a “clicking” sound as the Easy Drain Lever engages. 11. Insert and close the access door (refer to “Closing the access door” on page 52). FIG. 10 *Or heating cartridge www.ausrv.com Ph: 833 872 8778...
-
Page 62: Decalcification
Models AquaGo basic without control panel: You can have these models decalcified by a Truma service partner. Please contact the following address: Truma Corp. 825 East Jackson Blvd. Elkhart, IN 46516,USA Toll Free 1-855-558-7862 Fax 1-574-538-2426 info@trumacorp.com www.truma.net www.ausrv.com Ph: 833 872 8778... - Page 63 Allow about 3 hours for decalcification. The appliance works on its own for most of this time. • Sensitive surfaces (e. g. marble) may be damaged through contact with the decalcification agent. Immediately remove splashes of decalcification www.ausrv.com Ph: 833 872 8778...
- Page 64 You must use the water inlet filter for decalcification (included with the delivery Fig. 1 – 11a). If you are using an electric antifreeze kit, it must be removed and be unplugged from the power supply before decalcification (see Fig. 11). www.ausrv.com Ph: 833 872 8778...
- Page 65 Open all water-release points, e.g., hot water faucets, showers, toilets. Once water flows uniformly, the water system is vented. Close the water-release points. You must bleed the water system thoroughly otherwise the circulation pump cannot circulate the decalcification solution. www.ausrv.com Ph: 833 872 8778...
- Page 66 • Switch ON the appliance at the POWER switch. • Insert and close the access door (refer to “Closing the access door” on page 52). You have to switch the appliance off and on to unblock decalcification and enable further operation. www.ausrv.com Ph: 833 872 8778...
- Page 67 Truma offers a rear installation gas connection kit (part no. 77000-37500) if installation from the back of the appliance is required. AquaGo comfort upgrade kit Truma offers a kit (part. no. 77000-00005) to upgrade from AquaGo basic to AquaGo comfort. www.ausrv.com Ph: 833 872 8778...
-
Page 68: Appendix A - Error Codes
Internal error s,s,s,s,l,l,s,l Short circuit shut-off valve Short circuit detection in the gas valve (shut-off part) detected a current > 1000 mA and shut off. s,s,s,l,s,s,s,s Malfunction of the MCU Internal error of the control unit. www.ausrv.com Ph: 833 872 8778... - Page 69 Temperature in the appliance below 27 °F (3 °C). s,s,s,l,l,l,l,l Decalcification finished. s,s,l,s,s,s,s Current too low. Current in the antifreeze kit too low (e.g. cable break). s,s,l,s,s,s,s,l Current too high. Current in the antifreeze kit too high (e.g. short circuit). www.ausrv.com Ph: 833 872 8778...
- Page 70 Replace pressure relief valve. This must be performed by a Truma certified service technician. Water escaping at Lime or dirt under the O-ring Clean the O-rings and their corresponding sealing surfaces water inlet filter seats. with clean water. www.ausrv.com Ph: 833 872 8778...
-
Page 71: Furnace
Immediately shut down the Furnace and call a service agency if the Furnace cycles erratically or delays on ignition. • Shut OFF the gas valve to the Furnace before shutting off the electrical supply if the gas supply fails to shut off, or if overheating occurs. www.ausrv.com Ph: 833 872 8778... - Page 72 Protect building materials from degrading from vent assembly gas exhaust. • Compartment must be closed when operating the Furnace. • Use only Dometic replacement parts and components, which are specifically approved for use with the Furnace www.ausrv.com Ph: 833 872 8778...
-
Page 73: Operation
If no gas odor is present, proceed to the next step. • At the exterior access panel, turn the switch on the Furnace to the ON position. • Turn ON the main power supply. • Set the thermostat to the desired temperature. www.ausrv.com Ph: 833 872 8778... -
Page 74: Turning Off The Furnace
The manufacturer requires the user to perform regular inspections and have periodic maintenance undertaken to ensure reliable and safe operation of the appliance. The user must ensure the periodic maintenance is done as per the manufacturers Operation Manual. www.ausrv.com Ph: 833 872 8778... -
Page 75: Schematics & Part Numbers
14mm Wheels Stud YHJL110 14mm Wheel Nut YZCQ029 M38 Castle Nut M38 Metric LGPJ002 90mm Bearing Dust Cap (3 ”) AUSRV Specific CSWH001 Wheel Bearing (Timken) 25590 Bearing Race 25590 Bearing Seal Metric 55 x 85 x 12mm 2 ¹¹/ ”... -
Page 76: Electrical Diagram
Electrical Diagram www.ausrv.com Ph: 833 872 8778... -
Page 77: Battery Care
Allowing your battery voltage to drop below 12.05v can permanently damage its performance and reduce its service life. AGM BATTERY STATE OF CHARGE Level Voltage 100% 13.00V 12.75V 12.50V 12.30V 12.15V 12.05V 11.95V 11.81V 11.66V 11.51V 10.50V www.ausrv.com Ph: 833 872 8778... -
Page 78: Charging System - Bm Pro
Never block vents associated with the BM PRO unit storage. • Do not modify or attempt own repairs on the BM PRO unit. • Maintenance and repairs should only be carried out by a suitably qualified and accredited person. www.ausrv.com Ph: 833 872 8778... -
Page 79: Batteryplus Trouble Shooting
SI Battery OK, solar available SR & HA battery OK, solar or Aux/Solar available Battery OK, Aux Available Fault on One or More Output Loads High Temperature Fault Battery Fault Solar Fault Other Fault Power Off www.ausrv.com Ph: 833 872 8778... -
Page 80: Hub Assembly
Hub Assembly www.ausrv.com Ph: 833 872 8778... -
Page 81: Trailing Arms And Bushes
Trailing Arms and Bushes www.ausrv.com Ph: 833 872 8778... -
Page 82: Service Record And Schedule
Check all seals on doors and hatches compress 30-50%. All seals in Seals & Latches serviceable condition and free of damage. Grease bushes and check for play. Check torque on suspension hanger bolts (190Nm) Suspension Check retaining chain shackles tight. Service Center Notes www.ausrv.com Ph: 833 872 8778... - Page 83 Check all seals on doors and hatches compress 30-50%. All seals in Seals & Latches serviceable condition and free of damage. Grease bushes and check for play. Suspension Check torque on suspension hanger bolts (190Nm) Check retaining chain shackles tight. Service Center Notes www.ausrv.com Ph: 833 872 8778...
- Page 84 Check panels are free of damage. Solar Panels Inspect cable glands and sealants on penetrations through floor. Inspect cables under body for damage to conduits. Cables Inspect cable glands and sealants on penetrations through floor. www.ausrv.com Ph: 833 872 8778...
- Page 85 Treat with tank cleaner and flush. Drain Fitting Check all metal drain fittings for corrosion Inspect for leaks. Turn on pump and ensure it doesn’t start due to loss of Water System pressure. Service Center Notes www.ausrv.com Ph: 833 872 8778...
- Page 86 Check all seals on doors and hatches compress 30-50%. All seals in Seals & Latches serviceable condition and free of damage. Grease bushes and check for play. Check torque on suspension hanger bolts (190Nm) Suspension Check retaining chain shackles tight. Service Center Notes www.ausrv.com Ph: 833 872 8778...
- Page 87 Check panels are free of damage. Solar Panels Inspect cable glands and sealants on penetrations through floor. Inspect cables under body for damage to conduits. Cables Inspect cable glands and sealants on penetrations through floor. www.ausrv.com Ph: 833 872 8778...
- Page 88 Treat with tank cleaner and flush. Drain Fitting Check all metal drain fittings for corrosion Inspect for leaks. Turn on pump and ensure it doesn’t start due to loss of Water System pressure. Service Center Notes www.ausrv.com Ph: 833 872 8778...
- Page 89 Check all seals on doors and hatches compress 30-50%. All seals in Seals & Latches serviceable condition and free of damage. Grease bushes and check for play. Check torque on suspension hanger bolts (190Nm) Suspension Check retaining chain shackles tight. Service Center Notes www.ausrv.com Ph: 833 872 8778...
- Page 90 Check panels are free of damage. Solar Panels Inspect cable glands and sealants on penetrations through floor. Inspect cables under body for damage to conduits. Cables Inspect cable glands and sealants on penetrations through floor. www.ausrv.com Ph: 833 872 8778...
- Page 91 Treat with tank cleaner and flush. Drain Fitting Check all metal drain fittings for corrosion Inspect for leaks. Turn on pump and ensure it doesn’t start due to loss of Water System pressure. Service Center Notes www.ausrv.com Ph: 833 872 8778...
- Page 92 Check all seals on doors and hatches compress 30-50%. All seals in Seals & Latches serviceable condition and free of damage. Grease bushes and check for play. Check torque on suspension hanger bolts (190Nm) Suspension Check retaining chain shackles tight. Service Center Notes www.ausrv.com Ph: 833 872 8778...
- Page 93 Check panels are free of damage. Solar Panels Inspect cable glands and sealants on penetrations through floor. Inspect cables under body for damage to conduits. Cables Inspect cable glands and sealants on penetrations through floor. www.ausrv.com Ph: 833 872 8778...
- Page 94 Treat with tank cleaner and flush. Drain Fitting Check all metal drain fittings for corrosion Inspect for leaks. Turn on pump and ensure it doesn’t start due to loss of Water System pressure. Service Center Notes www.ausrv.com Ph: 833 872 8778...
- Page 95 Check all seals on doors and hatches compress 30-50%. All seals in Seals & Latches serviceable condition and free of damage. Grease bushes and check for play. Check torque on suspension hanger bolts (190Nm) Suspension Check retaining chain shackles tight. Service Center Notes www.ausrv.com Ph: 833 872 8778...
- Page 96 Check panels are free of damage. Solar Panels Inspect cable glands and sealants on penetrations through floor. Inspect cables under body for damage to conduits. Cables Inspect cable glands and sealants on penetrations through floor. www.ausrv.com Ph: 833 872 8778...
- Page 97 Treat with tank cleaner and flush. Drain Fitting Check all metal drain fittings for corrosion Inspect for leaks. Turn on pump and ensure it doesn’t start due to loss of Water System pressure. Service Center Notes www.ausrv.com Ph: 833 872 8778...
- Page 98 Check all seals on doors and hatches compress 30-50%. All seals in Seals & Latches serviceable condition and free of damage. Grease bushes and check for play. Check torque on suspension hanger bolts (190Nm) Suspension Check retaining chain shackles tight. Service Center Notes www.ausrv.com Ph: 833 872 8778...
- Page 99 Check panels are free of damage. Solar Panels Inspect cable glands and sealants on penetrations through floor. Inspect cables under body for damage to conduits. Cables Inspect cable glands and sealants on penetrations through floor. www.ausrv.com Ph: 833 872 8778...
- Page 100 Treat with tank cleaner and flush. Drain Fitting Check all metal drain fittings for corrosion Inspect for leaks. Turn on pump and ensure it doesn’t start due to loss of Water System pressure. Service Center Notes www.ausrv.com Ph: 833 872 8778...
- Page 101 Check all seals on doors and hatches compress 30-50%. All seals in Seals & Latches serviceable condition and free of damage. Grease bushes and check for play. Check torque on suspension hanger bolts (190Nm) Suspension Check retaining chain shackles tight. Service Center Notes www.ausrv.com Ph: 833 872 8778...
- Page 102 Check panels are free of damage. Solar Panels Inspect cable glands and sealants on penetrations through floor. Inspect cables under body for damage to conduits. Cables Inspect cable glands and sealants on penetrations through floor. www.ausrv.com Ph: 833 872 8778...
- Page 103 Treat with tank cleaner and flush. Drain Fitting Check all metal drain fittings for corrosion Inspect for leaks. Turn on pump and ensure it doesn’t start due to loss of Water System pressure. Service Center Notes www.ausrv.com Ph: 833 872 8778...
-
Page 104: Travel Record
Travel Record Your camper trailer service record booklet and logbook will help you keep track of miles travels and service records. Trip Name Date Miles Start Miles Finish Cumulative Miles www.ausrv.com Ph: 833 872 8778... - Page 105 Trip Name Date Miles Start Miles Finish Cumulative Miles www.ausrv.com Ph: 833 872 8778...
-
Page 106: Warranty Policy
Notwithstanding the foregoing or anything herein to the contrary, you are advised that certain states may provide you with different or additional rights OR REMEDIES with respect to your purchase of any Product from AUSRV. As such, these Limited Warranties, and any disclaimer or limitation stated herein, are subject to ANY APPLICABLE STATE OR FEDERAL LAW AND SHALL APPLY ONLY TO the maximum extent permitted by applicable law. - Page 107 AUSRV or its authorized representative(s). All costs incurred in transporting the Caravan or Camper Trailer for warranty service to the location designated by us shall be borne by you. If AUSRV elects to replace the defective Caravan or Camper trailer, then the replacement shall be with a Caravan or Camper trailer (as applicable) which, in AUSRV’s discretion, is of like kind and quality as the defective Caravan or Camper trailer.
- Page 108 FACTORY SECONDS, EX-DEMONSTRATION AND DAMAGED GOODS From time to time, AUSRV may offer for sale items deemed to be “factory seconds”, “ex-demonstration”, “used” or “damaged”. Products sold as “factory seconds”, “ex-demonstration” or “damaged” items are sold on an “as is” basis without any warranty of any kind.
- Page 109 PRODUCTS BOUGHT AT AUCTION From time to time, AUSRV, may, at their sole discretion, offer Products for auction, either independently or via a third party. While AUSRV will make every commercially reasonable effort to provide all relevant information regarding the Product on auction, to the maximum extent permitted by applicable law, any and all Products bought at auction do not carry any statutory or other warranty.
Need help?
Do you have a question about the X11 2021 and is the answer not in the manual?
Questions and answers