Table of Contents
Advertisement
Quick Links
• INSTALLATION MANUAL
Not applicable when installing in a NetZero firebox.
• OPERATION AND MAINTENANCE MANUAL
Please read these instructions completely before
installing or operating the NetZero FLA Burner
NetZero FLA Burner Series
Models: AA-11-04745 – NZ40B
AA-11-04746 – NZ48B
AA-11-04747 – NZ60B
AA-11-04748 – NZ72B
AA-11-04749 – NZ90B
AA-11-04750 – NZ108B
If the information in these instructions is not followed exactly, a fire or explosion may result,
Copyright Planika Sp. z o.o.
Do not fill while
operating
causing property damage, personal injury, or loss of life.
www.planikausa.com
Flammable
WARNING
Keep away from
children
I1453#00
26.08.2020
Advertisement
Table of Contents

Related Manuals for NetZero NetZero FLA Series


Summary of Contents for NetZero NetZero FLA Series
- Page 1 • INSTALLATION MANUAL Not applicable when installing in a NetZero firebox. • OPERATION AND MAINTENANCE MANUAL Please read these instructions completely before installing or operating the NetZero FLA Burner NetZero FLA Burner Series Models: AA-11-04745 – NZ40B AA-11-04746 – NZ48B AA-11-04747 –...
-
Page 2: Table Of Contents
Table of Contents 1 IMPORTANT INFORMATION .................... 3 1.1 Certification ....................... 3 1.2 Safety Information ....................3 1.3 Locating the Burner ....................4 1.4 Ventilation & Required Room Size ................4 1.5 Specifications ...................... 4 1.6 Electrical Requirement................... 4 1.7 Fuel ......................... 4 2 EQUIPMENT RECEIVED .................... -
Page 3: Important Information
1 IMPORTANT INFORMATION 1.1 Certification This product has been certified by OMNI-Test Laboratories, Inc. to: U.S. Certification Standard UL 1370 Canadian Certification Standard CAN/ULC-S674 ISSUED BY: OMNI-Test Laboratories, Inc. 13327 NE Airport Way Portland, Oregon 97230 1.2 Safety Information WARNING: 1) Risk of explosion Never use any fuel other than the fuels specifically identified for use in the unvented decorative appliance. -
Page 4: Locating The Burner
This is shown in the clearances and installation section of this manual. 1.7 Fuel Do not use gel or thick fuels. Only use fuels consisting of 86-96.6% ethanol (not dehydrated) by volume. NetZero Fuel is recommended. -
Page 5: Equipment Received
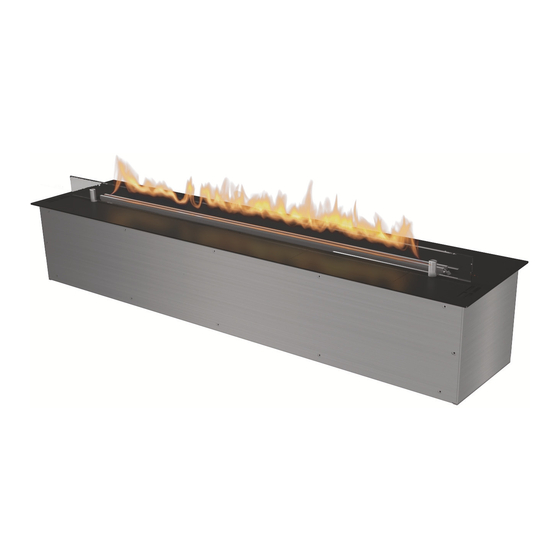
2 EQUIPMENT RECEIVED 2.1 Standard Equipment Table B QUANTITY OF STANDARD EQUIPMENT Screw Remote T-Fuel pump with Technical glass Burner Model USB service cable Technical glass Lifting straps control protective bag holder M3x15 NZ40B NZ48B NZ60B NZ72B NZ90B NZ108B 2.2 Optional Equipment Applies to see-through, peninsula and island installations. -
Page 6: Clearances And Installation
3 CLEARANCES AND INSTALLATION 3.1 Burner Clearances and Cavity Measurements Measurements Electricity Burner Model A [in] B [in] C [in] D [in] connection connection [in] [in] [in] [in] NZ40B 30 ½” 40” NZ48B 115V, 60Hz, 38 ⅜” 48” NZ60B min. 15A 46 ¼”... - Page 7 -Materials used in areas designated as non-combustible must be rated as non-combustible per NFPA 220 Standard on Types of Building Construction, or reported as passing ASTM E 136, Standard Test Method for Behavior of Materials in a Vertical Tube Furnace at 750 Degrees C. WARNING: common finishing materials not approved for use: - Paper-faced gypsum board (drywall) including Type X Fire Rated board is not a non-combustible material.
-
Page 8: Burner Clearances And Cavity Measurements For Multiple Burners
3.2 Burner Clearances and Cavity Measurements for Multiple Burners To create longer, or custom size burners multiple burners can be placed together in the same cavity. Follow the chart below when building a cavity for a multiple burner arrangement. The C and D dimensions will be calculated from the total length of the burners placed together. -
Page 9: Placing The Burner
3.3 Placing the Burner Scan or click to watch the video instruction https://www.youtube.com/watch ?v=b5dETFNTBW4&feature=youtu. 3.4 Installing Technical Glass Scan or click to watch the video instruction https://www.youtube.com/watch ?v=b5dETFNTBW4&feature=youtu. -
Page 10: Recommended Burner Installations
3.5 Recommended Burner Installations Installation requiring technical glass Single-Side, Left-Corner, Right-Corner and Three-Sided Installations Three- Sided Left-Corner Installation Requiring Large Glass Barrier Kit See-Through, Peninsula and Island Installations For these installations, the Large Glass Barrier Kit must be used. For additional information on installing the Large Glass Barrier Kit reference the installation manual for the Large Glass Barrier Kit. -
Page 11: Tv And Ac Installation
4 TV and AC INSTALLATION A TV can be installed above the burner enclosure by following the methods shown below. Single-Sided, Left-Corner, Right-Corner and Three-Sided Installations min. 2 in min. 2 in See-Through and Peninsula Installations min. 2 in min. 2 in If an air conditioning vent or fan is located near the burner the vent or fan must be positioned to blow away from the burner. -
Page 12: How To Operate The Burner
5 HOW TO OPERATE THE BURNER 5.1 Components 5.2 Filling Fuel a) Open the control panel and fuel inlet (I) and turn the burner ON by pressing b) If the tank is empty the message (NO FUEL) is displayed. Open the fuel inlet (I) and firmly connect the pump hose ‘A’... -
Page 13: Menu
Once the fuel container has been emptied, replace it with a full one and start the pump again (see point c). The pump will stop when the tank is full and message (“Beep” + RESERVOIR FULL) is displayed. d) Disconnect the power cable ‘B’. To disconnect the pump, hold the end of the hose ‘A’ and firmly press the button in the place marked with a sticker (V). -
Page 14: Wireless Control Configuration
If the burner temperature is too high, the flame will be automatically lowered and the ATTENTION! height regulation blocked. If the temperature keeps increasing, the flame will be extinguished automatically (COOLING THE DEVICE, TEMPERATURE TOO HIGH). c) Flame extinguishing To extinguish the flame: - Press - Press STOP. -
Page 15: Error Message
If put to mechanical stress the filament may break. NetZero is a distributor of these products, which are designed and manufactured by Planika SP S O O. THERE ARE NO WARRANTIES WHICH EXTEND BEYOND THE DESCRIPTION ON THE FACE HEREOF AND SUPPLIED MANUALS.
Need help?
Do you have a question about the NetZero FLA Series and is the answer not in the manual?
Questions and answers