Table of Contents
Advertisement
Quick Links
Advertisement
Table of Contents

Related Manuals for MSA LH 050


Summary of Contents for MSA LH 050
- Page 1 Maintenance manual MAINTENANCE MANUAL FLIGHT HELMET LH 050 PP020210-01...
-
Page 2: Table Of Contents
10 – Earphones and hygiene parts of the ear cups 14/22 Servicing and maintenance table 15/22 Inspection table and replacement criteria 16/22 Appendices: Replacement criteria 17 to 22/22 MSA, Châtillon sur Chalaronne • Tél. +33 (0)474 55 01 55 • E-mail info.fr@MSAsafety.com... -
Page 3: Warning Notice
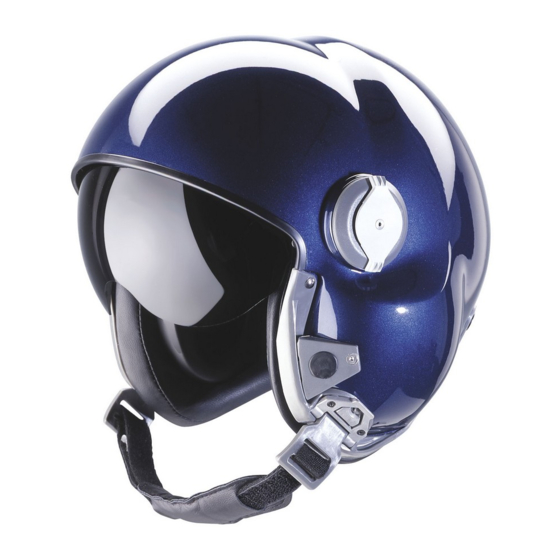
After any obvious impact an inspection should be carried out by the maintenance department or specialist workshop The MSA LH 050 flight helmet is designed solely for helicopter pilots and helicopter flight crew. It provides maximum comfort and protection. It is available in three sizes, covering head circumferences from 52 cm to 64 cm. It has an integrated visor and can be fitted with a wide range of communication systems, on request. -
Page 4: Helmet Description
All models, accessories and spares are subject to stringent checks before leaving the factory. MSA helmets and accessories are guaranteed for 12 months, parts and labour, from the date of delivery to the buyer, against any failure during use under the conditions described in this manual. -
Page 5: Introduction
Important: whenever you are handling the helmet, make sure you put it down on its carry bag. Tools required: - 7 mm flat spanner - 2 mm hexagonal screwdriver - Flat screwdriver - Philips screwdriver MSA, Châtillon sur Chalaronne • Tél. +33 (0)474 55 01 55 • E-mail info.fr@MSAsafety.com... -
Page 6: Chinstrap
Important: when reinstalling, the screws should be tightened 1/8 of a turn from when the tightening stress increases (screwing into plastic). Screws securing the chinstrap MSA, Châtillon sur Chalaronne • Tél. +33 (0)474 55 01 55 • E-mail info.fr@MSAsafety.com... -
Page 7: Inner Liner Elements
N.B. Be careful not to break the polystyrene core of the neck pad during removal or reinstallation. The audio cables must run between the edge roll and the neck pad (see audio cable section). MSA, Châtillon sur Chalaronne • Tél. +33 (0)474 55 01 55 • E-mail info.fr@MSAsafety.com... -
Page 8: Edge Roll
To reinstall the edge roll, engage the pins one after the other in the slots, then fasten the press studs. MSA, Châtillon sur Chalaronne • Tél. +33 (0)474 55 01 55 • E-mail info.fr@MSAsafety.com... -
Page 9: Inner Visor
Reinstallation: Pull the visor at a right angle Insert the clips into their housings to the 2 rivets and push to clip the visor in place MSA, Châtillon sur Chalaronne • Tél. +33 (0)474 55 01 55 • E-mail info.fr@MSAsafety.com... -
Page 10: Audio Cable
For reassembly, perform the same operations in reverse. Warning: connect the JST plug on the link cable to the switching box on the circuit, in the socket labelled "MIKE". MSA, Châtillon sur Chalaronne • Tél. +33 (0)474 55 01 55 • E-mail info.fr@MSAsafety.com... -
Page 11: Microphone Unit And Cover (Standard Or Winchman's)
Put on the cover followed by the ring, making sure the cutout for the microphone arm and the 2 projections for attachment to the unit are in the right place. MSA, Châtillon sur Chalaronne • Tél. +33 (0)474 55 01 55 • E-mail info.fr@MSAsafety.com... -
Page 12: Mixed Microphone Boom
Unscrew the central screw from the microphone boom. Unscrew the microphone boom, making sure its components remain stacked in the correct order. For reassembly, perform the same operations in reverse. MSA, Châtillon sur Chalaronne • Tél. +33 (0)474 55 01 55 • E-mail info.fr@MSAsafety.com... -
Page 13: Microphone Boom
Inside the helmet, remove the left ear cup. Unscrew the Philips screw Remove the anti-rotation washer Inside the helmet Outside the helmet For reassembly, perform the same operations in reverse. MSA, Châtillon sur Chalaronne • Tél. +33 (0)474 55 01 55 • E-mail info.fr@MSAsafety.com... -
Page 14: Removing The Complete Microphone
Remove the inner liner by pulling the hook and loop tape tab. Disconnect the 2 JST connectors From the outside of the helmet, pull out the microphone cable. MSA, Châtillon sur Chalaronne • Tél. +33 (0)474 55 01 55 • E-mail info.fr@MSAsafety.com... -
Page 15: Earphones And Hygiene Parts Of The Ear Cups
Pull the earphone cable away for easier access. Unscrew the 2 nuts from the terminals. (Keep the nuts, etc.) Remove the 3 connectors. To reassemble, proceed in the reverse order. MSA, Châtillon sur Chalaronne • Tél. +33 (0)474 55 01 55 • E-mail info.fr@MSAsafety.com... -
Page 16: Servicing And Maintenance Table
This section concerns the tests and inspections required to determine the condition of any units withdrawn from service.Dispose of any defective parts. All defective parts should be disposed of and replaced with new parts from MSA only. All tests should be carried out on clean parts (see section on cleaning). -
Page 17: Inspection Table And Replacement Criteria
All helmet users and maintenance units are responsible for reporting known or suspected impacts and damage to helmets. MSA will not be held responsible for failure to remove from service a shell that has been damaged or has suffered an impact. - Page 18 Wear Defective Replace Riveting Defective Replace Attachment Coming apart Replace Chinstrap mount Breakage Defective Replace Wear Defective Replace Edge seals Attachment Coming apart Rebond with glue MSA, Châtillon sur Chalaronne • Tél. +33 (0)474 55 01 55 • E-mail info.fr@MSAsafety.com...
- Page 19 Deep scratch affecting the aramid (yellow) or carbon (black) in the shell. Hole following an impact revealing the aramid (yellow) or carbon (black) in the shell. MSA, Châtillon sur Chalaronne • Tél. +33 (0)474 55 01 55 • E-mail info.fr@MSAsafety.com...
- Page 20 Paint Gelcoat Resin Carbon fibre The appearance of carbon filaments in the area where the visor mechanism is located means that the shell must be replaced. MSA, Châtillon sur Chalaronne • Tél. +33 (0)474 55 01 55 • E-mail info.fr@MSAsafety.com...
- Page 21 Replace Excessive play or Press stud Crimping Replace missing part near leather + rayon Examples of white marks on the carbon rim of the impact cap. MSA, Châtillon sur Chalaronne • Tél. +33 (0)474 55 01 55 • E-mail info.fr@MSAsafety.com...
- Page 22 N.B.: The two screws holding in place the inner visor controls should be tightened 1/8 turn from when the tightening stress increases, with the 2 mm hex screwdriver. MSA, Châtillon sur Chalaronne • Tél. +33 (0)474 55 01 55 • E-mail info.fr@MSAsafety.com...
-
Page 23: Appendices: Replacement Criteria 17 To
Replace chinstrap Screw Missing Defective assembly or screw Replace chinstrap Strap Wear Defective assembly or strap Replace chinstrap loop Wear Defective assembly or keeper MSA, Châtillon sur Chalaronne • Tél. +33 (0)474 55 01 55 • E-mail info.fr@MSAsafety.com...
Need help?
Do you have a question about the LH 050 and is the answer not in the manual?
Questions and answers