Garmin eTrex Legend H Owner's Manual
Portable gps receiver
Hide thumbs
Also See for eTrex Legend H:
- Safety and product information (40 pages) ,
- Quick reference manual (2 pages)
Table of Contents
Advertisement
Advertisement
Table of Contents

Related Manuals for Garmin eTrex Legend H


Summary of Contents for Garmin eTrex Legend H
- Page 1 eTrex Legend H and eTrex Vista ® ® owner’s manual...
- Page 2 Information in this document is subject to change without notice. Garmin reserves the right to change or improve its products and to make changes in the content without obligation to notify any person or organization of such changes or improvements.
-
Page 3: Introduction
If any pieces are missing, contact your Garmin dealer immediately. eTrex Legend H and eTrex Vista H Owner’s Manual Tips and Shortcuts • To return to the Main Menu... -
Page 4: Optional Accessories
(Europe) Ltd. by phone at +44 (0) 870.8501241. Optional Accessories For a complete list of available accessories and maps for use with the eTrex, refer to http://buy.garmin.com. eTrex Legend H and eTrex Vista H Owner’s Manual www.garmin Contact and click for in-country support... -
Page 5: Table Of Contents
...13 Using the Find Menu Using Tracks ...23 Main Pages ... Satellite Page ...31 Map Page ...31 eTrex Legend H and eTrex Vista H Owner’s Manual Compass Page Altimeter Page Trip Computer Page ...1 Main Menu ...1 Tracks ...2 Routes Page... -
Page 6: Getting Started
Remove the batteries when you do not plan to use the unit for several months. Stored data is not lost when batteries are removed. for setting Locking pin slot eTrex Legend H and eTrex Vista H Owner’s Manual Battery compartment... - Page 7 1. Place the loop of the lanyard through the slot at the base of the unit. 2. Route the strap through the loop, and pull tight. eTrex Legend H and eTrex Vista H Owner’s Manual USB connector port (under weather cap)
-
Page 8: Understanding Terms
ROCKER, and press in to enter after each item. For example, if you see Service “select you should highlight Service, eTrex Legend H and eTrex Vista H Owner’s Manual keys to scroll rapidly. Restore Defaults. Show Info,”... - Page 9 ROCKER. Then Show Info, and press highlight ROCKER again. On-screen buttons eTrex Legend H and eTrex Vista H Owner’s Manual Highlighted field Field...
-
Page 10: Key Functions
QUIT/PAGE POWER MENU/FIND key Press and release to view the Options Menu for the current page. Press and hold to display the Find Menu. eTrex Legend H and eTrex Vista H Owner’s Manual... -
Page 11: Turning On The Etrex
Press in and hold at any time to mark your current location as a waypoint. eTrex Legend H and eTrex Vista H Owner’s Manual QUIT/PAGE key Press to cycle through the main pages. Press and hold to turn the electronic compass on or off (Vista H only). -
Page 12: Adjusting The Backlight
QUIT If the unit cannot establish a satellite fix, a list of options eTrex Legend H and eTrex Vista H Owner’s Manual The number of each overhead satellite is shown. - Page 13 Main Menu and the Status Bar. The battery power icon shows the remaining power as the battery is depleted. The external eTrex Legend H and eTrex Vista H Owner’s Manual power icon is shown when the unit is powered externally.
- Page 14 Use the USB interface cable, provided with the unit, to transfer optional MapSource data from a computer to the eTrex. See the Garmin Web site .com products. mapping eTrex Legend H and eTrex Vista H Owner’s Manual www.garmin for compatible MapSource...
-
Page 15: Basic Operation
Go To directly to the selected waypoint. You can create waypoints using three methods. Press the eTrex Legend H and eTrex Vista H Owner’s Manual ROCKER while at a location, create a waypoint on the Map page, or enter coordinates for a waypoint manually. -
Page 16: Creating Waypoints
Using the Map To create a waypoint using ROCKER the Map page: 1. On the Map page, use the ROCKER to the map item you want to mark. eTrex Legend H and eTrex Vista H Owner’s Manual ROCKER to move the pointer... -
Page 17: Editing Waypoints
2. Select Waypoints. 3. Select the waypoint you want to edit, and press the ROCKER. eTrex Legend H and eTrex Vista H Owner’s Manual 4. Make changes by highlighting each field. Use the waypoint symbol chart and alphanumeric keypad to enter new data. -
Page 18: Using The Find Menu
Additional icons appear depending on the optional MapSource data loaded to the unit. Press and hold the eTrex Legend H and eTrex Vista H Owner’s Manual FIND > Waypoints. MENU > Project... -
Page 19: Find By Name
By Name: 1. Press and hold FIND the Find Menu. eTrex Legend H and eTrex Vista H Owner’s Manual 2. Select the icon for the type of item you want to search for, or search the entire database by selecting of Interest MapSource detailed maps). -
Page 20: Recent Finds
Options Menu. 2. Use the option: Average Location—takes • several readings at the same location and uses the average value to provide more accuracy. See eTrex Legend H and eTrex Vista H Owner’s Manual MENU ROCKER to select an page... - Page 21 Sun and Moon tables for this item’s location. See View Hunt And Fish—view • Hunt and Fish tables for this eTrex Legend H and eTrex Vista H Owner’s Manual item’s location. See Reposition Here—reposition • the location of the waypoint to your current location.
-
Page 22: Finding A Geocache
To find a geocache: 1. Press and hold FIND. 2. Highlight can view found geocaches or those that have not been found. eTrex Legend H and eTrex Vista H Owner’s Manual Waypoints and choose Geocache to view the list Geocache. -
Page 23: Finding A City
Cities from the Find Menu to find any city listed in the mapping data. eTrex Legend H and eTrex Vista H Owner’s Manual to highlight To find a city: 1. Press and hold FIND. 2. Select Cities. The Cities page shows a list of cities near your current location. -
Page 24: Finding An Address
4 Select the <Enter Street Name> field. The street list opens. 5. Use the on-screen keypad to enter the street name. Select OK. A list of matches appears. 6. Select the address. eTrex Legend H and eTrex Vista H Owner’s Manual... -
Page 25: Using Tracks
All Points of Interest to show a list of all points near your current location. 3. Press MENU. eTrex Legend H and eTrex Vista H Owner’s Manual 4. Select an item from the list, and press the ROCKER. Using Tracks... - Page 26 Interval—select a track log recording rate. Recording points more frequently creates a more-detailed track, but fills the track log faster. • Style—selects the type of line that represents the track currently being recorded. eTrex Legend H and eTrex Vista H Owner’s Manual...
- Page 27 ROCKER. 5. Repeat to select an ending point. Select OK. eTrex Legend H and eTrex Vista H Owner’s Manual To view a track on the map: On the Saved Track page, select Map. A map showing the entire track appears.
-
Page 28: Track Profiles
TracBack. 3. Move in the direction of the first turn. At the first turn, directions to each turn are to show it shown. eTrex Legend H and eTrex Vista H Owner’s Manual MENU to use Zoom ® feature: ROCKER to move... -
Page 29: Creating A Route
Create or modify a route using the Routes page, and add waypoints to a route. Create complex routes using optional MapSource mapping. eTrex Legend H and eTrex Vista H Owner’s Manual To create a route: 1. Press MENU 2. Select Point>. -
Page 30: Editing A Route
Use the Route page to edit, change the route name, and review route points. To change the name of the route: 1. Press eTrex Legend H and eTrex Vista H Owner’s Manual Navigate to begin QUIT to view the list of ROCKER... - Page 31 MENU twice > > MENU. 2. Select Off Road Transition Route Leg Transition. eTrex Legend H and eTrex Vista H Owner’s Manual 3. Select when advancing to the next point. Distance Select so that when within the entered distance, you are lead to the next point.
-
Page 32: Main Pages
Main Pages The eTrex Vista H has four main pages: Map page, Compass page, Altimeter page, and the Main Menu. The eTrex Legend H does not have the Altimeter page. Cycle through these pages by pressing QUIT. The Active Route page appears in the sequence when you are actively navigating a route. -
Page 33: Satellite Page
• New Location—use if you have moved the unit more than 600 miles (1,000 km). eTrex Legend H and eTrex Vista H Owner’s Manual • GPS Elevation—shows your current elevation. Map Page A built-in basemap that includes... - Page 34 View listings of nearby restaurants, lodging, shopping centers, attractions and entertainment, and retrieve Fields. addresses and phone numbers for any listed location when using optional MapSource data disks. eTrex Legend H and eTrex Vista H Owner’s Manual MENU > Change Data...
-
Page 35: Map Orientation
Map page. If no further map information is available, “overzoom” appears under eTrex Legend H and eTrex Vista H Owner’s Manual the zoom range. When using MapSource maps, “mapsource” appears below the scale. -
Page 36: Guidance Text
1. Press Text. 2. Select Show, or Navigating. If you select Navigating, a guidance message appears until you select Navigation. eTrex Legend H and eTrex Vista H Owner’s Manual MENU > Guidance Always Show, Never Show When Show When Stop... -
Page 37: Compass Page
The distance between the two points is shown in the upper- right corner. eTrex Legend H and eTrex Vista H Owner’s Manual Compass Page The Compass page guides you to your destination with a graphic compass display and a bearing or course pointer. - Page 38 When you are not using the electronic compass, turn QUIT it off to conserve batteries. When it is turned off, the unit uses the GPS receiver for navigation. eTrex Legend H and eTrex Vista H Owner’s Manual QUIT to turn...
-
Page 39: Calibrating The Electronic Compass
Calibrate the electronic compass outdoors when you first use the Vista H. To ensure continued accuracy, calibrate after installing eTrex Legend H and eTrex Vista H Owner’s Manual new batteries, after moving more than 100 miles (160 km), or experiencing a temperature change greater than 68º... -
Page 40: Compass Page Options
• Calibrate Compass— accesses the compass Calibration page (Vista H only). • Restore Defaults—returns to factory settings. eTrex Legend H and eTrex Vista H Owner’s Manual... - Page 41 Press ROCKER to lock the direction. Course. 3. Select eTrex Legend H and eTrex Vista H Owner’s Manual 4. Begin traveling to your destination on a course line using the course pointer as a guide. Select Project 5.
- Page 42 (right or left) according to Pointer the scale shown on the compass ring and indicated by the dotted line. Move to the right or left to get back on course. eTrex Legend H and eTrex Vista H Owner’s Manual...
-
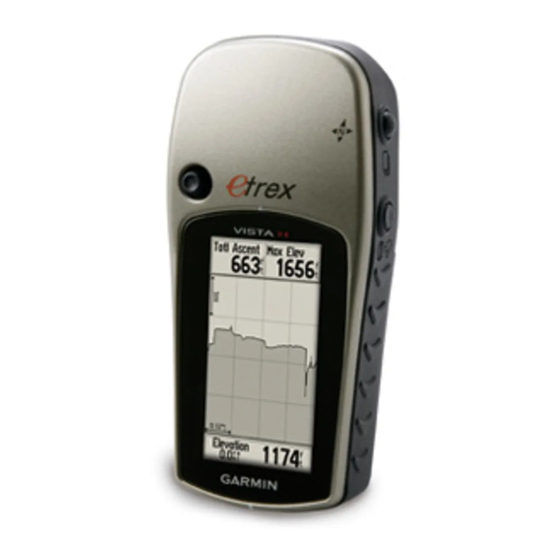
Page 43: Altimeter Page
Rate of ascent and descent Altimeter Page eTrex Legend H and eTrex Vista H Owner’s Manual Configure the profile field in the center of the page to show either elevation or ambient pressure plots. Data fields at the top of the page are user selectable. - Page 44 View Elevation Plot option. View Pressure Plot is measured by time. View Pressure or Elevation Plots Select the to plot elevation. Select Pressure Plot pressure. eTrex Legend H and eTrex Vista H Owner’s Manual View Elevation Plot View to barometric...
-
Page 45: Adjusting The Zoom
Ranges Set the zoom ranges for elevation, distance, or time when you use the View Elevation Plot. eTrex Legend H and eTrex Vista H Owner’s Manual Zoom Range Selection To adjust zoom ranges: 1. Select the type of plot you... -
Page 46: View Points
To reset the elevation data to scroll and max elevation fields: 1. Press 2. Select the reset options, and press the check by an option. eTrex Legend H and eTrex Vista H Owner’s Manual ROCKER to move the ROCKER to show MENU > Reset. -
Page 47: Trip Computer Page
1. Press MENU > Calibrate Altimeter. eTrex Legend H and eTrex Vista H Owner’s Manual 2. At the message “Do You Know The Correct Elevation?” select Yes. If you do not know the elevation, select the pressure option. If you do... -
Page 48: Main Menu
The Main Menu is accessible from any page by pressing select an item on the Main Menu, highlight the menu item, and press the eTrex Legend H and eTrex Vista H Owner’s Manual MENU twice. To... -
Page 49: Tracks
Main Menu. Tracks For more information, see page eTrex Legend H and eTrex Vista H Owner’s Manual Routes Page For more information, see page Setup Menu To access the Setup Menu: From the Main Menu, select Setup. - Page 50 15 seconds, 30 seconds, one minute, or two minutes. • Backlight Level—use the slider to adjust the brightness. • Contrast—adjust the difference between the lightest and darkest areas of the screen. eTrex Legend H and eTrex Vista H Owner’s Manual...
-
Page 51: Page Sequence Setup
Insert. Map Setup Page Use the Map Setup page to adjust how items are shown on the Map page. eTrex Legend H and eTrex Vista H Owner’s Manual To customize the Map Page display: 1. Press MENU The top of the page contains icons for each setup page. - Page 52 • Detail—selects the degree of map detail shown. Map Setup – Tracks Page Use the Map Setup –Tracks page settings for Saved Tracks, Track Log, Track Points, and Go To Line. eTrex Legend H and eTrex Vista H Owner’s Manual...
- Page 53 • Track Points—sets the maximum number of track points used to record a track. eTrex Legend H and eTrex Vista H Owner’s Manual • Go To Line—selects either a bearing or course line for navigating a track. Map Setup – Points Page Use the Map Setup –...
- Page 54 Map Setup – Marine Page Use the Map Setup – Marine page to customize settings for marine colors, spot soundings, light sectors, and symbol sets. eTrex Legend H and eTrex Vista H Owner’s Manual to view options for...
-
Page 55: Geocache Setup
Light Sectors—select from On, Off, and Auto. • Symbol Set—select the symbol set to use (Auto, GARMIN, NOAA, International). eTrex Legend H and eTrex Vista H Owner’s Manual Geocache Setup For more information about geocaching, visit www.geocaching.com. To setup the Geocache feature: 1. -
Page 56: Time Setup
• Distance/Speed—sets the unit of measurement to show your speed and distance. • Elevation (Vert. Speed)—sets the unit of measurement (Feet (ft/min), Meters (m/min), or Meters (m/sec)). eTrex Legend H and eTrex Vista H Owner’s Manual... - Page 57 From the Setup Menu, select Heading. • Display—choose from Cardinal Letters, Degrees or Mils. eTrex Legend H and eTrex Vista H Owner’s Manual • North Reference—choose from True, Magnetic, Grid or User options. The following two features apply to the Vista H only: •...
-
Page 58: Calendar
Vista H only. Refer to the Garmin Web site www.garmin.com/products/ etrexVistaH. Click then select the Using Jumpmaster manual. Calendar To access the Calendar: From the Main Menu, select Calendar. eTrex Legend H and eTrex Vista H Owner’s Manual Manuals... -
Page 59: Calculator
From the Main Menu, select Sun & Moon to view the Sunrise/Sunset and Moon phases. eTrex Legend H and eTrex Vista H Owner’s Manual Hunt & Fish To show hunting and fishing predictions for a specified date and location: 1. From the Main Menu, select Hunt &... -
Page 60: Appendix
Power Source: Two 1.5 volt AA batteries, 12 Vdc Adapter, or USB Cable Battery Life: Up to 18 hours eTrex Legend H and eTrex Vista H Owner’s Manual enabled, Hot start - 3 seconds Warm start - 33 seconds Cold start - 39 seconds... - Page 61 DGPS: 10 ft. (3.3 m) 95% typical Wide Area Augmentation System (WAAS) accuracy in North America. Velocity: 0.1 meter/sec steady state Interfaces: Garmin Proprietary (USB) Data Storage Life: Indefinite; no memory battery required Map Storage: 24 MB eTrex Legend H and eTrex Vista H Owner’s Manual...
-
Page 62: Connecting Your Etrex To A Computer
1. Connect the eTrex to the computer with the USB cable. 2. Turn the eTrex on. 3. Open MapSource on your computer. 4. Click Receive From Device or Send To Device on the MapSource Transfer menu. eTrex Legend H and eTrex Vista H Owner’s Manual... -
Page 63: Caring For The Etrex
Clean the eTrex screen using a soft, clean, lint-free cloth. Use water, isopropyl alcohol, or eyeglass lens cleaner. Apply the liquid to the cloth, and then gently wipe the screen with the moistened cloth. eTrex Legend H and eTrex Vista H Owner’s Manual... -
Page 64: Software License Agreement
America. Declaration of Conformity Hereby, Garmin declares that this eTrex Vista H or eTrex Legend H are in compliance with the essential requirements and other relevant provisions of Directive 1999/5/EC. To view the full Declaration of Conformity, see the Garmin Web site for your Garmin product: www.garmin.com/products/etrexVistaH and... -
Page 65: Index
16, backlight contrast level timeout barometer mode batteries below calculator calendar calibration eTrex Legend H and eTrex Vista H Owner’s Manual altimeter 42, electronic compass change reference cleaning compass bearing pointer calibration course pointer electronic compass page contact Garmin... - Page 66 Sight N’ Go specifications spot soundings status bar stopwatch sun and moon 19, symbol set time setup eTrex Legend H and eTrex Vista H Owner’s Manual TracBack track profiles tracks transferring track up trip computer units page units setup...
- Page 68 For the latest free software updates (excluding map data) throughout the life of your Garmin products, visit the Garmin Web site at www.garmin.com. © 2008 Garmin Ltd. or its subsidiaries Garmin International, Inc. 1200 East 151 Street, Olathe, Kansas 66062, USA Garmin (Europe) Ltd.
Need help?
Do you have a question about the eTrex Legend H and is the answer not in the manual?
Questions and answers