Table of Contents
Advertisement
Quick Links
Advertisement
Table of Contents

Related Manuals for Asko WCN111942G


Summary of Contents for Asko WCN111942G
- Page 1 INSTRUCTIONS FOR USE WCN111942G WINE CLIMATE CABINET EN (GB) (IE)
-
Page 2: Table Of Contents
Contents Introduction ..........Operation ............ Welcome to our growing ASKO family! ..Display ............Safety instructions ........First plug-in ..........Safety of children and vulnerable people ..Temperature setting ........General safety ..........Appliance Display Standby ......Installation ............ Key lock mode .......... -
Page 3: Introduction
Introduction Welcome to our growing ASKO family! We are proud of our appliances. We hope that this appliance will be an appreciated and dependable aid for many years to come. Please read the operating instructions before use. They include general tips, information about the settings and adjustments you can make, and the best way to take care of your appliance. -
Page 4: Safety Instructions
Safety instructions Before the installation and use of the appliance, carefully read the supplied instructions. The manufacturer is not responsible if an incorrect installation and use causes injuries and damages. Always keep the instructions with the appliance for future reference. WARNING! If the appliance is installed at an altitude of over 1000 m above sea level, there is a danger of glass cracking due to air pressure. -
Page 5: General Safety
Safety instructions General safety • Illumination in the appliance is only suitable for illumination of this appliance and not for household room illumination. • WARNING! This appliance is intended to be used in household and similar applications such as: - staff kitchen areas in shops, offices and other working environments;... -
Page 6: Electrical Connection
Safety instructions • Obey the installation instruction supplied with the appliance. • Always be careful when you move the appliance because it is heavy. Always wear safety gloves. • When tilting the appliance, make sure the door does not touch the floor. -
Page 7: Use
Safety instructions • Make sure that the electrical information on the rating plate agrees with the power supply. If not, contact an electrician. • Always use a correctly installed shockproof socket. • Do not use multi-plug adapters and extension cables. •... -
Page 8: Care And Cleaning
Safety instructions • Do not store flammable gas and liquid in the appliance. • Do not put flammable products or items that are wet with flammable products in, near or on the appliance. • Do not touch the compressor or the condenser. They are hot. Care and cleaning WARNING! Risk of injury or damage to the appliance. -
Page 9: Disposal
Safety instructions Disposal WARNING! Risk of injury or suffocation. • Disconnect the appliance from the mains supply. • Cut off the mains cable and discard it. • Remove the door to prevent children and pets to be closed inside of the appliance. •... -
Page 10: Installation And Connection
Installation and connection Selecting the location Place the appliance in a dry and well aired room. The permitted ambient temperature range for the appliance depends on the appliance’s climate class, which is shown on the type plate. WARNING! Do not place the appliance in a room where the temperature can fall below 5 °C: the appliance may not work properly or become defective! Description Class... -
Page 11: Appliance Placement
Installation and connection Appliance placement Appliance installation should be carried out by at least two persons, in order to avoid damage to the appliance and physical injury of anyone involved. When moving the appliance, be careful not to push it on the floor because of potential damages. - Page 12 Installation and connection • Place the appliance at least 50 mm away from an electric or gas stove, and at least 300 mm away from a heat source (e.g. a radiator or a heater). If such clearance is not possible, then install an insulation panel.
- Page 13 Installation and connection • The appliance comes supplied with two spacers that should be fitted in the slots on the back of the appliance, one on either side, near the bottom. The spacers ensure adequate air circulation that is required for correct appliance operation.
-
Page 14: Connecting The Appliance
Installation and connection Connecting the appliance • Connect the appliance to the power supply with a plug. The socket must be earthed. The nominal voltage and frequency required for the appliance are shown on the appliance’s type plate/label with basic information. •... -
Page 15: Before Using The Appliance For The First Time
Before using the appliance for the first time Before you use the appliance for the first time Do not connect the appliance to the mains until you have carefully read the instructions for the correct and safe use of the appliance. We recommend that you keep these instructions for future use. If you sell the appliance, enclose them with the appliance. -
Page 16: Storing Wine
The humidity should be between 50% and 80%. Too low humidity will result in a dry cork. Too high humidity will cause mold. The ASKO Wine Climate Cabinet provides excellent ventilation with clean air which helps preventing damage to labels and corks during storage. -
Page 17: Storing Bottles
Storing wine Storing bottles • Moving the bottles or excessive vibration can have a negative effect on the aging process and thus on the wine’s flavour. The appliance is fitted with a special sensor that continuously measures vibration. In case of excessive vibration, e.g. when the appliance door is slammed shut, an alarm signal will sound and alarm key will flash on the display. -
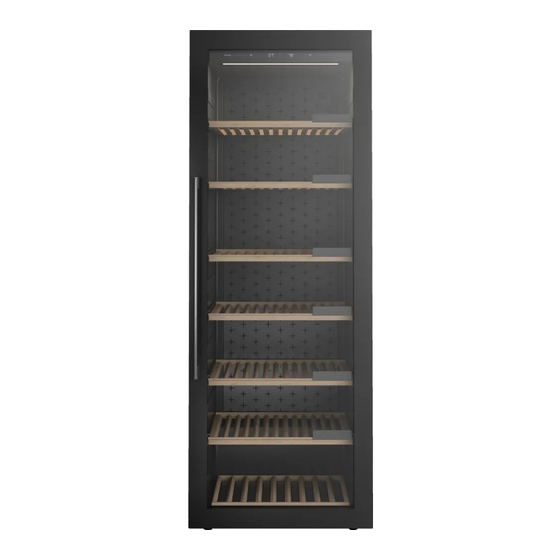
Page 18: Description Of The Appliance
Description of the appliance This product contains a light source of energy efficiency class <G>. 1. Control panel 2. Proximity sensor 3. Door sensor 4. LED illumination 5. Charcoal filter 6. Wooden bottle shelf 7. Chalkboard name tag 8. Wooden bottom bottle rack 9. - Page 19 Description of the appliance Door sensor (3) When you open or close the appliance door, light will change according to your preferences. They can be set in SETTINGS MENU. • Door open: light change to (no change, ambient mode or functional mode) •...
- Page 20 INFORMATION! For more informations refer to the local Asko dealer or to the Asko website of your country. Wooden bottle shelf (6) The shelves are placed on the plastic holders that are attached to the appliance cabinet.
- Page 21 Description of the appliance The shelf can also be partly pulled out from the appliance. The blocks on the plastic shelf supports protect the shelf from being fully extended and pulled out, which could result in the shelf falling from the appliance. INFORMATION! Before you start adding bottles to a shelf, check once more whether the shelf is...
- Page 22 Description of the appliance Wooden bottom bottle rack (8) The wooden bottom bottle rack is intended for storing the bottles in the compressor area. This area is suitable for storing bottles you wish to keep for a longer period of time, especially for ageing without excessive vibration and unnecessary movement.
- Page 23 Because of the relatively thin walls, the box is fragile and should be handled carefully. Occasionally, shower the inside of the box with tap water. INFORMATION! For more informations refer to the local Asko dealer or to the Asko website of your country. Appliance capacity The basic appliance configuration allows storing up to 261 Bordeaux bottles.
- Page 24 For safety reasons, side-by-side kit should only be installed by an authorized service technician! INFORMATION! For more informations refer to the local Asko dealer or to the Asko website of your country.
-
Page 25: Operation
Operation Display On/Off key: • a long press (2 seconds) to switch the appliance on or off • a short press to switch the appliance to or from Standby Key lock key to lock or unlock the user interface (3 seconds press) Temperature arrows: •... -
Page 26: First Plug-In
Operation Keylights intensity depends on the availability of the certain function: Keylight intensity with door closed or opened Function not available Function available Function activated or to be activated 100% First plug-in INFORMATION! When the appliance is plugged in for the first time or after the appliance was disconnected from the mains for a longer period of time it is mandatory to wait four hours until the appliance can be activated. -
Page 27: Temperature Setting
Operation Temperature setting Default setpoint temperature of the appliance is 12°C. This temperature can be changed instantly in Status display, after the appliance is switched on. Temperature of the appliance compartment can be set between: 5°C and 20°C. By pressing on the arrow keys, setpoint temperature on display 'T' changes. -
Page 28: Alarms
Operation • automatically, after a certain time of inactivity. It can be set in SETTINGS MENU. Status display: Key lock key active, door open If you press on any other key, Key lock key will blink fast, 2 times. Press on any other key is ignored. Exeption: In case that any of the alarms is triggered, short press on alarm key will cancel the alarm. - Page 29 Operation Humidity Humidity can be (de)activated in SETTINGS MENU. If it is set to 'OF', then humidity is no longer being monitored (not in the appliance and not in the mobile app). Display 'H' does not show any value and automatically humidity alarm and humidity box refill notification are disabled. Humidity alarm sounds when 7 days average value of compartment humidity falls below 40% or rises above 80%, for 7 days constantly.
- Page 30 Operation Humidity box notification The appliance can notify you when humidity box needs to be refilled. Humidity box notification starts when 7 days average value of compartment humidity is between 40% - 50% for 7 days constantly. So you do not have to remember to check it yourself and can also help avoid triggering the humidity alarm.
- Page 31 Operation Vibrations notification If light vibrations are detected, light vibrations alarm is triggered. 'UA' is blinking softly on display 'T'. Vibration has been noticed. Please close the door gently and pull-out /close the shelves gently, making use of the soft close mechanism. Frequent vibrations can influence the quality of the wine on longer term.
-
Page 32: Settings Menu
Operation Stopping the alarm: Short press on alarm key will stop 'PF' blinking. After that, current measured temperature and current humidity value will be shown on displays 'T' and 'H'. If you press on alarm key again, alarm will be canceled. Compartment setpoint temperature and humidity level will be shown on displays 'T' and 'H'. - Page 33 Operation Arrows can be used to toggle Arrows can be used to select through MENU options. the preferred setting or value. Example We will use the first option in SETTINGS MENU as an example: First 'A' is representing MENU option Group: GENERAL. Second 'A' is representing Menu option: Temperature unit.
- Page 34 Operation INFORMATION! If SETTINGS MENU is active, the alarm indications (audio and visual), error notifications and Charcoal filter notifications are not active, they will be activated as soon as SETTINGS MENU is closed. SETTINGS MENU is not activated again when, after failure, power is restored or when appliance goes back from Appliance-Off to Appliance-On.
- Page 35 Operation General sounds Select the preferred volume: from 0 to 5 SOUNDS Alarm sounds Select the preferred volume: from 0 to 5 Key sounds Select the preferred volume: from 0 to 5 Time of inactivity after which display goes to standby: 1 minute 5 minutes DISPLAY...
- Page 36 Operation Explanation about the light modes can be found in chapter "LED illumination". Ambient mode Kelvin Select the first two digits of the Kelvin value: from 2700 to 5000 Kelvin Ambient mode intensity Select the light intensity: from 0 to 99 How long will the cabinet be lit in Ambient mode: LIGHTS 1 minute...
- Page 37 Operation Functional mode Kelvin Select the first two digits of the Kelvin value: from 2700 to 5000 Kelvin Functional mode Intensity Select the light intensity: from 0 to 99 How long will the cabinet be lit in Functional mode: 1 minute LIGHTS 5 minutes 15 minutes...
- Page 38 Operation Proximity sensor can be (de)activated: Proximity sensor Proximity sensor on Proximity sensor off If Proximity sensor is set to 'On', associated settings will become available. On user poximity, light changes to: Light change No change Ambient mode Functional mode PROXIMITY AND On user poximity, display changes to: Display change...
- Page 39 Operation Night mode will dim the light during a set time. Night mode Night mode can be (de)activated: status On or Off If Night mode is set to 'On', associated settings will become available. Start Time hours Set the hours of the night mode starting time: from 00 to 23 hours Start Time minutes...
- Page 40 Operation WLAN can be (de)activated: WLAN on WLAN Status WLAN off Switch on the appliance Wireless Network to use the appliance optimally in combination with our ConnectLife application. NETWORK Explanation about the Connection Setup can be found in chapter “Connection CONNECTION setup”.
- Page 41 Operation Appliance Pairing can be activated: Appliance pairing on, press to confirm Appliance Pairing Both will be blinking during pairing The process ends automatcially if pairing was succesfull or after 3 minutes. Appliance can be paired to (additional) user account. Refer to the applicaton for further instructions. Unpair All can be activated: NETWORK CONNECTION...
- Page 42 Operation Key lock automatically activate it after: 5 minutes 15 minutes Key lock mode 30 minutes 60 minutes SYSTEM never Humidity can be (de)activated: Humidity Humidity alarm on Humidity alarm off If Humidity is set to 'On', associated settings will become available.
- Page 43 Operation Explanation about the charcoal filter can be found in chapter "Charcoal filter countdown and notification". Charcoal filter lifetime in days: First digit of 3 digit number Charcoal filter countdown SYSTEM Second and third digit of 3 digit number Charcoal filter lifetime is 365 days. Countdown will show the number of days left until the countdown.
- Page 44 Operation Set the number of days ahead of the end of the countdown, when you wish to receive a notification: no notification on the day itself Charcoal filter notification 1 day in advance 7 days in advance 15 days in advance SYSTEM 30 days in advance Appliance can be reset to the factory settings:...
-
Page 45: Wi-Fi Function
Operation Explanation about the Sabbath mode can be found in the chapter "Sabbath mode". Sabbath mode can be (de)activated: Sabbath mode on, press to confirm Sabbath mode* Sabbath mode off, press to confirm Appliance will continue to operate, while extra functions like light, display, sounds, alarms and proximity- and door sensor will be disabled for 72 hours. - Page 46 Operation at real time. Temperature in the compartment can be changed in the app too, so the door can remain closed. 1. Mobile app First, download the mobile application with your smart device and create a user account. It is available on Google Play, App Store and AppGallery.
-
Page 47: Charcoal Filter Countdown And Notification
Operation 6. Unpair all By triggering this option appliance removes all paired user accounts. Data and saved settings remain the same inside the appliance. Unpairing function ends automatically if the unpairing process on the cloud is successful or if after 1 minute the unpairing has not been successful on the cloud. -
Page 48: Eco Mode
Operation • automatically 72 hours after activation, • with a 3 seconds press on Key lock key If any error occurs during Sabbath mode, it won't be showed until Sabbath mode is deactivated. * Active Sabbath mode overrules ECO mode and Night mode for a maximum of 72 hours. Eco mode During ECO mode, the appliance internal illumination and display illumination are adjusted for best energy consumption. -
Page 49: Maintenance
Maintenance Defrosting the appliance • The wine climate cabinet is defrosted automatically. Drops of water will flow through an opening in the rear wall into a tray fitted above the compressor, from where they will evaporate. Cleaning the appliance WARNING! Switch off the appliance and remove the plug from the socket before you start cleaning it. -
Page 50: Reversing The Door Opening Direction
Reversing the door opening direction The direction in which the appliance door opens can be reversed. In order to safely reverse the door opening direction, at least three people should carry out the procedure described below. The door weighs about 40 kg. WARNING! In order to avoid damaging the floor, use a floor mat or other suitable protection on the floor in front of the appliance. - Page 51 Reversing the door opening direction To reverse the door opening direction, proceed as follows: Open the appliance door. Remove the two hinge caps (1) at the top and bottom. Set them aside, as you will need them later on. Partly (by no more than 5 mm) undo the hinge screws (2) at the top and bottom.
- Page 52 Reversing the door opening direction Remove the door, complete with the hinges, by moving it in the direction indicated by the arrow. Carefully place the door on the surface prepared for this purpose. Remove the cap (3). Save it (e.g. in the bag with the instruction manual) if you ever decide to reverse the door opening direction back to the original setting.
- Page 53 Reversing the door opening direction Remove the cap (6) and discard into the bin for plastic waste. Completely undo the screws (2). Then, partly screw them into the holes at the top and bottom on the opposite side of the housing. Carefully rotate the door by 180 degrees.
- Page 54 Reversing the door opening direction Hang the door onto the screws (2) at the top and bottom and slide it in the direction indicated by the arrow (a). Tighten the screws. The screws should be tightened to a torque of 6.2 Nm. Replace the hinge caps (1).
- Page 55 Reversing the door opening direction On the opposite side from the top hinge, attach the cap (5) using the screw (4). Take the caps (7 and 8) from the bag with the instruction manual and install them on the side opposite from the hinges.
- Page 56 Reversing the door opening direction If the door is not aligned with the housing (the angle α is not 0°), then proceed as follows: Open the door and detach the gasket from its groove in the corners at the top and bottom hinge.
- Page 57 Reversing the door opening direction Adjust the door position until the edge of the door is parallel to the side of the housing. When the door edge is parallel to the housing side, open the door again and tighten the screws (1) you released at the start of the door adjustment process.
-
Page 58: Solving Problems
Solving problems If you have any doubts about whether your appliance is working properly, we recommend to first read suggestions below. Tips & Tricks When temperature or humidity in the appliance is out of range an alarm will be triggered. Alarm sounds and alarm key is blinking on display. - Page 59 Solving problems Humidity out of range Possible cause Countermeasures Frequent and/or long door Try to minimize opening the door of the wine climate cabinet openings. appliance. Prepare loading plan of large quantities of bottles in advance to minimize the required time for loading. Try to use the ConnectLife (Wine Climate Cabinet) mobile application as much as possible to change appliance settings.
-
Page 60: Error Notifications
Solving problems Error notifications If a component inside the appliance is failing, a notification will pop-up. The notification will display a code. Codes for these errors can be found in the table below. Error Code shown on Code shown on Description Code Display 'T'... -
Page 61: General Problems
Solving problems The exception is error P1 (Proximity sensor), where the user can choose not to display this error anymore. Error itself can not be disabled. General problems Problem Cause/Solution • The ambient temperature is too high. Appliance cools continuously for a long time. -
Page 62: Other Display Warnings
Solving problems Other display warnings Warning Cause/Solution • The door has been open too long: close the door. The door is open: • If the warning keeps showing, call the service center to arrange repairs. The appliance operates in a safe mode until it is corrected. - Page 63 Solving problems INFORMATION! When calling a service center, you will have to state the type, model and serial number indicated on the type plate on the inside of the appliance [see chapter “Selecting the location”]. When waiting for a service technician, do not open the appliance door to avoid an unnecessary rise in temperature.
-
Page 64: Environmental Aspects
Environmental aspects Disposal of packaging and appliance This appliance is made from sustainable materials. This appliance must be disposed of in a responsible manner at the end of its service life. Contact the local authorities for information about the method. INFORMATION! See also the chapter ‘Disposal’... - Page 65 The instructions for use can also be found on our website: www.asko.com 849467...
Need help?
Do you have a question about the WCN111942G and is the answer not in the manual?
Questions and answers