Table of Contents
Advertisement
Quick Links
Advertisement
Table of Contents

Subscribe to Our Youtube Channel
Related Manuals for Steinberg CC121


Summary of Contents for Steinberg CC121
- Page 2 Mismatches or incorrect installation supplied or; a cart, rack, or stand that is recommended may result in overheating and battery case rupture. by Steinberg/Yamaha. If a cart, etc., is used, please observe all safety markings and instructions that Warning: accompany the accessory product.
- Page 3 Address : 6600 Orangethorpe Ave., Buena Park, Calif. 90620 Telephone : 714-522-9011 Type of Equipment : ADVANCED INTEGRATION CONTROLLER Model Name : CC121 This device complies with Part 15 of the FCC Rules. Operation is subject to the following two conditions:...
- Page 4 AC outlet. Then have the instrument inspected by in damage to the instrument or overheating. qualified Steinberg/Yamaha service personnel. • Check the electric plug periodically and remove any dirt or dust • Never insert or remove an electric plug with wet hands.
- Page 5 If you experience any hearing loss or ringing in the ears, consult a physician. Steinberg/Yamaha cannot be held responsible for damage caused by improper use or modifications to the instrument, or data that is lost or destroyed.
-
Page 6: Table Of Contents
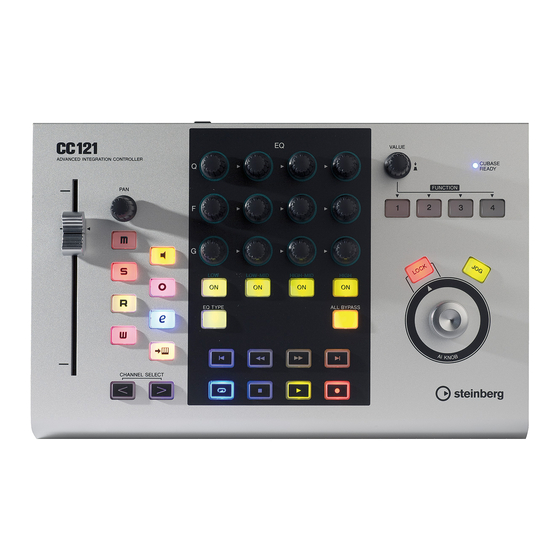
The CC121 serves as a comprehensive control surface for Cubase (versions that are compatible with the Link func- tion; see page 15). Simply connect the CC121 to a computer via a USB cable and enjoy a hardware/software link spe- cifically designed to give you tremendous efficiency and speed in your workflow within the Cubase environment. -
Page 7: Package Contents
Package Contents Package Contents The CC121 package contains the following items. After opening the CC121 package, make sure that it includes all of the items listed below. · CC121 · AC power adaptor (PA-3C, PA-130 or equivalent)* · CC121 Operation Manual (this book) ·... -
Page 8: Turning The Power On And Off
To make the CC121 active, connect the CC121 to your computer via a USB cable so that the power can be supplied from the computer to the CC121. To activate the motorized touch-sensitive fader, you'll need to also connect the AC power adaptor to the CC121 and a proper AC outlet. - Page 9 • Note that a small amount of current continues to flow while the switch is in the STANDBY position. If you do not plan to use the CC121 for an extended period of time, please be sure to unplug the adap- tor from the wall outlet.
-
Page 10: Software Installation
NOTE · If you have already installed a version of Cubase that is compatible with operation with the CC121 (page 15), the instructions on installing Cubase AI described below are not necessary. Jump to the next section “Installing TOOLS for CC121.”... - Page 11 NOTE Exit any open applications and close all open windows. · If the same or new version of Steinberg CC121 Exten- sion has already been installed in your computer, the From the Start menu, select ([Settings] ➝) installation window of the corresponding software will [Control Panel] ➝...
- Page 12 Setup window for USB-MIDI Driver and Steinberg CC121 Extension appearing in order. NOTE · If the same or new version of Steinberg CC121 Exten- sion has already been installed in your computer, the installation window of the corresponding software will not appear.
- Page 13 Uninstallation Remove the following files from the boot disk (gener- Preparing to install ally Macintosh HD) to uninstall TOOLS for CC121 (USB-MIDI Driver and Steinberg CC121 Extension.) Make sure that the [STANDBY/ON] switch of the CC121 is in the STANDBY ( ) position.
-
Page 14: Starting The Cc121 And Cubase
NOTE · Make sure to use the same USB terminal as the one used in the installation procedure when you connect the CC121 to the Windows computer again. If you connect the USB cable to a different terminal, you will have to install the USB-MIDI driver again. -
Page 15: The Controls And Connectors
CC121 and the computer is enabled or not. This lamp flashes to indicate that the CC121 is bus-powered from the connected computer. When the lamp is lit continuously, communication with the computer is enabled and Link functions are avail- able. - Page 16 ] (Edit Channel settings) button when the AC power adaptor is connected to the Opens/closes the settings window for the selected CC121. channel. · The touch sensitivity of the fader can be adjusted. Refer to “Adjusting the touch sensitivity of the fader”...
- Page 17 The Controls and Connectors ■ EQ sections The functions of the EQ section differ according to the mode: Normal, Selecting EQ TYPE, and Operat- ing Quick Control. Refer to the following table for explanations of the function in each mode. Normal mode This mode lets you adjust the parameters of the 4- band EQ built into the Audio track or Instrument...
- Page 18 The Controls and Connectors Selecting EQ TYPE mode Operating Quick Control mode This mode lets you select the shape type for the cor- This mode lets you operate the Quick Control func- responding band. In the Normal mode, press the tions built into the Audio track or Instrument track.
- Page 19 [VALUE] knob will turn the Studio on or off. tion to the footswitch, refer to “User Assignable:” on page 20. · Connect the foot switch to the CC121 when Cubase has not yet been started on your computer. ] (Previous) button...
- Page 20 Rotating the [VALUE] knob adjusts the under the [Devices] menu) on Cubase. From this win- Metronome output level of metronome sound. dow, select “Steinberg CC121” under “Remote Level: Pressing the [VALUE] knob switches the Devices” in the Devices box, then select a desired metronome sound on/off.
- Page 21 1 AI KNOB “Jog,” “Shuttle” and “Scrub.” This multi-function knob can control a desired Hold down this button to switch the CC121 control parameter within the principal window and plug-in panel window. Pressing this again after the CC121 software on Cubase, specified via the mouse pointer...
- Page 22 2 USB TO HOST terminal This terminal is used to connect the CC121 and the computer by using a USB cable. Since the CC121 is bus-pow- ered, the power can be supplied from the computer to the CC121 via this terminal.
-
Page 23: Adjusting The Touch Sensitivity Of The Fader
Hold the CHANNEL SELECT [ ] and [ ] (Enable Record) button buttons continuously. All of LEDs on the CC121 will light briefly, then ] (Read Enable) button some LEDs will light. (This indicates the version of the CC121 firmware.) -
Page 24: Troubleshooting
* Specifications and descriptions in this manual are for information purposes only. Steinberg/Yamaha Corp. reserves the right to change or modify products or specifications at any time without prior notice. Since specifi- cations, equipment or options may not be the same in every locale, please check with your Steinberg/Yamaha dealer. - Page 25 Information for Users on Collection and Disposal of Old Equipment This symbol on the products, packaging, and/or accompanying documents means that used electrical and electronic products should not be mixed with general household waste. For proper treatment, recovery and recycling of old products, please take them to applicable collection points, in accordance with your national legislation and the Directives 2002/96/EC.
- Page 26 ►Warranty Terms and Conditions available as printable PDF file at ►Gewährleistungsbestimmungen finden Sie als druckbare PDF Datei unter ►Les conditions de garantie se trouvent dans le document PDF imprimable sous ►Las condiciones de garantía se encuentran en el documento PDF en ►Termini e Condizioni di Garanzia disponibili su file PDF stampabile all’indirizzo web...
- Page 27 L’elenco dei distributori è disponibile sul sito Web al seguente indirizzo: Per individuare il distributore da contattare, rivolgersi alla sede centrale SMTG. 如需更多支持和深层产品信息,请联系您所在国家的代理商。 代理商列表请浏览下列网址 : 如需帮助决定联系哪方代理商,请联系 "SMTG 总公司 "。 HEAD OFFICE Steinberg Media Technologies GmbH Frankenstraße 18b, 20097 Hamburg, Germany Tel: +49-(0)40-210 35 0...
- Page 28 C.S.G., Pro Audio Division © 2008-2011 Yamaha Corporation ZA68190 111APDH*.*-01D0 Printed in Japan This document is printed on chlorine free (ECF) paper. Auf Umweltpapier gedruckt. Ce document a été imprimé sur du papier non blanchi au chlore. Este documento se ha impreso en papel sin cloro alguno.
Need help?
Do you have a question about the CC121 and is the answer not in the manual?
Questions and answers