
Related Manuals for Coccolle corso


Summary of Contents for Coccolle corso
- Page 1 Tricicleta pentru copii Tricikli Triciclo per bambini Baby Tricycle Manual de instructiuni / Hasznalati utmutato / Manuale di instruzioni / User’s manual...
- Page 3 Second step First step screw nut, shim screw scew...
- Page 4 Third step click First step Second step Second step...
- Page 5 click click...
- Page 6 Pull...
- Page 7 lock Push unlock...
- Page 9 Atentionari 1. Acest produs este destinat copiilor cu varsta cuprinsa intre 9 luni si 4 ani. 2. Inainte de utilizare, cititi cu atentie aceste instructiuni si pastrati-le pentru referinte viitoare. 3. Tineti produsul departe de foc si de surse directe de caldura. 4.
- Page 10 Pas 1 - introduceti aparatoarea de noroi (N) in furca fata (B), utilizand pentru fixare un surub (3N*M). - scoateti surubul de pe roata din fata (D), apoi introduceti furca fata (B) in roata din fata (D) fixand cu ajutorul unui surub (5N*M). Pas 2 - slabiti surubul de sub cadru (A), apoi inserati frana (Q2), garnitura, roata spate (C), axul rotilor din spate (M) in furca spate.
- Page 11 FIGYELMESEN OLVASSA EL ÉS ŐRIZZE MEG A HASZNÁLATI UTASÍTÁST! 1. 1,5 és 3 év közötti gyermekek számára ajánlott, 30 kg-os súly alatt. 2. Mielőtt a gyermek használni kezdi a triciklit, a szülő tanítsa meg a következőkre: pedálok használata, kormányzás, tekerés, le- és felszállás. Ha a gyermek nem tud egyedül biciklizni, a szülő...
- Page 12 Lépés 1 - tegye be a sárvédőt (N) az első villa (B) használyon egy csavart (3N*M). - távolítsa el a csavart az első kerekrol (D) es azutan tegye az első villat (B) az elso kereben (D), biztositja egy csvaral (5N*M). Lépés 2 - csavarlja ki a vaz allati csavart (A), azutan tegye a be a feket (Q2), a lezarast, hatso kerekeket (C), a kerek tengelyt (M) a hatso villaban.
- Page 13 Avvertenze! 1. Il prodotto è compatibile per bambini con eta compresa tra 37 mesi e 72 mesi. 2. prima di utilizzare, leggere attentamente il manuale di uso, se non sono seguite le istruzioni, si puo mettere in pericolo la sicurezza de vostro bambino 3.
- Page 14 2. Fasi di montaggio Passo 1 1. Inserire il parafango (N) nella forcella anteriore (B) e quindi serrare con vite (3N * M). 2. Togliere la vite sulla ruota anteriore (D), quindi inserire la forcella anteriore (B) nella ruota anteriore (D). Infine stringere con vite (5N * M). Passo 2 1.
- Page 15 Warnings! 1. The product is suitable for children aged 9-48 months old. 2. Before using it, an adult should read the instructions carefully because otherwise the child is at harm's risk. Please keep the instructions for future reference. 3. Please keep away from fire! 4.
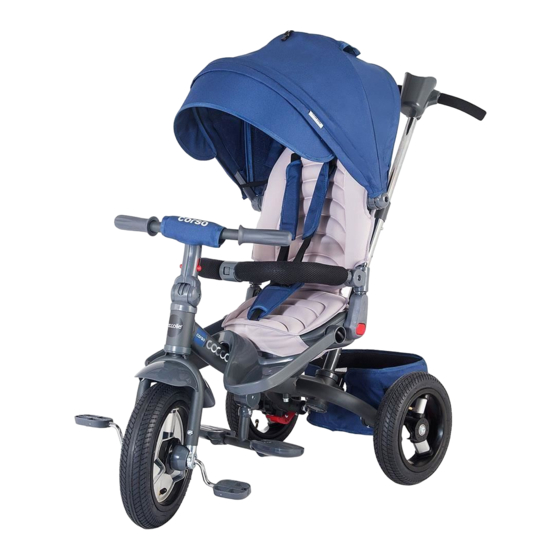
- Page 16 1. Parts name A.Frame B.Front fork C.Rear wheel D.Front wheel E.Pushbar (bottom) F-1.M8*38 screw F-2.M8*110 Screw F-3.5M-6M wrench F-4.∮8 shim G.Handlebar H.Back rest I.Rear basket J.Pushbar (up) K.Canopy L.Middle foot rest M.Rear axle N.Fender O.Seat P.Seat Fixture Q-1.Cup Q-2.Brake parts 2 R.Front foot rest 2.
- Page 17 Step 6 1.Insert the up pushbar(J) into the down pushbar(E) until hear “click”. then put pushbar set into the frame(A) until hear “click”.tighten them with wrench(3N*M) 2.Insert the rear basket(I) into the rear side of the frame then tighten them with plastic screw. 3.Insert the cup into the up pushbar(J).
Need help?
Do you have a question about the corso and is the answer not in the manual?
Questions and answers