
Related Manuals for Motorola MXP600


Summary of Contents for Motorola MXP600
- Page 1 Mobile Release 2021.2 MXP600 Feature User Guide JULY 2021 *MN006360A01* MN006360A01-AE © 2021 Motorola Solutions, Inc. All rights reserved...
-
Page 2: Table Of Contents
2.3 Battery Storage........................20 2.4 Extending Battery Life......................20 2.5 Battery Charging Temperature....................20 2.6 Additional Battery Warnings/Cautions................... 20 2.7 Battery Information........................ 20 Chapter 3: MXP600 Radio Overview..............21 3.1 One-Touch Buttons........................25 3.1.1 One-Touch Button Features..................25 3.1.2 One-Touch Dial......................28 Chapter 4: Getting Started..................29 4.1 Attaching or Removing the Antenna.................. - Page 3 MN006360A01-AE Contents Turning Your Radio On..................... 40 Turning Your Radio Off..................... 41 4.7 Unlocking Your Radio......................41 4.8 Unblocking Your Radio......................41 4.9 Holding Your Radio........................42 4.10 Recommended Wearing Position..................42 Chapter 5: Display and Keys..................45 5.1 Default Home Screen......................45 5.2 Soft Key..........................
- Page 4 MN006360A01-AE Contents 9.1.5 Word Locking......................69 9.1.6 Adding Words to Dictionary..................69 9.2 Locking or Unlocking the Keys or Buttons................69 9.3 Selecting Talkgroups......................69 9.3.1 Using Timed Talkgroup Change................70 9.3.2 Selecting Talkgroups by Index.................70 9.4 High or Low Audio Toggle..................... 70 9.4.1 Using High Audio.....................
- Page 5 MN006360A01-AE Contents 14.2.2 Storing Numbers from Messages................87 14.3 Entering the Outbox......................88 14.4 Using Submenus in the Inbox and Outbox................88 14.5 Entering the Call-Out Box....................89 14.6 Radio Messaging System....................90 14.6.1 Entering the RMS Box................... 90 14.6.2 Sending RMS Statuses..................90 14.7 Entering the WAP Box......................
- Page 6 MN006360A01-AE Contents Protecting the Radio with a PIN Code................104 Changing PIN Codes...................... 104 18.2 Managing Keypad Lock..................... 105 Locking Keypad......................105 Unlocking Keypad......................105 Setting Automatic Keylock Delay..................105 Setting Keylock on Startup....................105 18.3 Managing Air Encryption....................105 Viewing Air Encryption State...................106 Deleting User Keys......................
- Page 7 MN006360A01-AE Contents 20.6 Connecting Devices......................125 20.7 Disconnecting Devices...................... 125 20.8 Managing Devices......................125 20.9 Setting Indoor Location......................126 20.10 Viewing Detected Beacons....................126 Chapter 21: Browser..................... 127 21.1 Using the Browser......................127 Setting Up Data.......................127 Entering the Browser...................... 127 Entering Browser Menu Panes..................127 Exiting the Browser......................
- Page 8 MN006360A01-AE Contents 22.3.4 Deleting Talkgroups from Favorite Folders............136 Chapter 23: Individual Setup................137 23.1 Enabling or Disabling Call Waiting..................137 23.2 Setting Call Forwarding..................... 137 Chapter 24: Favorites................... 138 24.1 Adding Folders to Favorites....................138 24.2 Adding Contact Numbers to Favorites................138 24.3 Making Private Calls to Favorite Contacts.................138 24.4 Adding Talkgroups to Favorites..................
- Page 9 MN006360A01-AE Contents 29.3.4 Using Any TG Net Registration................150 Chapter 30: Location.................... 151 30.1 Enabling GPS or GNSS.....................151 30.2 Viewing Your Position......................151 30.3 Viewing the Testpage......................152 30.4 Changing Location Accuracy..................... 153 30.5 Backlog..........................153 30.5.1 Enabling or Disabling Backlog................153 30.5.2 Viewing Backlog Reports..................
- Page 10 MN006360A01-AE Contents Chapter 35: Contact Address................164...
-
Page 11: List Of Figures
List of Figures Figure 1: MXP600 Front View ....................... 21 Figure 2: MXP600 Side and Back View ....................23 Figure 3: MXP600 Top and Bottom View ....................24 Figure 4: Desktop Charger ........................39 Figure 5: Car Charger ..........................40 Figure 6: Travel Charger ........................40 Figure 7: Recommended Wearing Position ...................43... -
Page 12: List Of Tables
MN006360A01-AE List of Tables List of Tables Table 1: Special Notations ........................15 Table 2: Displayed Messages ....................... 16 Table 3: Battery Information ........................20 Table 4: Front View Description ......................21 Table 5: Side and Back View Description ....................23 Table 6: Top and Bottom View Description ................... 24 Table 7: One-Touch Button Features .................... -
Page 13: Legal And Compliance Statements
License Rights The purchase of Motorola Solutions products shall not be deemed to grant either directly or by implication, estoppel or otherwise, any license under the copyrights, patents or patent applications of Motorola Solutions, except for the normal non-exclusive, royalty-free license to use that arises by operation of law in the sale of a product. -
Page 14: Safety Information
Exposure and Product Safety Guide for Portable Two-Way Radios which contains important operating instructions for safe usage and RF energy awareness and control for Compliance with applicable standards and Regulations. For a list of Motorola Solutions-approved antennas, batteries, and other accessories, visit the following website: http://www.motorolasolutions.com Under Industry Canada regulations, this radio transmitter may only operate using an antenna of a type and maximum (or lesser) gain approved for the transmitter by Industry Canada. -
Page 15: Chapter 1: Read Me First
MN006360A01-AE Read Me First Chapter 1 Read Me First This user guide covers operating basic functions and other features of your radio. You can refer to the Product Information Manual for further information on the features. Notations Used in This Guide The user guide is designed to give you more visual clues. -
Page 16: Chapter 2: Radio And Battery Care
• It is recommended to use Universal Connector Dust Cover (Motorola Solutions part number: PMHN4429_) if your radio is deployed near the seaside or salt water area, when it is without any audio accessory attached on it. - Page 17 Gateway not available Your radio cannot connect to a gateway, or connection has been lost. Invalid Battery The radio detects non-Motorola Solutions batteries and prompts you on battery authentication. This message is prompted upon power-up, with a tone. Individual Calls Only You can make only individual (private) calls.
- Page 18 MN006360A01-AE Chapter 2: Radio and Battery Care Message Message Description List Partially Attached The scan list is active, but not all talkgroups are attached to it. Low Battery The battery charge level is too low to perform the required operation. Message Delivered Indicates mail successfully delivered.
- Page 19 MN006360A01-AE Chapter 2: Radio and Battery Care Message Message Description Please Try Again You could not call. Please Wait Connecting A message during startup. Radio Disabled Check with your service provider. Radio time not updated Check for Wi-Fi update triggered from Menu failed be- cause radio time is not set.
-
Page 20: Battery Storage
Extending Battery Life A battery is an expendable part and may need replacing during the life of your radio. To ensure maximum service life of your radio, always replace the battery with a genuine Motorola Solutions replacement. Battery Charging Temperature The temperature range of battery operation is from 0 °C to +45 °C in charger mode. -
Page 21: Chapter 3: Mxp600 Radio Overview
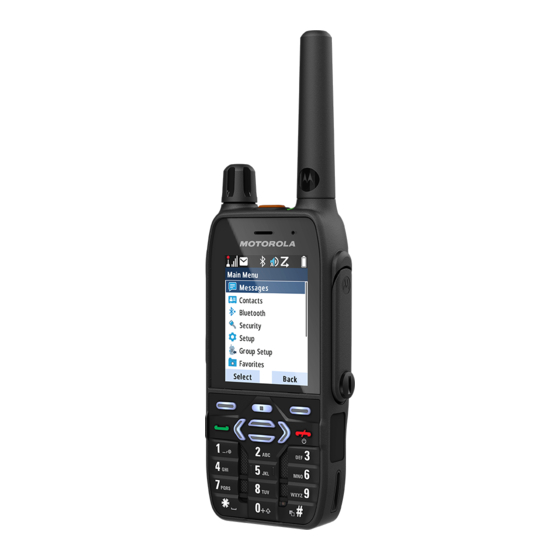
MN006360A01-AE MXP600 Radio Overview Chapter 3 MXP600 Radio Overview Familiarize yourself with the buttons and functions on your radio. The MXP600 radio specifications are available at https://www.motorolasolutions.com/mxp600radio. Figure 1: MXP600 Front View Table 4: Front View Description Annotation Name Description... - Page 22 MN006360A01-AE Chapter 3: MXP600 Radio Overview Annotation Name Description Menu Key • From the home screen, press to enter the main menu. • Used to enter context-sensitive menus. Navigation Key To navigate throughout the interface up, down, left, and right.
-
Page 23: Figure 2: Mxp600 Side And Back View
MN006360A01-AE Chapter 3: MXP600 Radio Overview Figure 2: MXP600 Side and Back View Table 5: Side and Back View Description Annotation Name Description Programmable Button Programmable buttons support the One-Touch Button feature. NOTE: The required time to press and hold a button to activate a One- Touch Button feature is by default set to 0.1 second. -
Page 24: Figure 3: Mxp600 Top And Bottom View
Provides battery power for your radio. Battery Latch Locks or unlocks the battery. RF Connector Dust Cover Reduces the ingress of dust and dirt Figure 3: MXP600 Top and Bottom View Table 6: Top and Bottom View Description Name Description Emergency Button Press and hold the Emergency button to start Emergency Operations. -
Page 25: One-Touch Buttons
MN006360A01-AE Chapter 3: MXP600 Radio Overview One-Touch Buttons The One-Touch Button (OTB) feature allows you to activate a feature by a long key press of the programmable button. NOTE: You can also assign features to the option buttons of RSM accessories. - Page 26 MN006360A01-AE Chapter 3: MXP600 Radio Overview Feature Description Initiate Call-Out Fallback Sends a Call-Out Fallback Alert. Location Information Pro- Sends a message with the location of your radio to a dedicated tocol (LIP) Report address. Lock to Current Network Selects the current network only.
- Page 27 MN006360A01-AE Chapter 3: MXP600 Radio Overview Feature Description • your radio returns to the original talkgroup. • your radio restarts the timer before returning to the previously selected talkgroup. • no action on your radio, depending on the configuration. After the timer expires, your radio returns to the previously selected talkgroup.
-
Page 28: One-Touch Dial
MN006360A01-AE Chapter 3: MXP600 Radio Overview Feature Description Turn Bluetooth On or Off Turns Bluetooth on or off. Turn Repeater Mode On Turns Repeater Mode on or off. or Off Unassigned Your radio displays Unassigned Button when no feature is as- signed to this button. -
Page 29: Chapter 4: Getting Started
MN006360A01-AE Getting Started Chapter 4 Getting Started Familiarize yourself with basic information on how to use the radio. Attaching or Removing the Antenna NOTE: Use only the antenna intended for your radio. Using other antennas can result in significant range loss due to poor Radio Frequency (RF) performance. Attaching the Antenna Procedure: 1 Insert the threaded base of the antenna into the antenna terminal on top of your radio. - Page 30 MN006360A01-AE Chapter 4: Getting Started Annotation Description Finger Scoop Area SIM/microSD connector plastic door 3 Flip open the microSD card holder. 4 Insert the microSD card into the microSD card holder ensuring that the gold contact area is facing down.
- Page 31 MN006360A01-AE Chapter 4: Getting Started 5 Close the microSD card holder and slide it to the lock position.
-
Page 32: Uninstalling The Microsd Card
MN006360A01-AE Chapter 4: Getting Started 6 Close the SIM/microSD connector plastic door. 7 Install the battery. Uninstalling the MicroSD Card Procedure: 1 Remove the battery. 2 Flip open the SIM/microSD connector plastic door from the finger scoop area. NOTE: Avoid pressing on the SIM/microSD connector plastic door. 3 Flip open the microSD card holder. -
Page 33: Installing Or Uninstalling The Sim Card
MN006360A01-AE Chapter 4: Getting Started 5 Close the microSD card holder and slide it to the lock position. 6 Close the SIM/microSD connector plastic door. 7 Install the battery. Installing or Uninstalling the SIM Card NOTE: The SIM card slot has a delicate construction. You must avoid installing or uninstalling the SIM card unnecessarily as this action can damage the mechanism of the reader. - Page 34 MN006360A01-AE Chapter 4: Getting Started Annotation Description Finger Scoop Area SIM/microSD connector plastic door 3 Flip open the SIM card holder. 4 Insert the SIM card into the SIM card holder ensuring that the gold contact area is facing down.
- Page 35 MN006360A01-AE Chapter 4: Getting Started 5 Close the SIM card holder and slide it to the lock position.
-
Page 36: Uninstalling The Sim Card
MN006360A01-AE Chapter 4: Getting Started 6 Close the SIM/microSD connector plastic door. 7 Install the battery. Uninstalling the SIM Card Procedure: 1 Remove the battery. 2 Flip open the SIM/microSD connector plastic door from the finger scoop area. NOTE: Avoid pressing on the SIM/microSD connector plastic door. 3 Flip open the SIM card holder. -
Page 37: Attaching Or Removing The Battery
MN006360A01-AE Chapter 4: Getting Started 5 Close the SIM card holder and slide it to the lock position. 6 Close the SIM/microSD connector plastic door. 7 Install the battery. Attaching or Removing the Battery Attaching the Battery Procedure: 1 Insert battery into the compartment until the contacts align and the battery hooks in place. 2 Press down the battery until it clicks in place. -
Page 38: Removing The Battery
MN006360A01-AE Chapter 4: Getting Started Removing the Battery Prerequisites: Turn off your radio. Procedure: 1 Slide the Battery Latch to the right and hold it. 2 Lift the battery. 3 Remove the battery from the compartment. NOTE: Pressing the latch while slide will cause battery hard to be removed... -
Page 39: Charging The Battery
The battery charges faster when your radio is turned off. IMPORTANT: Use only Motorola Solutions approved-chargers which provide optimal performance. Using other chargers may fail to fully charge, or can reduce the life of the battery. -
Page 40: Turning Your Radio On Or Off
MN006360A01-AE Chapter 4: Getting Started Figure 5: Car Charger Figure 6: Travel Charger NOTE: If the LED of a Multi-Unit Charger (MUC) blinks red when charging, you must re-insert your radio. If the LED still blinks red after several reconnection to MUC, the battery may be damaged or have reached end of life. -
Page 41: Turning Your Radio Off
MN006360A01-AE Chapter 4: Getting Started Your radio performs a self-check and registration routine. After successful registration, your radio is in service. NOTE: If Covert Mode is activated, your radio turns on without visible and audible notification. Turning Your Radio Off Procedure: Press and hold the Off key. -
Page 42: Holding Your Radio
MN006360A01-AE Chapter 4: Getting Started Holding Your Radio Your radio has three microphones. The top microphone is for simplex dispatcher or private calls. The bottom microphone is for duplex telephone-like calls. The third microphone is at the back of your radio for the optional noise cancellation feature. -
Page 43: Figure 7: Recommended Wearing Position
MN006360A01-AE Chapter 4: Getting Started For optimized antenna performance, you must ensure that the accessory cable is away from the antenna of your radio. Figure 7: Recommended Wearing Position Avoid overlapping the accessory cable with the antenna of your radio. -
Page 44: Figure 8: Wearing Position To Avoid
MN006360A01-AE Chapter 4: Getting Started Figure 8: Wearing Position to Avoid... -
Page 45: Chapter 5: Display And Keys
MN006360A01-AE Display and Keys Chapter 5 Display and Keys Familiarize yourself with the default home screen and keys elements of your radio. Default Home Screen Figure 9: Default Home Screen with Icons Annotation Description Status icon area Text display area Soft key area Menu/Context sensitive icon... -
Page 46: Soft Key
MN006360A01-AE Chapter 5: Display and Keys Soft Key Table 8: Colors of the Soft Key Area The colors of the Soft key area changes according to the mode the radio is in. Color Mode or State Light Blue Normal TMO and DMO Modes Orange Emergency Mode Purple... -
Page 47: Configurable Idle Screen
MN006360A01-AE Chapter 5: Display and Keys Configurable Idle Screen Your service provider can configure the information that is displayed on the idle screen below the status icon area. The displayed information depends on your radio configuration and services supported. • Audio Profile Name •... -
Page 48: Display Features
MN006360A01-AE Chapter 5: Display and Keys Display Features Your radio utilizes colors to highlight certain special situations: • When your radio is in an emergency mode/call. • When in the call-out mode (alert received state, standby state, accept the state). •... -
Page 49: Chapter 6: Status Indications
MN006360A01-AE Status Indications Chapter 6 Status Indications Familiarize yourself with the status indications of your radio. Battery Status Indication Your radio indicates low battery level by playing an audible alert when the battery charge falls to a preset level. The low battery alert can be programmed to be 5, 10, or 20 % of remaining capacity by your service provider. -
Page 50: Led Status Indication
MN006360A01-AE Chapter 6: Status Indications LED Status Indication Table 11: LED Status Indication Indication Status when Not Charging Status when Charging Solid green Battery is fully charged • In use • Repeating call Blinking green Battery is charged at 90% •... -
Page 51: Chapter 7: Icon Indications
MN006360A01-AE Icon Indications Chapter 7 Icon Indications Familiarize yourself with the icons on your radio. Status Icons Status icons appear when your radio is engaged in certain activities or when you have activated certain features. Depending on your service provider settings, status icons can appear in normal or large size. By default, they are large on the home screen and normal when browsing though your radio menu. -
Page 52: Table 14: General Icons
MN006360A01-AE Chapter 7: Icon Indications Icon Name Description Direct Mode Your radio is in Direct Mode, a radio-to-radio commu- nication. Repeater Mode Your radio is operating as a repeater in Repeater Mode. DMO Repeater The Repeater option in DMO Mode is selected. Communication •... - Page 53 MN006360A01-AE Chapter 7: Icon Indications Icon Name Description GNSS (Global • Solid – Your radio detects a fixed location. Navigation Satellite • Blinking – Your radio is acquiring a fixed location. This feature Systems) is an optional setting and may not be enabled on your radio. RUI Pseudo Log You are in pseudo log on state.
- Page 54 MN006360A01-AE Chapter 7: Icon Indications Icon Name Description Indoor Location Indicates that Indoor Location operation is temporarily suspen- Suspended ded. Secure Operation Solid – Your radio is operating in a secure channel. Blinking – Your radio is receiving an encrypted voice call. Encryption Off Blinking –...
-
Page 55: Talkgroup Icons Selection
MN006360A01-AE Chapter 7: Icon Indications Icon Name Description Wi-Fi Strength The more bars, the stronger the Wi-Fi signal. OTAP over Wi-Fi Indicates that there is an OTAP over Wi-Fi update available. Available Talkgroup Icons Selection Talkgroup icons are used to indicate that a talkgroup has a special function, show the status of network selection, and/or show the talkgroup properties. -
Page 56: Menu Icons
MN006360A01-AE Chapter 7: Icon Indications Icon Talkgoup in Common Folders and Favorite Folders Displayed when your radio is locked to a current single network. The selected ISI talkgroup or Any Net talkgroup allows multiple networks. Menu Icons Menu icons help you to identify the items in the menu at first glance. Table 17: Menu Icons Icon Name... -
Page 57: Text Entry Icons
MN006360A01-AE Chapter 7: Icon Indications Icon Name Description Location Displays location of your radio. Packet Data Allows you to send data from your radio to other devices. Crypto Menu Allows you to manage SIM card based End-to-End Encryption. Services Allows you to manage Broadcast, Assistance, and Disaster Calls. Wi-Fi Allows you to manage the Wi-Fi functions to access a network. -
Page 58: Messages Icons
MN006360A01-AE Chapter 7: Icon Indications Icon Description Locks for numeric entry only Symbol Mandarin Phonetic Symbol Japanese Hiragana syllabary Korean alphabet Chinese pinyin Chinese characters strokes Messages Icons Message icons are used as a description or quick indication of the message status. 7.5.1 Inbox Icons The inbox folder contains up to 100 new or old incoming messages. -
Page 59: Outbox Icons
MN006360A01-AE Chapter 7: Icon Indications Icon Description Protected and Secured Message is read. General The sender's name and number is in the Message View. The date and time of message arrival is in the Message View. The delivery status for Store and Forward messages is received. 7.5.2 Outbox Icons The outbox stores up to 100 sent messages that are arranged chronologically. -
Page 60: Call-Out Icons
MN006360A01-AE Chapter 7: Icon Indications Icon Description Outgoing Secured Message is successful. Outgoing Secured Message failed. Protected and Secured Messages Protected and Secured Message delivery is in progress. Protected and Secured Message delivery is accomplished. Protected and Secured Message delivery failed. Outgoing Protected and Secured Message is successful. -
Page 61: Wap Icon
MN006360A01-AE Chapter 7: Icon Indications Icon Description RMS Box Read Message RMS Box Unread Message 7.5.5 WAP Icon Table 24: Wireless Application Protocol (WAP) Icon Icon Description WAP message. Bluetooth Icons These icons indicates the type of Bluetooth device paired with your radio, and when listed during discovery and radio scan. -
Page 62: Contacts
MN006360A01-AE Chapter 7: Icon Indications Icon Description Wi-Fi signal is average. Wi-Fi signal is poor. Wi-Fi signal is unavailable. Wi-Fi Signal Strength for Secured Networks Wi-Fi signal is excellent for secured networks. Wi-Fi signal is good for secured networks. Wi-Fi signal is average for secured networks. Wi-Fi signal is poor for secured networks. -
Page 63: Table 27: Contact Types
MN006360A01-AE Chapter 7: Icon Indications Name If you store more than one number to one contact, this entry is required. Type Each contact must be assigned to one of the following types: Table 27: Contact Types Icon Description Private Cannot have a speed dial number. Mobile Home Work... -
Page 64: Chapter 8: Keypad Overview
MN006360A01-AE Chapter 8: Keypad Overview Chapter 8 Keypad Overview Familiarize yourself with the keys on your radio. Alphanumeric and Symbol Keys List of keys and characters in Alphanumeric Mode for TAP or iTAP. . , ? ! 0 1 @ ’ ” - ( ) / : _ ;... -
Page 65: Idle Keys
MN006360A01-AE Chapter 8: Keypad Overview Idle Keys From an idle display, you have easy access to stored target lists. Table 29: Description of Idle Keys Description Up Navigation Press to access the Favorite Talkgroup list. Down Navigation Press to access the Recent Calls list. Send Press to access the Last Dialed Numbers list. - Page 66 MN006360A01-AE Chapter 8: Keypad Overview Description Any numeric key Press and hold to enter TAP or iTAP alphanumeric mode. Press and hold to enter numeric mode. In TAP, press to reject word completion and continue entering text. A new word completion starts after TAP timeout. Press to run through single shift, uppercase, and lowercase func- tions.
-
Page 67: Chapter 9: General Radio Operation
MN006360A01-AE General Radio Operation Chapter 9 General Radio Operation Get to know the general operations of your radio. Writing Text This section provides information on entering texts on your radio. 9.1.1 Selecting Text Entry Modes Prerequisites: Your radio displays the text entry screen. Procedure: 1 Press Menu→Entry Mode. -
Page 68: Writing In Tap Alphanumeric
MN006360A01-AE Chapter 9: General Radio Operation When and where to use:It allows you to write quicker. For example, try to write David 232! Procedure: 1 Press Menu→Entry Setup→Prim.. 2 Select iTAPEnglish and press Back. 3 Press Menu→Entry Mode. 4 Select Primary. 5 Press 3 key. -
Page 69: Word Locking
MN006360A01-AE Chapter 9: General Radio Operation 9.1.5 Word Locking Prerequisites:Your radio displays the text entry screen. When and where to use:To add the words that are not in the dictionary. Procedure: 1 Press Menu→Entry Setup→Prim.. 2 Select iTAPEnglish and press Back. 3 Enter the word. -
Page 70: Using Timed Talkgroup Change
MN006360A01-AE Chapter 9: General Radio Operation • Select Options→TG by Folder. Select a folder (for example, Favorite) and then a talkgroup name. NOTE: Your radio can access up to three levels of the folder structure. 9.3.1 Using Timed Talkgroup Change This feature allows you to switch a selected talkgroup between the currently selected talkgroup and a predefined talkgroup (TMO or DMO), making the predefined talkgroup the selected talk group for a predefined time by using a One-Touch button. -
Page 71: Using High Audio
MN006360A01-AE Chapter 9: General Radio Operation Speaker Low indicates that audio is routed to the earpiece or PHF earpiece, and not to the main speaker. 9.4.1 Using High Audio When and where to use:Placing or receiving a Phone, PABX, or Duplex Private call. Procedure: 1 Hold your radio in a vertical position with its top microphone 5 cm to 10 cm away from your mouth. -
Page 72: Chapter 10: Operation Modes
MN006360A01-AE Chapter 10: Operation Modes Chapter 10 Operation Modes This section contains information on available modes that your radio can operate in. 10.1 Entering TMO or DMO Mode Entering TMO Mode Procedure: Perform one of the following actions: • From the home screen, press Options. Select Trunked Mode. •... -
Page 73: Enabling Network Monitor
MN006360A01-AE Chapter 10: Operation Modes Option Actions To use the first available repeater for that Select Repeater. talkgroup To use the first available gateway or re- Select GW + Rep. peater for that talkgroup To use the first available gateway for that Select Automatic. -
Page 74: Chapter 11: Types Of Radio Calls
MN006360A01-AE Chapter 11: Types of Radio Calls Chapter 11 Types of Radio Calls Your radio can make Group, Private, Phone and Private Automatic Branch Exchange (PABX), and Broadcast calls in Trunked Mode Operation (TMO), Direct Mode Operation (DMO), or both. Call Type Description Group Calls... - Page 75 MN006360A01-AE Chapter 11: Types of Radio Calls Option Actions D-PTT Preempt In a group call: Group Calls a Press the PTT button twice on your radio or the Remote Control Unit (RCU). b Speak into the microphone. Simplex Private To initiate: Calls a From the home screen, enter a number.
-
Page 76: Making Calls From Messages
MN006360A01-AE Chapter 11: Types of Radio Calls 11.2 Making Calls from Messages You can call a number embedded in the message in the Inbox or Outbox folder or start a group call with the message sender of a talkgroup using the Embedded Number feature. The Embedded Number feature is enabled by your service provider. -
Page 77: Dialing Short Numbers
MN006360A01-AE Chapter 11: Types of Radio Calls Option Actions Group Call in Ongo- When your radio receives a group call with higher priority while in ing Group Call an active group call, respond by performing one of the following actions: a To end the current group call and start the incoming one, select Join. -
Page 78: Selecting Talkgroups By Index
MN006360A01-AE Chapter 11: Types of Radio Calls 11.6 Selecting Talkgroups by Index Procedure: 1 From the home screen, enter the talkgroup speed number and *. 2 Press Attach. You can start a group call by pressing the PTT button. -
Page 79: Chapter 12: Viewing Dgna Talkgroups
MN006360A01-AE Viewing DGNA Talkgroups Chapter 12 Viewing DGNA Talkgroups DGNA allows the network operator to dynamically manage talkgroups on your radio over the air interface by transmitting data to your radio. Prerequisites:Your radio receives the DGNA message. Procedure: 1 To view the added talkgroups details, press View. 2 Scroll through the list to select required talkgroup. -
Page 80: Chapter 13: Emergency Operations
MN006360A01-AE Chapter 13: Emergency Operations Chapter 13 Emergency Operations Emergency Operations are used in critical situations. Emergency Operation Services: • Emergency Alarm • Emergency Call (Group, Private, or Phone) • Emergency Status • Emergency Alert Emergency Services are initiated in: •... -
Page 81: Entering And Exiting Emergency Mode
MN006360A01-AE Chapter 13: Emergency Operations Hot Mic Automatically grants your radio with a talk permit for a provisioned amount of time without needing to press the PTT button during Emergency Operation. HotMic operation is applicable for: • Tactical and non-tactical Emergency groups. •... -
Page 82: Making Emergency Calls
MN006360A01-AE Chapter 13: Emergency Operations Making Emergency Calls Procedure: 1 Make emergency calls by using one of the following options: Option Actions Group Call To enter: Press and hold the Emergency button. To talk: Press and hold the PTT button to talk and wait for the Talk Permit tone. -
Page 83: Sending Emergency Sds Status
MN006360A01-AE Chapter 13: Emergency Operations Sending Emergency SDS Status Prerequisites:Pre-defined SSI and status number is configurable. Procedure: Press and hold the Emergency button. Initiating Disaster Alert Procedure: 1 From the home screen, press the Menu key. 2 Select Services→Disaster Alert. 3 To start the call press PTT button. -
Page 84: Chapter 14: Messages
MN006360A01-AE Chapter 14: Messages Chapter 14 Messages The Messages feature allows you to send, receive, and store and forward text messages. You can manage messages with the following messaging features. Collaborative Messaging and Radio Messaging System (RMS) are additional features. Check with your service provider for configuration. -
Page 85: Configuring Delivery Reports
MN006360A01-AE Chapter 14: Messages Option Actions c Enter the recipient number or choose from contacts by pressing abc. NOTE: For Private target selection, you can enter either Individual Short Subscriber Identity (IS- SI), Individual TETRA Subscriber Identity (IT- SI), or Group Short Subscriber Identity (GSSI) of the recipient. -
Page 86: Viewing Delivery Reports
MN006360A01-AE Chapter 14: Messages Option Description Consumed Delivery reports are required when the recipient reads your messages. Both Delivery reports are required when the recipient receives and reads your messages. 14.1.3 Viewing Delivery Reports Procedure: 1 From the home screen, press the Menu key. 2 Navigate to the required message by selecting Messages→Inbox or Outbox. -
Page 87: Entering The Inbox
MN006360A01-AE Chapter 14: Messages 14.2 Entering the Inbox The inbox stores incoming messages. Procedure: 1 From the home screen, press the Menu key. 2 Select Messages→Inbox. 14.2.1 Receiving New Messages When you receive a new message, your radio shows the following indications: •... -
Page 88: Entering The Outbox
MN006360A01-AE Chapter 14: Messages Option Actions Saving in an existing contact a Select Edit. b Choose the Type of the new number and press Done. 14.3 Entering the Outbox The outbox stores outgoing messages. Procedure: 1 From the home screen, press the Menu key. 2 Select Messages→Outbox. -
Page 89: Entering The Call-Out Box
MN006360A01-AE Chapter 14: Messages Option Actions • Press the PTT button. • Press the Send key. Invoking the edit screen with an a Select Forward and edit the text. old message and send it to a b To send, perform one of the following options: different recipient •... -
Page 90: Radio Messaging System
MN006360A01-AE Chapter 14: Messages 14.6 Radio Messaging System The Radio Messaging System (RMS) feature allows your radio to receive and send RMS messages. NOTE: This is a Software Selling Feature. This feature is only available when enabled by your service provider. 14.6.1 Entering the RMS Box Procedure:... -
Page 91: User-Defined Templates
MN006360A01-AE Chapter 14: Messages Procedure: 1 From the home screen, press the Menu key. 2 Select Messages→WAP Box. 3 Select the required message. 4 View the message in the browser by selecting Go to. 14.8 User-Defined Templates A template box stores user-defined message templates. 14.8.1 Managing User-Defined Templates When and where to use:To manage your saved templates. -
Page 92: Predefined Templates
MN006360A01-AE Chapter 14: Messages Option Actions Sending the message to a talk- Select the required talkgroup from the TalkGroup group List. Sending the message to an ad- a Press abc. dress in your contact list b Select the name of the recipient. Sending the message to a con- a Enter the contact number. -
Page 93: Viewing A Status Message Number
MN006360A01-AE Chapter 14: Messages 14.10.1 Viewing a Status Message Number Procedure: 1 From the home screen, press the Menu key. 2 Select Messages→Send Status. 3 Press the Menu key and select View. 14.10.2 Sending Status Messages When and where to use:Status messages are sent to either a selected talkgroup or a programmed private number. -
Page 94: Managing Additional Address
MN006360A01-AE Chapter 14: Messages Option Action Sending existing status mes- a Select the required status message. sages in your radio b Press the Send key. Sending status messages using a Enter a 5-digit status message number. a status number or if the status b Press Send. -
Page 95: Setting Call-Out Availability
MN006360A01-AE Chapter 14: Messages Option Actions d Select one of the following options: • Edit – for User Defined Additional Address alias. • View – for Pre-defined Additional Address alias. The display shows the Alias, the ISSI/ITSI/GSSI and the Status of the address (Pre-Defined or User Defin- ded). - Page 96 MN006360A01-AE Chapter 14: Messages Procedure: 1 From the home screen, press the Menu key. 2 Select Messages→Call-Out Availability. 3 Select one of the following options: • Available • Not available...
-
Page 97: Chapter 15: Contacts
MN006360A01-AE Contacts Chapter 15 Contacts Contacts feature offers “address-book” capabilities on your radio. Each entry matches the alias (name) and ID (number) that used to initiate a call. Contact entries are sorted alphabetically according to entry alias. Each alias can be associated with up to five IDs of different call forms. -
Page 98: Deleting Contacts And Numbers
MN006360A01-AE Chapter 15: Contacts • Simplex • Duplex NOTE: Simplex and Duplex options are only available if the contact Type is Private and the respective Private Call Hook Customization is enabled. 6 Press Done. 15.3 Deleting Contacts and Numbers Deleting Contacts Procedure: 1 From the home screen, press Contacts key. -
Page 99: Dialing Through The Contact List
MN006360A01-AE Chapter 15: Contacts 15.5 Dialing through the Contact List Procedure: 1 From the home screen, press Contacts key. 2 Select the required contact or enter up to 12 characters of the contact name. 3 If the contact has more than one number, use Left and Right Navigation keys to select the required number. -
Page 100: Chapter 16: Pictures
MN006360A01-AE Chapter 16: Pictures Chapter 16 Pictures The Pictures menu activates the Picture Browser for saved pictures in the microSD card or internal radio memory. 16.1 Starting the Picture Browser Procedure: 1 From the home screen, press the Menu key. 2 Select Pictures. -
Page 101: Navigating In Full Screen View
MN006360A01-AE Chapter 16: Pictures Option Actions b Highlight the folder and press the Rotary Knob. Returning to the previous folder Highlight the folder in the upper left corner of the dis- or going up a level play (with three dots) and press Select. Displaying a picture in full a Highlight the picture and press View. -
Page 102: Managing Comments In Pictures
MN006360A01-AE Chapter 16: Pictures Option Actions Returning to the Multi-Picture Perform one of the following actions: View • Press Back. • Press the Rotary Knob. Removing a picture Press Delete. 16.4 Managing Comments in Pictures A comment can have a maximum of 144 characters. If the Digital Fingerprint feature is active or the picture exceeds 3 MB, adding and editing comments are disabled. -
Page 103: Chapter 17: Man Down
MN006360A01-AE Man Down Chapter 17 Man Down NOTE: This is a Software Selling Feature. Man Down alerts when no movement occurs for a set time or the radio stays at an angle of tilt below a defined value. The radio alerts you when: •... -
Page 104: Chapter 18: Security
MN006360A01-AE Chapter 18: Security Chapter 18 Security Security menu stores all your security settings. 18.1 Managing PIN Protect PIN Protect allows you to configure PIN code authentication at the next power on. NOTE: To increase security, set your own PIN code. By default the PIN code are all zeros (depending on the length of the PIN code). -
Page 105: Managing Keypad Lock
MN006360A01-AE Chapter 18: Security 18.2 Managing Keypad Lock Keypad Lock lock the keypad on your radio. NOTE: By default, the Power and Emergency buttons are always operative when the keypad is locked. Locking Keypad Procedure: Perform one of the following actions: •... -
Page 106: Viewing Air Encryption State
MN006360A01-AE Chapter 18: Security Air Encryption enables encryption of entire communication between the radio and infrastructure, which results in increased security of calls, messages, and data. Viewing Air Encryption State Procedure: 1 From the home screen, press the Menu key. 2 Select Security→AirEncrypt. -
Page 107: Setting Covert Mode
MN006360A01-AE Chapter 18: Security Option Actions • TMSCK is Valid – The radio can work encrypted in TMO. • TMSCK is Invalid – The radio cannot work encrypted in TMO. Contact your service provider to restore SCKs to your radio. DMSCK Validity Your radio displays: •... -
Page 108: Setting Vibrate In Covert Mode
MN006360A01-AE Chapter 18: Security Setting Vibrate in Covert Mode Procedure: 1 From the home screen, press the Menu key. 2 Select Security→Covert Mode→Vibrate. 3 Select one of the following options: Option Description Restore all vibrations. Disable all vibrations. 18.6 Setting Remote Control There are two types of remote control, Short Data Service (SDS) Remote Control and Status Remote Control. -
Page 109: Chapter 19: Setup
MN006360A01-AE Setup Chapter 19 Setup The Setup menu allows you to change the general configuration on your radio. 19.1 Setting Detail Vibrate Procedure: 1 From the home screen, press the Menu key. 2 Select Setup→Vibrate→Custom..3 Depending on the type of calls, configure vibrate settings by performing one of the following actions. -
Page 110: Setting Ring Style
MN006360A01-AE Chapter 19: Setup Option Actions • Vibe On • Vibe Off Status Messages and Text Messages a Select Mail Rcvd. b Select one of the following options: • Vibe then Ring • Vibe Only • Ring Only 19.2 Setting Ring Style Procedure: 1 From the home screen, press the Menu key. -
Page 111: Setting Language
MN006360A01-AE Chapter 19: Setup Option Description Keypad Vol Sets the volume level for keypad tones. Tones Vol Sets the volume level for alert tones. Call-Out Vol Sets the volume level for Call-Out tones (if enabled). NOTE: If the display shows only one option Volume, you can adjust all of the above settings at once. -
Page 112: Setting Audio
MN006360A01-AE Chapter 19: Setup 19.6 Setting Audio Procedure: 1 From the home screen, press the Menu key. 2 Select Setup→Audio. 3 Set audio by using the following options: Option Actions Adjusting audio parameters in a Select Audio Profile. the current operating environ- b Select a required profile. -
Page 113: Setting Tones
MN006360A01-AE Chapter 19: Setup Option Actions b Select Enabled or Disabled. NOTE: When enabled, warning messages will be prompted. 19.7 Setting Tones Your radio has two tone packs that is Classic Tones (default) and New Tones. Prerequisites:Contact your service provider to enable a tone pack. Procedure: 1 From the home screen, press the Menu key. -
Page 114: Setting Display
MN006360A01-AE Chapter 19: Setup 19.8 Setting Display Procedure: 1 From the home screen, press the Menu key. 2 Select Setup→Display. 3 Set the display by using the following options: Option Actions Adjusting font size a Select Font Level. b Perform one of the following actions: •... -
Page 115: Setting Time And Date
MN006360A01-AE Chapter 19: Setup Option Actions when pressing keys on your radio or connec- ted accessory, select Auto. • To illuminate backlight when your radio is turning on, charging, or when the backlight One-Touch button is pressed, select Semi Auto. •... - Page 116 MN006360A01-AE Chapter 19: Setup 2 Select Setup→Time & Date. 3 Set the time and date by using the following options: Option Actions Displaying the time and date on a Select Display. your home screen b Perform one of the following actions: •...
-
Page 117: Setting Energy Economy
MN006360A01-AE Chapter 19: Setup Option Actions • To update time and offset received from the infrastructure, select Time & Offset. 19.10 Setting Energy Economy Energy Economy (EE) is a mode of operation to save battery life. Procedure: 1 From the home screen, press the Menu key. 2 Select Setup→Energy Economy. -
Page 118: Selecting Accessory Setup
MN006360A01-AE Chapter 19: Setup 19.12 Selecting Accessory Setup You can connect IMPRES, CORE, Other, or Secondary accessories to the radio side connector. NOTE: Availability of Accessories Setup might vary depends on configuration Procedure: 1 From the home screen, press the Menu key. 2 Select Setup→Accry Setup. - Page 119 MN006360A01-AE Chapter 19: Setup 2 Select Setup→Rotary Knob. 3 Set the rotary knob by using the following options: Option Actions Setting the mode for a Select Rotary Mode. the Rotary Knob b Perform one of the following actions: • To enable both volume and scroll modes, select Dual. •...
-
Page 120: Entering Car Kit Settings
MN006360A01-AE Chapter 19: Setup Option Actions • To set the function for volume setting, select Volume Ad- just.. • To set the function to predefined One-Touch Button fea- tures, select OTB Feature. 19.15 Entering Car Kit Settings The car kit connects accessories to your radio in a car and enables you to operate your radio hands- free. -
Page 121: Changing The Usb Settings Mode
MN006360A01-AE Chapter 19: Setup Option Actions • To turn on or off backlights by pressing a function button, select Semi Auto. • To keep backlights on, select On. Defining accessories connected to a Select Accry Setup. a car kit b Select one of the following options: •... -
Page 122: Selecting Default Setting
MN006360A01-AE Chapter 19: Setup 19.17 Selecting Default Setting The Default Settings sub-menu item resets your radio back to default settings. Procedure: 1 From the home screen, press the Menu key. 2 Select Setup→Def. Settings. 3 To confirm, press Yes. -
Page 123: Chapter 20: Bluetooth
MN006360A01-AE Bluetooth Chapter 20 Bluetooth The Bluetooth menu allows you to manage the Bluetooth feature. 20.1 Enabling Discoverable Mode Procedure: 1 From the home screen, press the Menu key. 2 Select Setup→Bluetooth→Discoverable. Your radio remains discoverable to other Bluetooth-enabled devices for the configured time. 20.2 Adding Bluetooth Devices Prerequisites:... -
Page 124: Pairing Bluetooth Devices With Your Radio
MN006360A01-AE Chapter 20: Bluetooth Option Description • Power Optimized – The Bluetooth audio link is released when there is no active call. This option increases the bat- tery life time, but causes a delay in the call setup time for group calls. This delay can cause audio loss on some headsets. -
Page 125: Connecting Devices
MN006360A01-AE Chapter 20: Bluetooth 20.6 Connecting Devices NOTE: If Secure Connection Only is enabled for your radio, your radio only connects to accessories that support secure connection. Your radio can only pair with one device using secure connection. Prerequisites: • To connect to specific devices, contact your service provider to configure your radio. -
Page 126: Setting Indoor Location
MN006360A01-AE Chapter 20: Bluetooth 4 Select one of the following options: Option Description Name Displays the name of the device. The name is editable only if your service provider did not pre-set it. Type Displays the type of device. This menu item cannot be con- figured. -
Page 127: Chapter 21: Browser
MN006360A01-AE Browser Chapter 21 Browser Browser menu activates a WAP browser to browse the Internet from your radio. 21.1 Using the Browser Setting Up Data Procedure: 1 From the home screen, press the Menu key. 2 Select Setup→Data Setup. 3 Select to Data Only or Voice & Data. Entering the Browser Procedure: 1 From the home screen, press the Menu key. -
Page 128: Creating Bookmarks Using The Navigate Pane
MN006360A01-AE Chapter 21: Browser 21.2.1 Creating Bookmarks Using the Navigate Pane Procedure: 1 Open the browser and browse to the required page. 2 Enter the browser menu by pressing Menu. 3 Select Mark Page. The screen displays the title and URL of the marked page 4 Press Save or Select. -
Page 129: Downloading Pages Using Hotkeys
MN006360A01-AE Chapter 21: Browser 4 Select Assign. The display shows the bookmark and assigned hotkey. 21.2.5 Downloading Pages Using Hotkeys Procedure: 1 Open the browser. 2 Download a bookmarked page by pressing and holding the corresponding hotkey. 21.2.6 Saving Pages for Offline Browsing Procedure: 1 Open the browser and browse to the required page. -
Page 130: Managing Saved Pages
MN006360A01-AE Chapter 21: Browser 3 Select one of the following options: Option Description Back To display the bookmarked page. Details To modify the title and URL of the bookmark. Delete To delete the bookmark. New Bookmark To create a bookmark. New Folder To create a folder. -
Page 131: Searching For Visited Urls
MN006360A01-AE Chapter 21: Browser Option Description Copy Text To copy text from the document to the clipboard. 21.6 Searching for Visited URLs You can search up to nine recently visited pages from the History pane. Procedure: 1 From the History pane, select the URL. 2 Press OK. -
Page 132: Chapter 22: Group Setup
MN006360A01-AE Chapter 22: Group Setup Chapter 22 Group Setup The Group Setup menu item allows you to set the operation parameters, scanning and my groups folder. 22.1 Operation Parameters Operation Parameter is used to define the radio mode and the talkgroup at the radio startup, and when changing modes TMO to DMO and TMO to Repeater. -
Page 133: Determining Talkgroup When Switching Mode
MN006360A01-AE Chapter 22: Group Setup 22.1.3 Determining Talkgroup When Switching Mode When and where to use:To determine the talkgroup of your radio when switching from TMO to DMO or Repeater mode. Procedure: 1 From the home screen, press the Menu key. 2 Select Group Setup→Operations Parameters→Home Group TMO to DMO/Repeater. -
Page 134: Scan
MN006360A01-AE Chapter 22: Group Setup 22.2 Scan The Scan menu item allows you to activate or deactivate scanning, view the active scan list, and edit the scan lists. This feature is available only for Trunked Mode Operation. Your radio joins any group call as long as this group is defined in the scan list and scan is turned on. -
Page 135: Setting Scan Lists
MN006360A01-AE Chapter 22: Group Setup 22.2.3 Setting Scan Lists When and where to use:If you want to set up any scan list. Procedure: 1 From the home screen, press the Menu key. 2 Select Group Setup→Scan→Scan Lists. 3 Highlight the required scan list and press Menu to see additional settings: Option Description Rename... -
Page 136: Adding Talkgroups To Favorite Folders
MN006360A01-AE Chapter 22: Group Setup 22.3.2 Adding Talkgroups to Favorite Folders Procedure: 1 From the home screen, press the Menu key. 2 Select Group Setup→My Groups. 3 Select <FolderName>. 4 Select [New Group]. 5 Select the required talkgroup by Folder or by alphabetic search. 22.3.3 Editing My Folder List Procedure:... -
Page 137: Chapter 23: Individual Setup
MN006360A01-AE Individual Setup Chapter 23 Individual Setup Individual setup menu allows you to set call settings for individual calls. 23.1 Enabling or Disabling Call Waiting Procedure: 1 From the home screen, press the Menu key. 2 Select Individual Setup→Trunked Mode→Call Waiting. 3 Perform one of the following actions: •... -
Page 138: Chapter 24: Favorites
MN006360A01-AE Chapter 24: Favorites Chapter 24 Favorites Favorites contains shortcuts to frequently used talkgroups and contact numbers that are organized in favorite folders. When and where to use:You can quickly access favorite folders from the home screen by: Procedure: 1 Press Up Navigation key to access the folders. 2 Use Navigation Keys or Rotary Knob to scroll through items inside the folders. -
Page 139: Adding Talkgroups To Favorites
MN006360A01-AE Chapter 24: Favorites Option Actions b Wait for the Talk Permit tone before talk- ing. c Release the PTT button to listen. Making duplex calls in TMO a Press the Send key to initiate the call. b You hear a ringing tone until the called party answers the call. -
Page 140: Deleting Items From Favorites Folder
MN006360A01-AE Chapter 24: Favorites 24.6 Deleting Items from Favorites Folder Deleting Single Items Procedure: 1 From the home screen, press the Menu key. 2 Select Favorites. 3 Select a folder containing the item you want to remove. 4 Highlight the item and select Delete. Deleting All Items Procedure: 1 From the home screen, press the Menu key. -
Page 141: Chapter 25: My Info
MN006360A01-AE My Info Chapter 25 My Info My info menu enables you to view your private, phone, and radio information. 25.1 Viewing Personal Information Procedure: 1 From the home screen, press the Menu key. 2 Select My Info. 3 Select one of the following options: Option Description My Private Num... -
Page 142: Viewing Talkgroup Subaddresses
MN006360A01-AE Chapter 25: My Info 25.2 Viewing Talkgroup Subaddresses Procedure: 1 From the home screen, press the Menu key. 2 Select My Info→Talkgroup Info. 3 To view a subaddress, select the talkgroup from the talkgroup list. 25.3 Formatting the MicroSD Card You can format microSD cards that are non-formatted or incorrectly formatted. -
Page 143: Chapter 26: Recent Calls
MN006360A01-AE Recent Calls Chapter 26 Recent Calls Recent call menu allows you to view the call history of last dialed numbers, answered call numbers, and missed call numbers. 26.1 Viewing Recent Calls Procedure: 1 From the home screen, press the Menu key. 2 Select Recent Calls. -
Page 144: Storing Recent Calls Into The Contact List
MN006360A01-AE Chapter 26: Recent Calls Option Actions Making private calls a Press PTT button to make the call. Making phone calls a Press Send key to make the call. Phone calls are only supported in Trunked Mode Operation (TMO). 26.3 Storing Recent Calls into the Contact List Procedure: 1 From the home screen, press the Menu key. - Page 145 MN006360A01-AE Chapter 26: Recent Calls Option Actions Deleting a call a Select Delete. Deleting all calls a Press Delete All.
-
Page 146: Chapter 27: Shortcuts
MN006360A01-AE Chapter 27: Shortcuts Chapter 27 Shortcuts Shortcuts menu allows you to set up shortcuts to access frequently used menu items. 27.1 Creating Menu Shortcuts Procedure: 1 From the home screen, press the Menu key. 2 Scroll to the item that you want to create a shortcut for. 3 Highlight the item. -
Page 147: Chapter 28: Logging On Or Off Radio User Identity
MN006360A01-AE Logging On or Off Radio User Identity Chapter 28 Logging On or Off Radio User Identity Logging On Radio User Identity Procedure: 1 From the home screen, press the Menu key. 2 Select RUI →Log on. 3 Perform one of the following actions: Option Action Selecting an existing user ID... -
Page 148: Chapter 29: Networks
MN006360A01-AE Chapter 29: Networks Chapter 29 Networks The Networks menu allows you to switch between the radio operation modes. 29.1 Selecting Network Operation Mode Procedure: 1 From the home screen, press the Menu key. 2 Select Networks. 3 Select one of the following options: Option Description Network Sel... -
Page 149: Using Select Net Registration
MN006360A01-AE Chapter 29: Networks 29.2.2 Using Select Net Registration Use this feature to migrate to another predefined network when you are out of the range of your network and your radio displays the No Service message. Procedure: 1 From the home screen, press the Menu key. 2 Select Networks→Network Sel→Select Net. -
Page 150: Using Prefer Tg Net Registration
MN006360A01-AE Chapter 29: Networks multiple talkgroup linked networks. Use this feature to migrate to another predefined network, when you are out of the range of your network and your radio displays the No Service message. Procedure: 1 From the home screen, press the Menu key. 2 Select Networks→TG Net Sel→Select TG Net. -
Page 151: Chapter 30: Location
MN006360A01-AE Location Chapter 30 Location The Location menu allows you to enable the Global Positioning System (GPS) or Global Navigation Satellite System (GNSS). You can also view your position and testpage, and change the accuracy of the location. 30.1 Enabling GPS or GNSS NOTE: Your service provider can enable this feature. -
Page 152: Viewing The Testpage
MN006360A01-AE Chapter 30: Location 30.3 Viewing the Testpage Procedure: 1 From the home screen, press the Menu key. 2 Select Location→Testpage. 3 Select one of the following options: Option Description Position To view detailed information of your current position. Your radio displays: •... -
Page 153: Changing Location Accuracy
MN006360A01-AE Chapter 30: Location 30.4 Changing Location Accuracy NOTE: The accuracy of the Global Positioning System (GPS) or Global Navigation Satellite System (GNSS) Location Service depend on the coverage and selected accuracy mode. Procedure: 1 From the home screen, press the Menu key. 2 Select Location→Accuracy. -
Page 154: Deleting All Backlog Reports
MN006360A01-AE Chapter 30: Location 30.5.3 Deleting All Backlog Reports Procedure: 1 From the home screen, press the Menu key. 2 Select Location→Backlog→Delete All. -
Page 155: Chapter 31: Packet Data
MN006360A01-AE Packet Data Chapter 31 Packet Data NOTE: This is a Software Selling Feature. Packet Data menu allows you to view the data statistics and encryption status of your radio. 31.1 Viewing Data Statistics Procedure: 1 From the home screen, press the Menu key. 2 Select Packet Data. -
Page 156: Chapter 32: Crypto Menu
MN006360A01-AE Chapter 32: Crypto Menu Chapter 32 Crypto Menu Crypto menu allows you to manage SIM card based End-to-End Encryption. 32.1 Enabling or Disabling SIM Card End-to-End Encryption Prerequisites: Perform the following actions: • Insert the SIM card into your radio. •... -
Page 157: Updating Encryption Keys
MN006360A01-AE Chapter 32: Crypto Menu 32.3 Updating Encryption Keys Prerequisites: • End-to-End Encryption is enabled. • Ensure that you are not in an active call or in Direct Mode Operation (DMO). Procedure: 1 From the home screen, press the Menu key. 2 Select Crypto Menu→Upd Encr Keys→Upd Group Key. -
Page 158: Setting Dmo Encryption Mode
MN006360A01-AE Chapter 32: Crypto Menu 3 Select one of the following options: Option Description Encr Audio On To turn on encrypted audio. Encr Audio Off To turn off encrypted audio. 32.8 Setting DMO Encryption Mode Procedure: 1 From the home screen, press the Menu key. 2 Select Crypto Menu→DMO Encr Mode. -
Page 159: Chapter 33: Wi-Fi
MN006360A01-AE Wi-Fi Chapter 33 Wi-Fi The Wi-Fi menu enables operating Wi-Fi functions to access a network. 33.1 Turning Wi-Fi On or Off Prerequisites:Contact your service provider to enable the Wi-Fi feature for your radio. Turning Wi-Fi On Procedure: 1 From the home screen, press the Menu key. 2 Select Wi-Fi→Wi-Fi: Off→On. -
Page 160: Viewing Network Information
MN006360A01-AE Chapter 33: Wi-Fi Procedure: 1 From the home screen, press the Menu key. 2 Select Wi-Fi→Network List. 3 From the list of predefined networks, highlight the required network. NOTE: The Network List lists all predefined networks. However some of the listed networks may not be within Wi-Fi range of your radio. - Page 161 MN006360A01-AE Chapter 33: Wi-Fi Your radio displays the following information. Category Description Device Key Indicate whether the Radio Device Key Pair is present in the radio. Base Indicates the enrollment status of the Base Certificate in the radio. Wi-Fi OTAP Indicates the enrollment status of the Wi-Fi Over-the-Air Pro- gramming (OTAP) Service Certificate.
-
Page 162: Chapter 34: Over The Air Programming
MN006360A01-AE Chapter 34: Over The Air Programming Chapter 34 Over The Air Programming NOTE: This is a Software Selling Feature. Over The Air Programming (OTAP) enables remote radio reconfiguration over TETRA network and Wi-Fi network. 34.1 Receiving LMR OTAP Update Prerequisites:Your radio display shows an OTAP prompt with Reboot required. -
Page 163: Receiving Mandatory Wi-Fi Otap Update
MN006360A01-AE Chapter 34: Over The Air Programming Option Actions Installing updates immedi- Select Now. ately Installing updates later a Select Later. Your radio shows New radio settings before upgrade completion will not be preserved. b Perform one of the following actions: •... - Page 164 MN006360A01-AE Chapter 35: Contact Address Chapter 35 Contact Address Motorola Solutions Korea, Inc. 8F, HanyangTower, 12 Beobwon-ro 11gil, Songpa-gu, Seoul, 05836, Republic of Korea...
Need help?
Do you have a question about the MXP600 and is the answer not in the manual?
Questions and answers