
Subscribe to Our Youtube Channel
Related Manuals for TVC ColcheK 2


Summary of Contents for TVC ColcheK 2
- Page 1 The Validation Centre (TVC) Limited Unit 15, Brinell Way, Great Yarmouth, Norfolk, NR31 0LU, UK. 01493 443800 01493 443900 sales@tvcalx.co.uk www.tvcalx.co.uk ColcheK 2 Instruction Manual V1.1...
-
Page 2: Table Of Contents
Contents Introduction Unsuitable applications Complete unit, layout and connections Lighting column inspection Setting up: probe Inspecting wall loss: first scan Continuing the inspection Finalising the Inspection Setting the threshold Setting the time off period Depth reading Likely indications FAQ / Troubleshooting Additional information Annex 1: Unit set up and internal set up view Page | 2... -
Page 3: Introduction
By design, no special skills are required to use the ColcheK 2™ or interpret the results. The ColcheK 2™ works by comparing the wall thickness of the column at and below ground level with the thickness above ground (around 150mm above ground), At this above ground point there is rarely any major damage, and any significant corrosion can be easily seen. -
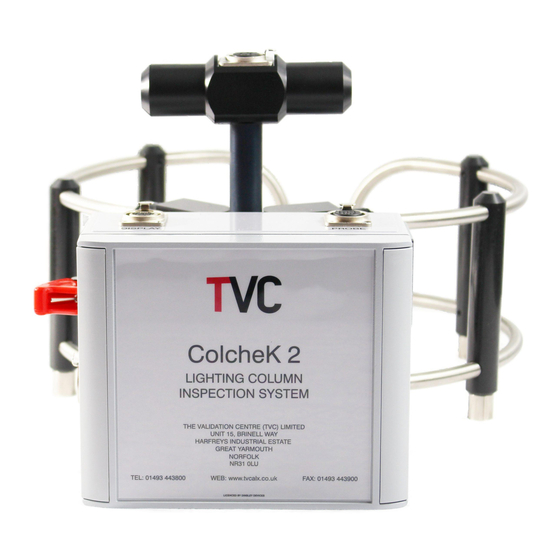
Page 4: Complete Unit, Layout And Connections
Complete unit, layout and connections Display unit ColcheK 2™ unit Ultrasonic receiver (optional) Probe (shown with optional ultrasonic depth transmitter fitted) Battery charger On / off switch Wake-up button The operator also needs a key to open the access doors on the columns. -
Page 5: Lighting Column Inspection
Visually confirm the state of the column at a level about 150mm (6 inches) above ground level. Place the coil system of the ColcheK 2™ around the base of the column. Switch the unit on using the main switch and wake the unit up using the “on” control on the display module. - Page 6 Fig. 1 Press the Down button on the display. The system will count down to zero. Page | 6...
- Page 7 Up / down buttons Once zero has been reached the system will display 100% on all bar graphs. Continue down the column until the probe tip is approx. level with the lower part of the drive coil. The display will read at or near 0. Page | 7...
-
Page 8: Inspecting Wall Loss: First Scan
Inspecting Wall Loss: First scan If, as you push the probe down the inside of the column, the tip of the probe passes a region where there is wall loss, the bar graph readings will rise above zero, indicating the presence of significant wall loss. -
Page 9: Setting The Threshold
Setting the Threshold The ColcheK 2™ has a facility to set an acceptance threshold. Once set, any wall loss area equal to or above the threshold will be indicated on the display, and the display background will turn red. The bar graph reading on bottom the display will show the threshold setting and give a graphical display of any indications and how close they are to the threshold point. -
Page 10: Depth Reading
Depth reading (optional) The ColcheK 2™ display has an indication of the depth the probe is at within the column relative to ground level. This system uses an ultrasonic transducer and must have a reasonable line of sight between the transmitter mounted on the probe and the receiver fitted inside the column door. To use the depth measurement, follow the below instructions. -
Page 11: Likely Indications
What do I do if the column has been planted to deep and the access door interferes with the drive coil position? Do not attempt to set up the ColcheK 2™ on this column. Use the set up from a previous column. While this may not be ideal, significant areas of corrosion will still be indicated. -
Page 12: Additional Information
Green and over to the right-hand side, gradually falling to the left as the battery voltage decreases. The ColcheK 2™ also has a battery cut off circuit which will not allow the unit to switch on when the battery voltage reaches 10.5V. Tests prove that the readings are unaffected until the battery drops below 10 volts so the cut off is set as a safety feature to prevent inaccurate readings being taken. - Page 13 To meet our obligatons under the WEEE directive we have financed a collection point for the recycling of this product once it has reached the end of its normal working life. In these circumstances, please contact us for further instructions. For further information on equipment calibration or disposal, please contact TVC. Page | 13...
- Page 14 Annex 1: Unit Set Up and Internal View Set Up Full unit set up Internal view Page | 14...
Need help?
Do you have a question about the ColcheK 2 and is the answer not in the manual?
Questions and answers