Advertisement
Quick Links
SSUTAYU15
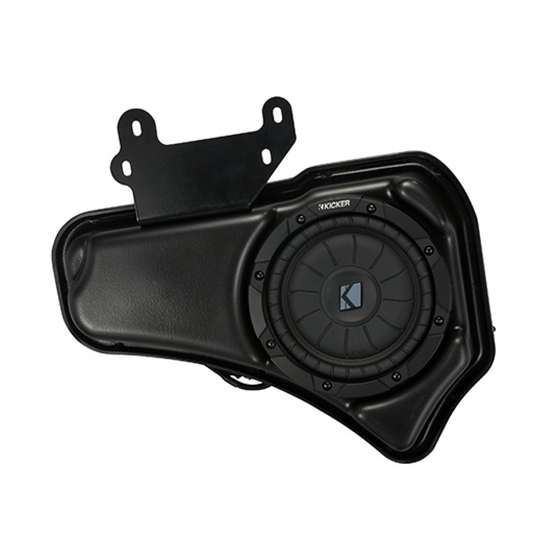
Designed for 2015 and newer Chevrolet® Tahoe/Suburban and GMC® Yukon/Yukon XL vehicles
Subwoofer Assembly
Subwoofer Harness
Subwoofer Power Harness
Module Relocation Bracket (rear)
Lower Bracket (long)
Lower Bracket (short)
Wire Ties X 6
Fuse
Foam Pad
Bolts X 2
©2018 Stillwater Designs
Nut
SSUTAYU15 - 20180313
Plastic Fastener
Adapter Harness
1
Advertisement

Related Manuals for Kicker SSUTAYU15


Summary of Contents for Kicker SSUTAYU15
- Page 1 Designed for 2015 and newer Chevrolet® Tahoe/Suburban and GMC® Yukon/Yukon XL vehicles Subwoofer Assembly Subwoofer Harness Subwoofer Power Harness Module Relocation Bracket (rear) Lower Bracket (long) Lower Bracket (short) Wire Ties X 6 Fuse Foam Pad Bolts X 2 ©2018 Stillwater Designs SSUTAYU15 - 20180313 Plastic Fastener Adapter Harness...
- Page 2 Disassembly Disconnect the negative battery cable from the battery. Note: On vehicles equipped with dual batteries, disconnect negative battery cable from both batteries. Using a panel removal tool, pry loose the driver’s side front and rear threshold panel along the bottom of the door openings.
- Page 3 Using a panel removal tool pry loose the screw cover on the driver’s side C and D pillar post cover and remove the screws securing both covers. Pry loose the C pillar post cover and lay aside. Pry loose the D pillar post cover, disconnect speaker wiring and lay aside.
- Page 4 Wire Routing Remove the red battery terminal cover and then the power distribution cover next to the battery on the passenger’s side. Remove the fuse from the fuse holder on the subwoofer power harness. Connect the ring terminal of the subwoofer harness to the power lug identified in Fig 10.
- Page 5 ® If the vehicle is equipped with a base audio system, (non-Bose find the brown with blue stripe wire and the blue wire that are twisted together in the factory harness near the parking brake pedal. Install the supplied wiretaps onto the vehicle wires. Connect the green wire if the adaptor harness to the blue wire of the vehicle harness and the brown wire of the adaptor harness to the brown/blue stripe wire of the vehicle harness.
- Page 6 If equipped, remove the larger module by snapping it out of the factory bracket. Pull the factory module bracket from the metal and discard. If equipped with two modules, slide the larger module into the relocation bracket first as shown in Fig 17 Using the supplied bolt and plastic fastener, install the smaller module over the top of the larger module as shown in Fig 18 Note: The connectors on the smaller module face the opposite direction as the...
- Page 7 Reconnect the amplifier connector to the amplifier. Connect the white two-pin connector of the adaptor harness to the white two-pin connector of the subwoofer harness. There are two lower subwoofer brackets provided depending on the wheelbase of the vehicle. For Tahoe/Yukon use the longer bracket.
- Page 8 Swing the subwoofer into position and over the studs where the factory module bracket attached. Install the nuts and tighten. Fig 26 Note: The lower set of holes in the upper bracket are for Tahoe/Yukon and the upper set of holes are for Suburban/Yukon XL Reattach the factory wire harness to the metal.
- Page 9 Due to the increased output of the Kicker® subwoofer, failure to disable ANC will result in a “feedback” issue between ANC and the subwoofer at certain RPM’s. Disabling ANC is easy and can be reversed if the Kicker® subwoofer is ever removed from the vehicle.
- Page 10 Disabling Active Noise Cancellation (ANC) 1. Using a panel tool, remove the screw cover from the driver’s side visor. Fig. 1 2. Remove the three screws securing the visor, pull visor loose and disconnect wiring. 3. Open the screw covers on the grab handle above the driver’s door, remove the two screws and pull loose handle.
- Page 11 Troubleshooting the Kicker Integrated Systems If you experience a problem once the subwoofer or amplifier are installed use this guide to locate the trouble. The radio is working, but the Subwoofer is not working: • Check the battery voltage to make sure it is not discharged below 11 volts.
- Page 12 If you continue to experience problems after troubleshooting, please contact KICKER Technical Support at (800) 256-0808 ext. 6007, or support@kicker.com. P.O. Box 459 • Stillwater, Oklahoma 74076 • USA • (405) 624–8510...
Need help?
Do you have a question about the SSUTAYU15 and is the answer not in the manual?
Questions and answers