Dell OptiPlex 3090 Ultra Setup And Specifications
Hide thumbs
Also See for OptiPlex 3090 Ultra:
- Service manual (140 pages) ,
- Setup and specifications manual (89 pages)

Related Manuals for Dell OptiPlex 3090 Ultra


Summary of Contents for Dell OptiPlex 3090 Ultra
- Page 1 OptiPlex 3090 Ultra All-in-One Bundle Setup and Specifications Regulatory Model: D13U Regulatory Type: D13U003 June 2021 Rev. A00...
- Page 2 A WARNING indicates a potential for property damage, personal injury, or death. © 2021 Dell Inc. or its subsidiaries. All rights reserved. Dell, EMC, and other trademarks are trademarks of Dell Inc. or its subsidiaries. Other trademarks may be trademarks of their respective owners.
-
Page 3: Table Of Contents
Contents Chapter 1: Set up your OptiPlex 3090 Ultra All-in-One Bundle............4 Installing the device................................4 Stand tilt, pivot, and swivel images..........................12 Chapter 2: Powering the system....................14 Chapter 3: Dell power button sync....................15 Chapter 4: Create a USB recovery drive for Windows..............16 Chapter 5: Views of OptiPlex 3090 Ultra All-in-One Bundle............17... -
Page 4: Chapter 1: Set Up Your Optiplex 3090 Ultra All-In-One Bundle
3. Tighten the captive screw to secure the stand to the base. 4. Write the service tag number of the OptiPlex device in the blank space provided in the service tag of the monitor. Set up your OptiPlex 3090 Ultra All-in-One Bundle... - Page 5 6. Align and insert the hooks on the mounting bracket on the stand into the slots on the monitor, until you hear a click. 7. Remove the monitor along with the stands from the packaging box. Set up your OptiPlex 3090 Ultra All-in-One Bundle...
- Page 6 8. Connect the USB Type-C cable of the OptiPlex device to the USB Type-C port on the monitor. Set up your OptiPlex 3090 Ultra All-in-One Bundle...
- Page 7 9. Connect the keyboard cable, mouse cable, and network cable to the monitor. Set up your OptiPlex 3090 Ultra All-in-One Bundle...
- Page 8 10. Connect the monitor power cord to the power port. Set up your OptiPlex 3090 Ultra All-in-One Bundle...
- Page 9 11. Power On the computer. NOTE: To enable the Dell power button sync between the monitor and the computer, press the power button on the monitor first and then press the power button on the computer. Set up your OptiPlex 3090 Ultra All-in-One Bundle...
- Page 10 NOTE: When connecting the OptiPlex device and the monitor for the next time, press the monitor power button, both the monitor and computer will turn On. Set up your OptiPlex 3090 Ultra All-in-One Bundle...
- Page 11 NOTE: For more information on Dell power button sync feature, see Dell power button sync. 12. Lock the device and the stand cover. Set up your OptiPlex 3090 Ultra All-in-One Bundle...
-
Page 12: Stand Tilt, Pivot, And Swivel Images
Stand tilt, pivot, and swivel images Monitor rotate: Monitor tilt: Set up your OptiPlex 3090 Ultra All-in-One Bundle... - Page 13 Monitor swivel: Set up your OptiPlex 3090 Ultra All-in-One Bundle...
-
Page 14: Chapter 2: Powering The System
Powering the system This system can be powered using a 65 W adapter (4.5 mm input power source) or through the USB Type-C cable connected to a display capable of providing power delivery of 65 W or greater. During normal operation, when the device is connected with a single power source (primary power source), connecting a second power source and disconnecting the primary power source will shut down the device. -
Page 15: Chapter 3: Dell Power Button Sync
This feature is compatible with Dell OptiPlex 3090 Ultra platform, and is only supported over USB Type-C interface. For the first time, the user needs to establish a sync between the computer and the Dell power button sync enabled monitor by powering on the monitor first and then the computer. -
Page 16: Chapter 4: Create A Usb Recovery Drive For Windows
A message appears, indicating that all data in the USB flash drive will be deleted. 7. Click Create. 8. Click Finish. For more information about reinstalling Windows using the USB recovery drive, see the Troubleshooting section of your product's Service Manual at www.dell.com/support/manuals. Create a USB recovery drive for Windows... -
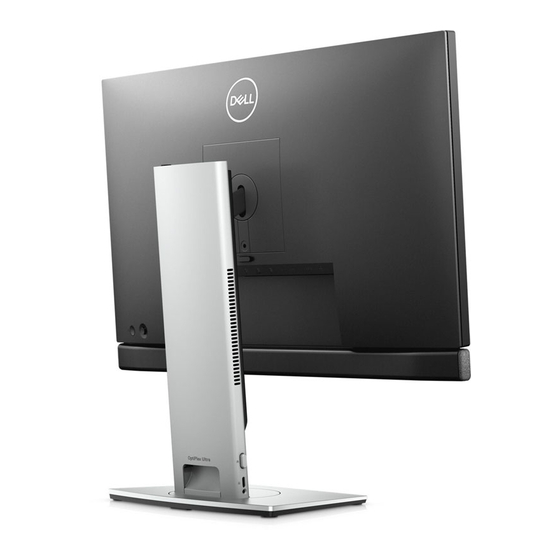
Page 17: Chapter 5: Views Of Optiplex 3090 Ultra All-In-One Bundle
Views of OptiPlex 3090 Ultra All-in-One Bundle Back view 1. Monitor 2. Height Adjustable Stand 3. Power button status light 4. Power button 5. Joystick Views of OptiPlex 3090 Ultra All-in-One Bundle... -
Page 18: Bottom View
9. RJ-45 connector 10. Super speed USB 5 Gbps (USB 3.2 Gen1) 11. Headphone jack 12. USB Type-C downstream port Front view 1. Webcam 2. Display 3. Power LED indicator 4. In-built speakers Webcam: Views of OptiPlex 3090 Ultra All-in-One Bundle... - Page 19 3. Webcam lens 4. Webcam LED indicator Front controls: 1. Teams button and LED 2. Hookswitch and LED 3. Volume down and LED 4. Volume up and LED 5. Microphone mute and LED Views of OptiPlex 3090 Ultra All-in-One Bundle...
-
Page 20: Left And Right View
6. USB 3.2 Gen 2 Type-A port 7. USB 3.2 Gen 2 Type-A port with PowerShare Service tag location 1. Service tag location of the computer 2. Service tag location of the monitor Views of OptiPlex 3090 Ultra All-in-One Bundle... -
Page 21: Chapter 6: Specifications Of Optiplex 3090 Ultra All-In-One Bundle
● Service tag label on the monitor (back) NOTE: For more information about the ports and connectors of OptiPlex 3090 Ultra see the Views and Specifications section of your product's Setup and specifications guide at www.dell.com/support/manuals. Specifications of OptiPlex 3090 Ultra All-in-One Bundle... -
Page 22: Dimensions And Weight
Dimensions and weight The following table lists the height, width, depth, and weight of your OptiPlex 3090 Ultra All-in-One Bundle. Table 3. Dimensions and weight Description Values Height ● Minimum: 364.00 mm (14.33 in.) ● Maximum: 514.00 mm (20.24 in.) NOTE: The Height Adjustable Stand is height adjustable. -
Page 23: Chapter 7: Getting Help
Dell provides several online and telephone-based support and service options. Availability varies by country and product, and some services may not be available in your area. To contact Dell for sales, technical support, or customer service issues: 1. Go to Dell.com/support.
Need help?
Do you have a question about the OptiPlex 3090 Ultra and is the answer not in the manual?
Questions and answers