Table of Contents
Advertisement
Quick Links
Advertisement
Table of Contents

Related Manuals for Hytera VM550


Summary of Contents for Hytera VM550
- Page 1 Body Worn Camera USER MANUAL...
- Page 2 Preface Welcome to the world of Hytera and thank you for purchasing this product. To derive optimum performance from the product, please carefully read this manual before use. This manual is applicable to the following product: VM550 Body Worn Camera...
-
Page 3: Icon Conventions
Indicates situations that could cause minor personal injury. Copyright Information Hytera is the trademark or registered trademark of Hytera Communications Corporation Limited (the Company) in PRC and/or other countries or areas. The Company retains the ownership of its trademarks and product names. All other trademarks and/or product names that may be used in this manual are properties of their respective owners. -
Page 4: Fcc Statement
2006/66/EC 2011/65/EU 2012/19/EU 2014/53/EU Please note that the above information is applicable to EU countries only. FCC Statement This equipment has been tested and found to comply with the limits for a Class B digital device, pursuant to Part 15 of the FCC Rules. -
Page 5: Body-Worn Operation
based on standards that were developed by independent scientific organizations through periodic and thorough evaluation of scientific studies. The standards include a substantial safety margin designed to assure the safety of all persons regardless of age or health. Body-worn Operation This device was tested for typical body-worn operations. - Page 6 The device complies with RF specifications when the device used at 5 mm form your body. Hereby, Hytera Communications Corporation Limited declares that this product is in compliance with essential requirements and other relevant provisions of Directive 2014/53/EU. This product is allowed to...
-
Page 7: Packing List
1. Packing List Please unpack carefully and check if all items listed below are received. If any item is missing or damaged, please contact your dealer. Name Qty. Body Worn Camera (RVM) Battery Belt Clip USB Cable Power Adapter User Manual Pictures listed in this manual are for reference only. -
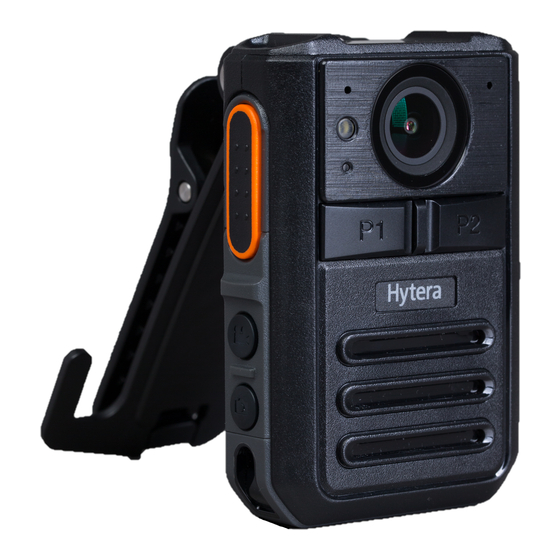
Page 8: Product Overview
2. Product Overview 2.1 Product Controls Name Name Push-to-Talk (PTT) Key Audio/Video Recording Microphone Video Recording Key Camera P2 Key (Programmable key, default as the Audio Photo Taking Key Recording key) OLED Display Accessory Connector (10-pin) Speaking Microphone USB Connector Camera Flash Emergency Key LED Indicator... - Page 9 Name Name Speaker Battery Latch The P1 key and P2 key can be programmed through the RVM Manager tool. Contact us or your local dealer to get the tool. 2.2 OLED Icons Type Icon Description The product is connected to WLAN with very weak signal.
-
Page 10: Led Indicators
Type Icon Description Displays the current channel, or the current contact in standby mode while connected to a portable Channel/Contact radio. Only letters, digits and some special characters are supported. Displays the current time in standby mode while not Time connected to the portable radio. -
Page 11: Specifications
Status Description The product is transmitting voice or emergency alarm. The product is being charged. Glows red The TF card is full. The product is being turned off. The product is receiving voice or emergency alarm. ... - Page 12 Body Worn Camera ≥6h (1080P 30 FPS) ≥9h (audio recording) Main Battery Capacity 2,500 mAh Main Battery Charging Time ≤4 h Standby Battery Capacity 0.8 mAh RTC Hold Time 72 h (without main battery) Display Size 0.9 inch Display Resolution 128 ×...
- Page 13 Body Worn Camera Speaker Power Microphone Electret microphone ×2, Omni-directional: –44 dB Connector Micro USB port, 10-pin connector Sensor Accelerometer Camera Flash IP Class MIL-STD-810G, IP67 Drop Resistance 1.5 m ±6 kV (contact discharge) ±12 kV (air discharge) Operating Temperature 0 ˚...
- Page 14 Body Worn Camera Power Adapter Input AC 110 – 240 V, 50 – 60 Hz Output DC 5 V, 1 A...
-
Page 15: Before Use
3. Before Use 3.1 Attaching the Battery Use only the Hytera standard or optional battery. Polarity reverse or use of other batteries may result in explosion and fire hazards. The battery is applicable to a temperature range of 0 ˚ C to +55 ˚ C. - Page 16 3.3 (Optional) Connecting the Accessory Cable Skip this section if you do not purchase the accessory cable. Connect the cable to RVM as shown in the figure below. To disconnect the cable, press both sides of the cable connector with proper force and remove the connector.
-
Page 17: Charging The Product
3.4 Charging the Product Charge the product according to the steps shown in the following figure. The LED indicator tells you the charging status of the product. See 2.3 LED Indicators for details. -
Page 18: Basic Operations
4. Basic Operations 4.1 Turning On and Turning Off the Product Turning On the Product In power-off mode, press and hold the On/Off key for three seconds to turn on the product. Turning Off the Product In power-on mode, press and hold the On/Off key for three seconds to turn off the product . 4.2 Entering BT Pairing In power-off mode, press and hold the On/Off key for five seconds to start BT pairing. - Page 19 the recording is deactivated. You can program the pre- and post-event recording features through the RVM Manager. Pre-event Recording In power-on mode, press and hold the Video Recording key to enter pre-event recording; press and hold the key again to exit. In pre-event recording mode, the product loops to record video every 10 or 20 seconds according to the pre-recording time.
- Page 20 In power-on mode, press the Emergency key to start recording videos and tag the videos as critical evidence; press and hold the Emergency key or press the Video Recording key to exit recording. You can modify the method to tag and untag recordings through the RVM Manager. 4.9 Taking Photos during Video Recording During video recording, press the Photo Taking key to take photos.
-
Page 21: Silent Mode
press the Emergency key again. The method to send and cancel an emergency alarm can be set by your dealer. 4.13 Silent Mode With this feature enabled, the product gives no alert tones, the indicator will not light up. You can program this feature through the RVM Manager. -
Page 22: Troubleshooting
5. Troubleshooting Phenomena Analysis Solution The battery may be improperly Remove the battery and attach it attached. again. The battery may run out. Recharge or replace the battery. The product cannot be The battery and the charging turned on . probes are in poor contact due to Clean the battery contacts. - Page 23 Phenomena Analysis Solution The product gives no The Silent Mode is enabled. Disable the Silent Mode. alert tone; the indicator does not light up. The product gives no The system has crashed. Press the P1 key, the P2 key, and the response to operations.
-
Page 24: Care And Cleaning
6. Care and Cleaning To guarantee optimum performance as well as a long service life of the product, please follow the tips below. Product Care Do not pierce or scrape the product. Keep the product away from substances that can corrode the circuitry. ... -
Page 25: Optional Accessories
7. Optional Accessories Use the accessories specified by the Company only; otherwise, we shall not be liable for any losses or damages arising out of the use of any unauthorized accessories. Contact your local dealer for the optional accessories of the product.
Need help?
Do you have a question about the VM550 and is the answer not in the manual?
Questions and answers