
Related Manuals for Hytera VM750D


Summary of Contents for Hytera VM750D
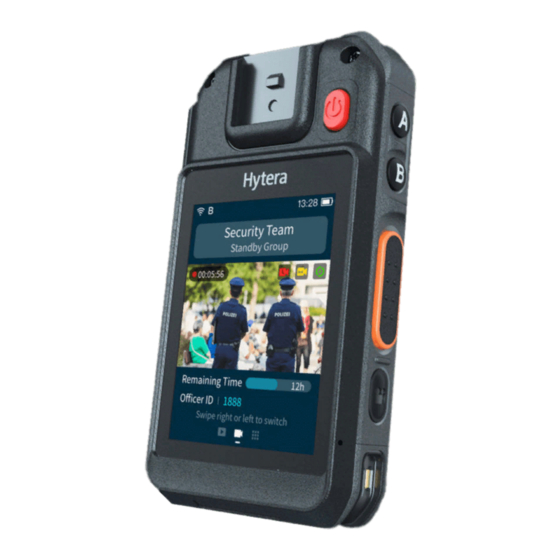
- Page 1 VM750D Body Worn Camera (Hytera Hytalk Sight) User Manual Hytera Communications Corporation Limited...
- Page 2 Preface Welcome to the world of Hytera and thank you for purchasing this product. To derive optimum performance from the product, please read this manual carefully before use. This manual is applicable to the following product: VM750D Body Worn Camera (Hytera Hytalk Sight)
-
Page 3: Icon Conventions
We do not guarantee, for any particular purpose, the accuracy, validity, timeliness, legitimacy or completeness of the Third Party products and contents involved in this manual. If you have any suggestions or would like to learn more details, please visit our website at: http://www.hytera.com. EU Regulatory Conformance... - Page 4 2006/66/EC 2011/65/EU 2012/19/EU 2014/53/EU Please note that the above information is applicable to EU countries only.
-
Page 5: Packing List
Please unpack carefully and check that you have received the following items. If any item is missing or damaged, contact your dealer. Quantity Quantity Item Item (PCS) (PCS) VM750D Body Worn Camera (BWC) USB Data Cable Battery Power Adapter Belt Clip User Manual Pictures in this manual are only for reference. -
Page 6: Product Overview
2. Product Overview 2.1 Product Layout 2.2 LED Indicator Status Description The product is transmitting voice. Always The product is being charged, and the battery power is below 80%. Glows red For three seconds The TF card is full. For two seconds The product is being turned off. - Page 7 Status Description Once every five The battery runs low. Please recharge or replace the battery in time. seconds Flashes orange slowly The product is recording audio. Once every The product is connected with a BT device (without BLE). second Flashes blue slowly Once every two The product is transmitting data.
-
Page 8: Before Use
Lock the flip cover and slot cover, as shown in the following figure. 3.2 Attaching the Battery Use only the Hytera standard or optional battery. Polarity reverse or use of other batteries may result in explosion and fire hazards. ... -
Page 9: Attaching The Belt Clip
3.3 Attaching the Belt Clip Attach the belt clip according to the following figure. To remove the belt clip, reverse the attaching steps. 3.4 Charging the Product Charge the product according to the following figure. -
Page 10: Attaching The Accessory
You can learn about the charging status from the LED indicator. For details, see 2.2 LED Indicator. 3.5 Attaching the Accessory To ensure the waterproof performance, do not scrape the silicone surrounding the accessory jack. After disconnecting the accessory, put the accessory jack cover back in place and tighten the screw on the cover. - Page 11 Tighten the screw on the accessory.
-
Page 12: Basic Operations
4. Basic Operations 4.1 Turning On/Off the Product Long press for three seconds to turn on or off the product. 4.2 Understanding the Screen 4.2.1 Status Bar Icon The following table describes icons that might appear in the status bar. Icon Description Icon... -
Page 13: Connecting To The Network
On the home screen, swipe down from the status bar to open the notification center, where you can adjust brightness, turn on or off shortcut switches, open settings, and view or clear notifications. 4.2.3 Sleep and Wakeup Sleep To enter sleep mode manually, press in power-on mode. - Page 14 4.3.2 WLAN You can connect the product to the WLAN to access the Internet or share files with other network devices. To use the WLAN, do the following: To enable the WLAN feature and view the WLAN list, do either of the following: Swipe down from the status bar, tap to enable WLAN, and then touch and hold till the WLAN...
- Page 15 Enter the address and port number (default: 9702) of the HHS server, and then tap OK. Upon successful login, the Login button turns into Logout.
-
Page 16: System Settings
5. System Settings On the home screen of the product, tap to enter the Settings interface, and then configure the parameters according to actual situations. Setting Description Accounts You can view information such as user name, user number, unit name, and unit number. You can enable or disable the WLAN, view the available networks, and connect to a WLAN network without or with the password. - Page 17 Setting Description For security, you may be asked to turn off the product or turn on the airplane mode the airplane. With the airplane mode enabled, the product will Airplane automatically close the cellular network and WLAN so the services such as mode voice, audio, and data are unavailable.
- Page 18 Setting Description In silent mode, the product gives no alerts or rings; the indicator does not light, and the Silent mode screen goes dim to keep the product in concealment. Enter the password (99999999 as initial password) to enable the external camera feature. External camera You can connect the product with a compatible external camera, and then use it to realize the features of the product such as video recording, video return, and photo taking.
-
Page 19: Basic Settings
6. HHS Settings 6.1 Basic Settings On the HHS video preview screen, tap , and then select Settings. Configure the parameters according to actual situations. Setting Description You can do the following: View the product ID and user name. Device info ... - Page 20 The HHS with the version cannot be upgraded through online update or local update. You can select one option from the HHS, GB28181, ONVIF, and RTMP systems. For the GB28181, ONVIF, and RTMP systems, contact technical support engineers of Hytera. The parameters of the HHS system are described as follows: ...
- Page 21 Setting Description After enabling the feature, you cannot restore to current settings again. Before enabling the feature, consider it carefully. About device You can view the total storage and available storage. Screen lit With the feature enabled, while the HHS app is opened, the screen will always light up. Auto run With the feature enabled, the product automatically opens the HHS app upon power-on.
-
Page 22: Other Settings
6.2 Other Settings In the HHS video preview interface, tap to enter the camera interface, and then configure the parameters according to actual situations. Only in the logout status and non-recording status, you can switch to external camera, and set the external camera, videos, and audios. - Page 23 Setting Description system, and BT earphone on this product. You can add OSD type, OSD information, OSD render, OSD position, and Custom Text to your videos or photos. OSD information To validate the settings, select Enable.
-
Page 24: Basic Functions
7. Basic Functions 7.1 Zooming In the HHS video preview interface, slide to adjust the focal length. As you increase the focal length, the field of view become narrower. As you decrease the focal length, the field of view become wider. 7.2 Video Recording You can locally record the dynamic scenes during law enforcement. - Page 25 Set OSD information according to "OSD information" in 6.2 Other Settings. Encrypt the video according to "File encryption" in 6.1 Basic Settings. Procedure Normal recording In preview mode, press the Video Recording key to start. The LCD touch screen displays the recording time. Press the Video Recording key again to finish.
-
Page 26: Audio Recording
7.3 Audio Recording You can locally record the on-site audios during law enforcement. After recording, you can manually upload the local audios to the HHS system according to 7.12 File Synchronization. When the dispatcher enables remote audio recording features through the HHS system, the product will automatically record and upload audios without your operations. -
Page 27: Photo Taking
7.4 Photo Taking You can locally take photos during law enforcement, and then you can upload the local photos to the HHS system in the following modes: Self-upload: For details, see "Platform" in 6.1 Basic Settings. Manual upload: For details, see 7.12 File Synchronization. - Page 28 7.5 Photo Snapshot You can snapshot the key static scenes during the video recording. Before Photo Snapshot Set the burst mode according to "Camera setting" in 6.1 Basic Settings. Encrypt the photo according to "File encryption" in 6.1 Basic Settings.
- Page 29 7.6 Flashlight On the home screen, swipe down from the status bar to enter the notification center. to turn on the flashlight; or tap to turn off the flashlight. 7.7 PoC Services If using the two-way intercom (one-to-one) and one-way intercom (one-to-one or one-to-many) services, you can only answer a call initiated by the HHS dispatcher.
- Page 30 After speaking, release the PTT key. Full-duplex mode Speak into the microphone. 7.8 Message Message allows you to exchange texts, voice, emotions, pictures, and others in the group. The group members include the HHS dispatcher and the product users. Prerequisite The product has been added to a group created by the HHS dispatcher.
-
Page 31: Enabling Emergency Mode
Send messages. If You Want To… Then… 1. Tap the text box, and then enter your content. Send texts 2. Tap Send. 1. Tap Send voice 2. Tap and hold Hold to Talk, and then speak into the microphone. 3. After finishing speaking, release the button. 1. - Page 32 7.10 Alarm 7.10.1 Man Down Alarm When tilted by an angle equal to or greater than 60° for one minute or longer, the product will send an alarm to the HHS Monitor. Place the product upright to cancel the alarm. 7.10.2 Disassembly Alarm In power-on mode, when the battery or the shell is removed, the product will send an alarm to the HHS Monitor.
-
Page 33: File Synchronization
7.12 File Synchronization You can manually upload the local photos, videos, and audios to the HHS system. In the HHS video preview interface, tap , and then select FileUpload. In the displayed interface, tap Photo sync, Video sync, Audio sync, or GPS sync to enter the corresponding interface. - Page 35 8. Playing Back Videos/Photos/Audios On the home screen of the product, tap Gallery. Enter the password (123456 as initial password). Tap Video, Photo, or Audio to enter the playback list of the corresponding media. Tap the photo, audio, or video in the playback list to play the media.
-
Page 36: Data Collection
9. Data Collection You can switch the product into disk mode through the BWC Manager, and then copy photos, audios, and videos to your PC. For details on the operations, refer to the BWC Manager Operation Guide in the BWC Manager folder. To connect the product to your PC, do as follows. -
Page 37: Troubleshooting
10. Troubleshooting Phenomena Analysis Solution The battery may be improperly Remove the battery and attach it again. attached. The product cannot be The battery may run out. Recharge or replace the battery. turned on. The battery and the charging probes are in poor contact due to dirtied or Clean the battery contacts. - Page 38 Fill in the correct IP address and port wrongly filled in. number of the HHS server. The HHS app is not authenticated. Contact the dealer or Hytera. The product gives no Press the Power On/Off key for 10 The product has crashed.
-
Page 39: Product Care
11. Product Care 11.1 BWC If the BWC is seriously wet inside, do not turn on it. Contact the dealer or maintenance center in time. To guarantee optimum performance as well as a long service life of the BWC, follow the tips below: ... - Page 40 Do not use the BWC during charging. Charge the battery under the temperature from 0°C to 45°C . When the low battery alert occurs, replace or charge the battery in time. When the battery is fully charged, disconnect the charger in time. ...
- Page 41 Do not directly spray the alcohol on the BWC. Keep the BWC away from the power supply and fire. Do not use the BWC until it is fully dry. It is recommended to sterilize the BWC regularly. You can sterilize the BWC by the following tips: Use the lint-free cloth with proper rubbing alcohol (density ≥...
-
Page 42: Optional Accessories
12. Optional Accessories Use the accessories specified by Hytera only. Otherwise, we shall not be liable for any losses or damages arising out of the use of any unauthorized accessories. Contact your local dealer for the optional accessories of the product. -
Page 43: Appendix-Product Specifications
13. Appendix—Product Specifications Item Description GSM: 850/900/1800/1900 TD-SCDMA: B34/B39 European CDMA: BC0 version WCDMA: B1/B3/B5/B8 TDD-LTE: B34/B38/B39/B40/B41 Frequency range FDD-LTE: B1/B3/B5/B7/B8/B20/B26/B28 GSM: 850/1900 WCDMA: B2/B4/B5 American version TDD-LTE: B38/B40/B41 FDD-LTE: B2/B4/B5/B7/B12/B13/B17/B26/B28 ... - Page 44 Hytera Communications Corporation Limited. © 2021 Hytera Communications Corporation Limited. All Rights Reserved. Address: Hytera Tower, Hi-Tech Industrial Park North, 9108# Beihuan Road, Nanshan District, Shenzhen, People's Republic of China Postcode:518057...
Need help?
Do you have a question about the VM750D and is the answer not in the manual?
Questions and answers