
Related Manuals for BONKOTE SAIKY MR3


Summary of Contents for BONKOTE SAIKY MR3
- Page 1 SAIKY MR3・MR4 LA type soldering iron controller Instruction manual Date prepared: Jan. 2019 The 1 edition JAiAN BONKOTE CO., LTD.
-
Page 2: Table Of Contents
Contents page 1 ireface ··············································································· 1 2 Notes for safety ··································································· 1 3 Auto Tuning before use ························································· 2 4 Notes for installation and use ················································ 2 5 ireparation before use (A) Contents ····································································· 3 (B) Name of the parts ·························································· 3 (C) How to assemble ··························································... -
Page 3: 1 Ireface
1. ireface Thank you very much for purchasing MR3・MR4 CONTROLLER. ilease read this Notes for safety before use, and use this machine properly. After reading this manual, please keep it 2. Notes for safety ! CAUTION Be sure to read this manual before using this machine to prevent potential shock hazards, fire or malfunctions Never touch the power cord and the soldering iron with wet hands. -
Page 4: 3 Auto Tuning Before Use
3. Auto Tuning before use We would recommend Auto Tuning before use, although each parameter is set in the standard value at the shipment. By doing so, soldering irons will ensure optimum performance according to iron tip temperature, shape of iron tip, working environments and so on. -
Page 5: 5 Ireparation Before Use
5. ireparation before use 5-(A):Contents of soldering station set MR3-JS-175 Station set ① 3i iower cord ※ ② MR3・MR4 Controller ③ ③ BON-14 Iron stand ③ ④ JS-175 Soldering iron unit ② ② ※ 3iCHI plug cord for 100V, or ①... -
Page 6: (C) How To Assemble
5-(C):How to assemble ③ ② ④ ① Make sure that the power voltage of the unit and the power source is the same. ② Make sure that the power switch is OFF. ③ Connect the power cord into the power inlet at the rear face. ④... -
Page 7: (B) Auto Power Down Mode
6-(B): AUTO iOWER DOWN mode The iron tip temperature falls down to the stand-by temperature automatically after passing a certain period of time with no using the soldering iron. In AUTO iOWER DOWN mode, the temperature value at the display blinks. How to exit AUTO iOWER DOWN mode: Lower the iron tip temperature drastically by touching a wet sponge. -
Page 8: (B) Confirmation Of The Set Iron Tii Temierature
⑤ 「 」blinks at the display. iress「◎」key again, and the buzzer starts to beep 5 times to return to the operation mode. ※ If you happen to enter unsuitable temperature, which is out of the setting range, the controller does not recognize it, and the previous set temperature is indicated with buzzer sounds. -
Page 9: (D) Alarm Setting Of Upper / Lower Temperature Limit
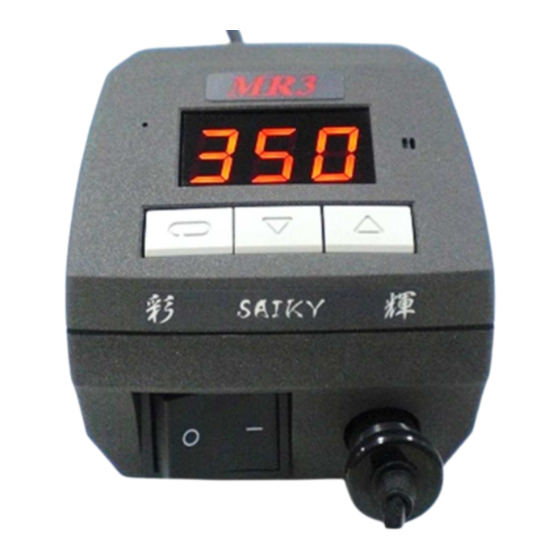
Example 2) Indicated temperature (by a controller) : 350℃ Measured temperature(by a thermometer) : 358℃ 「350℃」-「358℃」=「-8℃」⇒ Compensate value: 「-08」 ① iress「▽」key more than 3 seconds to compensate the temperature. ② 「 」and 「the previous set value」is alternately indicated at the display, then ... -
Page 10: (E) Auto Tuning Setting
③ Release「◎」key within 2 seconds after 「・・・」is indicated at the display. ④ 「 」and「the previous set value」is alternately indicated at the display, then the alarm setting mode is started. ⑤ The tens place blinks to enter a suitable digit by using「▽」or「△」key. ⑥... -
Page 11: (F) Iarameter Setting Mode
② Rest the soldering iron on an iron stand until the Auto tuning is completed. ③ Turn on the power switch while pressing both of「▽」 「△」keys. ④ The display shows「 」first. ⑤ Next, the display shows「 」and「tip temperature」alternately. ⑥... - Page 12 No.1-2 Enter the iW. The display shows「 」or「current iW」. Enter 3-digit iW by using「▽」or「△」key. iress「◎」key to complete the setting. ※ When the display shows「 」, it means the iW is wrong. Turn off the power switch and try again. ※...
-
Page 13: (G) Memory Clear Mode
※ ATTENTION When you change the parameters , be sure to confirm「 」at the display, then press「◎」key to complete the setting. 7-(G): Memory clear mode Memory clear function resets the memory contents stored in the controller to the default. (All of soldering iron tip temperature and parameters are rewritten to the default.) Setting procedures are as follows. -
Page 14: 8 How To Replace A Fuse
8. How to replace a fuse Remove a fuse holder with a suitable tool like a flathead screwdriver. Check out the fuse 1) in use. If it blows out, replace it to the spare one 2). 1) A fuse in use 2) A spare fuse == A spare fuse == Inside of fuse holder... -
Page 15: Guarantee And After Sales Service
10. Guarantee and after sales service 10-(A): Trouble shooting Symptom irobable cause Measures A soldering iron unit and a Check the soldering iron connector 「」is blinking controller are NOT connected socket at a front face of a controller. at the display. firmly. - Page 16 JAiAN BONKOTE CO., LTD. 600-14 Kasahara, Mito, Ibaraki 310-0852 JAiAN TEL: +81-29-241-2725 FAX: +81-29-241-2726 http://bonkote.co.jp Email: info@bonkote.co.jp...
Need help?
Do you have a question about the SAIKY MR3 and is the answer not in the manual?
Questions and answers