Table of Contents
Advertisement
Quick Links
USER'S MANUAL
Adjustable Bed Base
HU10061
THIS INSTRUCTION BOOKLET CONTAINS IMPORTANT SAFETY INFORMATION. PLEASE READ AND KEEP FOR FUTURE REFERENCE.
Follow Costway
Please give us a chance to make it right and do better!
Contact our friendly customer service department for help first.
Replacements for missing or damaged parts will be shipped ASAP!
Advertisement
Table of Contents

Subscribe to Our Youtube Channel
Related Manuals for Costway HU10061


Summary of Contents for Costway HU10061
- Page 1 USER’S MANUAL Adjustable Bed Base HU10061 THIS INSTRUCTION BOOKLET CONTAINS IMPORTANT SAFETY INFORMATION. PLEASE READ AND KEEP FOR FUTURE REFERENCE. Follow Costway Please give us a chance to make it right and do better! Contact our friendly customer service department for help first.
- Page 3 E-mail US: cs.us@costway.com UK: cs.uk@costway.com...
-
Page 4: Warranty Warning
Patent Pending 2-Year Parts and Labor on entire base Warranty. Attention: Read the following information before using this product. Failure to use a surge protection device could compromise safety or cause product malfunction and could void the electrical portion of your warranty. - Page 5 The decision to repair or to replace defective parts under this warranty shall be made, or cause to be made, by COSTWAY at its option and in its sole discretion. Repair or replacement shall be the sole remedy of the purchaser. There shall...
- Page 6 Warranty Commencement Date, COSTWAY will repair or replace (at no cost to You) any defective adjustable base part. In the case where adjustable base needs to be replaced COSTWAY does not cover or pay for any part of transportation costs.
-
Page 7: Product Ratings
This can fool the pacemaker into "thinking" you are engaged in some sort of physical activity and require a faster heart rate. You may experience a sensation similar to when you are exercising. Consult your physician for further information. PRODUCT RATINGS: The bed lift motors are not designed for continuous use of more than 2 minutes in an 18 minutes period, or approximately 10% duty cycle. -
Page 8: Fcc Compliance
TO REDUCE THE RISK OF SHOCK, BURNS, FIRE OR INJURY: Make sure the base is in a flat position and the vibrating motors are turned off before unplugging the bed base from the power source. Always unplug the base from the electrical outlet before cleaning or servicing the base. -
Page 9: Parts List
Parts List All electronics and components that need to be installed are located in boxes under the foundation or attached to the frame. Make sure that all parts are counted before discarding the packaging materials. Power Supply (1) Power Cord (1) Remote Control (1) Retainer Bar (1) Deck Bolt... - Page 10 HU10061 Electronics Quick Reference Guide Control Box Head Motor Foot Motor Pairing Power Bu on Supply Head Motor Foot Motor Power Cord...
- Page 11 Installation Guide Two people are required to set up the foundation. NOTE: To avoid damage to the foundation, always open the carton while the bed is in the flat position. 1. Open the shipping box and take out top decking.Cut the ribbon securing accessory Boxes&mattress retainer bar and put them aside.
- Page 12 3. Carefully turn the base over without placing weight on the legs, to prevent bending. 4. Attach the deck sections. Place the top deck from head to foot accordingly (Please refer to the yellow stickers on the board and metal frame accordingly,as TXL Size:1-4,Q Size:1-5.Notice : The sides with stickers face up.), make the holes on top deck correspond to those on bed frame, and the screw the deck bolt into the holes.
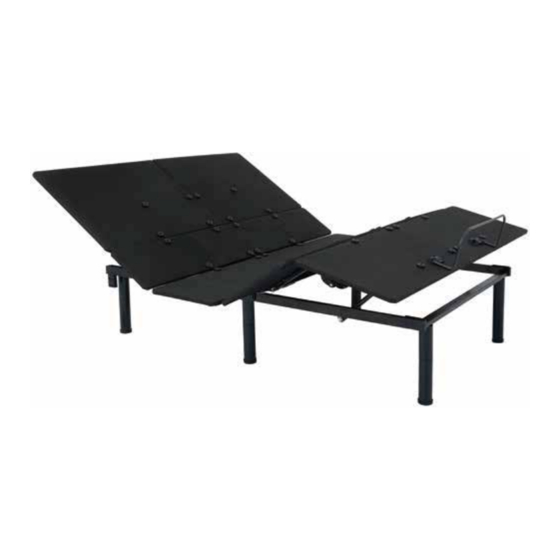
- Page 13 Finally, HU10061 Adjustable Base is completed as shown in picture below. 6. Uncoil the input power cord (connected to the control box’s power port) and plug it into the power supply. 7. Uncoil the power cord and connect it to the power supply.
- Page 14 HU10061 Remote Control Instructions Flat Position Lifts and Lifts and Lowers Foot Lowers Head Pairing Remote The original remote that comes in the box is already paired to the foundation. No further action is required. In the event that the remote is not paired with the foundation, follow...
-
Page 15: Synchronizing Two Bases
STEP 1 STEP 2 Make sure the Plug the power cord to the power batteries work fine. source. Replace them when needed. STEP 3 Press and hold head lift and foot lift simultaneously, then press and hold the button on the cord of control box for 3 seconds until you hear 2 beeps sound, the remote is then paired. - Page 16 Base A Remote A STEP 4 For HU10061 press and hold the Head Down and Foot Down buttons simultaneously for 5 seconds on remote B. The remote flashlight will turn on. Within 10 seconds, press and hold the Head Up and Foot Up buttons on Remote A until the flashlight on Remote B starts to flash.
- Page 17 Headboard Bracket Installation Guide Headboard brackets are optional accessories and are not included. A 1/2" (13 mm) socket and 1/2" (13 mm) crescent wrench are necessary to complete installation. HEADBOARD BRACKET COMPONENTS (2) Headboard Brackets (2) T-Brackets (12) Short Bolts (12) Nuts STEP 1 The headboard bracket will have 2 long slots to accomodate any...
- Page 18 STEP 2 To put the T-Bracket and Headboard Bracket together, you will need (2) bolts and (2) nuts. Slip the bolts through the holes from T-Bracket to Headboard Bracket with the head of bolt facing outward. Use 1/2" (13mm) socket and 1/2" (13mm) wrench to tighten the bolts. STEP 3 You may now connect your headboard to the attachment plates using the remaining bolts and nuts to secure it to the brackets.
-
Page 19: Troubleshooting
Troubleshooting In the event that the power foundation fails to operate, assess the symptoms and possible solutions provided in the chart below. SYMPTOMS SOLUTIONS Remote control Verify that the power cord is plugged into a illuminates and appears to working, grounded electrical outlet. Test the be operable, but will not outlet by plugging in another working appliance. - Page 20 SYMPTOMS SOLUTIONS Check batteries in wireless remote control, replace with two (2) new AAA batteries if necessary. Make sure that you are following the duty cycle of the motors (do not operate more than two minutes over an 18-minute period, or Head &...
- Page 21 Welcome to visit our website and purchase our quality products! With your inspiring rating, COSTWAY will be more consistent to offer you EASY SHOPPING EXPERIENCE, GOOD PRODUCTS and EFFICIENT SERVICE! US office: Fontana, California UK office: Ipswich Reward Points Exclusive Customer Service...
Need help?
Do you have a question about the HU10061 and is the answer not in the manual?
Questions and answers