Table of Contents
Advertisement
Advertisement
Table of Contents

Related Manuals for Ducky One 3 SF


Summary of Contents for Ducky One 3 SF
-
Page 2: Table Of Contents
Ducky One 3 SF 規格與特色 標準層鍵盤配置圖 Fn 層鍵盤配置圖 Fn+Alt層鍵盤配置圖 RGB 燈光操作模式 RGB 記憶區域背光 多媒體功能 設定 Debounce Time 店家櫥窗Display模式 回復出廠設定 Windows Lock功能 鍵位切換操作 DIP指撥開關功能 Ducky SF Macro Ducky SF Macro 基本快捷鍵功能 Ducky SF Macro 設定區域的範圍 Ducky SF Macro 指定「多媒體鍵功能」設定輸入指令 Ducky SF Macro 指定「鍵盤按鍵功能」設定輸入指令... - Page 3 Ducky One 3 SF Specs & Features Standard Layer Keyboard Configuration Diagram Fn Layer Keyboard Configuration Diagram Fn+Alt Layer Keyboard Configuration Diagram RGB Backlit Modes RGB Zone Customization Modes Multimedia Function Debounce Time Setting Display Mode Reset to Factory Defaults...
-
Page 4: Ducky One 3 Sf 規格與特色
Ducky One 3 SF Ducky One 3 SF 重點特色: 產品規格: 重點特色: 結構:機械式結構 軸體熱插拔,靈活使用相容大多數軸體 RGB多種燈光效果設定 燈光:RGB 鍵帽材質:PBT 或 ABS 真正支援Type-C介面,支援任何Type-C設備 印字技術:二色成型或雷雕 提供滑鼠動作功能,雙手不離開鍵盤也能操作 產地:台灣 小鍵盤可以送出全鍵盤的訊號,節省空間易攜帶 尺寸:335 x 110 x 40 mm 提供硬體Macro設定,想要什麼功能自行設定 重量:700g 搭配PBT二色成形鍵帽字形完美,不用擔心掉字... - Page 5 Ducky One 3 SF...
- Page 6 Ducky One 3 SF...
- Page 7 Ducky One 3 SF...
-
Page 8: Rgb燈光操作模式
RGB燈光操作模式 ● 以上各種模式,皆可透過下列操作來進行細節調整: ◆ Fn + Alt + /:降低速度。 ◆ Fn + Alt + ,:增加速度。 ● Fn + Alt + T 按住3秒鐘,可以關閉所有燈光效果(含CM1、CM2)。 ● 有 符號的模式可透過下列操作來進行細節調整: ◆ Fn + Alt + Z:調整紅色(R)亮度,10 階。 ◆ Fn + Alt + X:調整綠色(G)亮度,10 階。 ◆ Fn + Alt + C:調整藍色(B)亮度,10 階。 ◆... -
Page 9: Rgb 記憶區域背光
RGB 記憶區域背光 CM1依序有不同動作:第1段:依玩家設定的區域顯示背光。 Fn + Alt + G 第2段:依玩家設定的區域進行呼吸。 第3段:OFF 關閉 CM1。 CM2依序有不同動作:第1段:依玩家設定的區域顯示背光。 Fn + Alt + B 第2段:依玩家設定的區域進行呼吸。 第3段:OFF 關閉 CM2。 按住3秒後,亮起按鍵 G(CM1)、B(CM2),挑選要設定 Fn + Alt + Caps Lock (REC) 的按下即可開始錄製。 Caps Lock + Z 調整紅色(Red)燈光顏色,有10階。 Caps Lock + X 調整綠色(Green)燈光顏色,有10階。... - Page 10 RGB 記憶區域背光 操作過程 ● 操作重點提示:先調整喜歡的燈色,再選擇要指定的按鍵。 1. 按住 Fn + Alt + Caps Lock 達3秒後,將亮起按鍵 G(CM1)、B(CM2),按下G為設定 CM1,若按下B 則是設定 CM2。 2. 當進入錄製模式後,Caps Lock 鍵會顯示當前要設定的顏色,可以透過 Caps Lock + Z / X / C / V 調整顯示 燈色。當有喜歡的顏色出現時,直接在鍵盤上按下任意鍵,該鍵就會儲存成喜歡的顏色。 3. 使用者可以重覆上一個步驟,讓鍵盤在同一組區域背光設定中,不同按鍵能擁有多種不同燈色。若該鍵已 被設定亮起,再按一下可取消該鍵的設定值。 4. 當完成錄製後,按下 Caps Lock +左Shift鍵(REC over),結束錄製。此時 Caps Lock 按鍵指示的顏色, 會變成...
-
Page 11: 多媒體功能
多媒體功能 Fn + W Fn + Q 滑鼠游標向上 滑鼠左鍵 Fn + A Fn + E 滑鼠游標向左 滑鼠右鍵 Fn + S Fn + R 滑鼠游標向下 滾輪向上 Fn + D Fn + F 滑鼠游標向右 滾輪向下 設定 Debounce Time Fn + Alt + Y 10ms(預設值)... - Page 12 店家櫥窗Display模式,用以展示燈光模式 Fn + Alt(右) + Ctrl(右) 達3秒 開啟 / 關閉展示多種背光模式 ● 循環使用各種 RGB 模式時,鍵盤將會無法使用。 ● 拔除電源以退出燈光展示模式。...
-
Page 13: 回復出廠設定
回復出廠設定 美規、歐規 左Windows鍵 + 方向鍵 鍵 註: 壓住3秒後,鍵盤或指示燈會閃3下表示回復。 Windows 開啟 關閉 鍵功能 Fn + 任一Alt + 任一Windows鍵 註: 壓住3秒後,全鍵盤會閃3下表示切換完成(預設為開啟Windows鍵功能)。... -
Page 14: 鍵位切換操作
鍵位切換操作 鍵位切換功能 DIP1 DIP1 DIP2 1. 適用按鍵: Fn/Alt/Ctrl/Windows/Caps lock鍵 2. 操作方式: ●按住Fn + Alt + k達5秒,ESC、左Ctrl、左Win鍵、左Alt、右Alt、Fn、右Ctrl及Caps lock鍵皆會亮起 ,燈色分別為粉、紅、橙、黃、綠、藍、紫、白。 ●除Capslock鍵之外, 其餘6個按鍵只要同時或依序按下任意2顆, 即可交換其鍵位。(燈色也會跟著交換) ●按1下後Caps lock鍵將改變其功能,順序為Caps lock(白燈) -> Fn(藍燈) -> 左Ctrl(紅燈)依序循環。 (Caps lock會依據功能來亮燈) ●再次按下Caps lock以恢復Caps lock。 ●更改完成後按Esc鍵1下結束切換。 註: 尚未做鍵位切換前,可按Esc鍵1下離開此功能。... -
Page 15: Dip指撥開關功能
DIP 指撥開關功能 DIP 指撥開關功能 OFF(預設) DIP1 關閉F1~F12功能切換 (FN+\) 開啟F1~F12功能切換 (FN+\) OFF(預設) DIP2 任意全鍵輸出 任意6鍵輸出 OFF(預設) DIP3 Ducky VID 可自定VID OFF(預設) DIP4 註: 切換每1次DIP的On與Off,鍵盤就必須重新插拔,功能才會生效。... - Page 16 Ducky One 3 SF Step1. 選取要錄製的Profile 註: 切換至第1組設定 原始鍵盤功能(預設值) 當鍵盤插入時,Caps Lock與 ● 切換至第2組設定 數字鍵會閃爍Profile數值。 切換至第3組設定 Fn + Alt + ● 請先將設定檔切換至Profile 切換至第4組設定 可自定義按鍵Macro功能 2~6,才可進行Macro設定。 切換至第5組設定 ● 切換完後,Caps Lock或指示燈 切換至第6組設定 會閃爍該設定值數字的次數。...
-
Page 17: Ducky Sf Macro 使用範例
Ducky One 3 SF Macro 基本快捷鍵功能 按住達3秒後,可開始錄製Macro 按住達1秒,則結束錄製Macro Fn + Alt + 指示燈會閃爍當前的Profile值次數 Backspace 刪除當前Profile值 Fn + Alt 按住達1秒,跳出當前錄製的按鍵,並可選擇其他按鍵繼續錄製Macro... - Page 18 Ducky One 3 SF Macro 設定區域的範圍 Ducky SF Macro可設定之鍵盤層 ● 基本層 ● Fn層 ● Fn + Alt層 Ducky SF Macro不可設定之按鍵 ● Fn鍵 ● Caps Lock鍵 註: ● 預設支援同時輸出多組Macro,最多可以同時4組。即正在執行第1組Macro時,若按下其他Macro鍵則會同 時再輸入第二組Macro。 ● 支援同時錄製N顆按鍵,輸出時即同時錄製的N顆按鍵。 ● Macro預設輸入會以使用者打字的時間進行記錄儲存...
- Page 19 Ducky One 3 SF Macro 指定「多媒體鍵功能」設定輸入指令 Fn + Windows鍵 + 下方按鍵 音量靜音 上一首 搜尋 滑鼠游標向上 音量變大 計算機 上一頁 滑鼠游標向下 音量變小 我的電腦 下一頁 滑鼠游標向左 播放 / 暫停 瀏覽器首頁 滑鼠左鍵 滑鼠游標向右 停止 郵件 滑鼠右鍵 滑鼠滾輪向上捲動 下一首 多媒體程式 滑鼠中鍵 滑鼠滾輪向下捲動 註:需錄製後才可使用。...
- Page 20 Ducky One 3 SF Macro 指定「鍵盤按鍵功能」設定輸入指令 Fn + Shift鍵 + 以下按鍵 Profile 提示 值 燈光模式:波浪模式 Profile 1 燈光模式:循環模式 Profile 2 燈光模式:雨滴模式 Profile 3 燈光模式:漣漪模式 Profile 4 燈光模式:隨機單點亮模式 Profile 5 燈光模式:單點亮模式 Profile 6 100% 燈光模式: 全亮模式 燈光模式切換 燈光模式:單色呼吸燈模式 調整紅色燈光/調整亮度 燈光模式:雷達模式 調整綠色燈光...
- Page 21 Ducky One 3 SF Macro Windows 常見功能快捷鍵 Ctrl + C Windows鍵 + D 複製選取的項目 顯示桌面 Ctrl + X Windows鍵 + M 剪下選取的項目 將所有視窗最小化 Ctrl + V Windows鍵 + L 貼上選取的項目 鎖定電腦或切換使用者 Ctrl + Z Windows鍵 + R 復原動作 開啟 [執行] 對話方塊...
- Page 22 Ducky One 3 SF Macro 使用範例 註:請先將設定檔切換至Profile2~6,才可進行Macro設定。 情境A 想要將Z設定成Q輸出 操作方式: 按住 Fn + Alt + Tab 達3秒鐘 → 按下Z → 按下Q → 按下 Fn + Alt → 按住 Fn + Alt + Tab 達1秒 在 Windows 系統下,想要按下Z就能顯示桌面 情境B 操作方式: 按住 Fn + Alt + Tab 達3秒鐘 → 按下Z → 按住Windows鍵 + D → 按下 Fn + Alt →按住Fn + Alt + Tab達1秒...
-
Page 23: 熱插拔使用說明
熱插拔使用說明 使用範例 使用拔鍵器拔出鍵帽 拔軸器將軸拔出 步驟一 步驟二 校對針腳與孔位 垂直輕按並定位軸體 步驟三 步驟四... -
Page 24: 免責聲明
Ducky One 3 SF 免責聲明 ●在使用熱插拔型號時,請確保托住熱插拔底座,再將軸體拔起。 軸體插入時請確保不會過度用力而損壞軸體與PCB。 ●鍵盤等硬體設備如因任何液體損壞都將導致保固失效。 ●如有任何的鍵盤改裝都將使保固失效。 保固期為從我們官方供應商購買日起一年 https://www.duckychannel.com.tw/en/location/global 任何關於產品的退貨流程等問題,請您聯繫所購買的供應商會協助您處理。... - Page 25 Provides mouse functions for a convenient experience or Laser Engrave Miniature yet packed with features Origin of Production:Taiwan Supports Ducky Macro through hardware, personalize functions as you like Size:335 x 110 x 40 mm Products with PBT Double-shot Seamless keycaps, providing the perfectly Weight:700g...
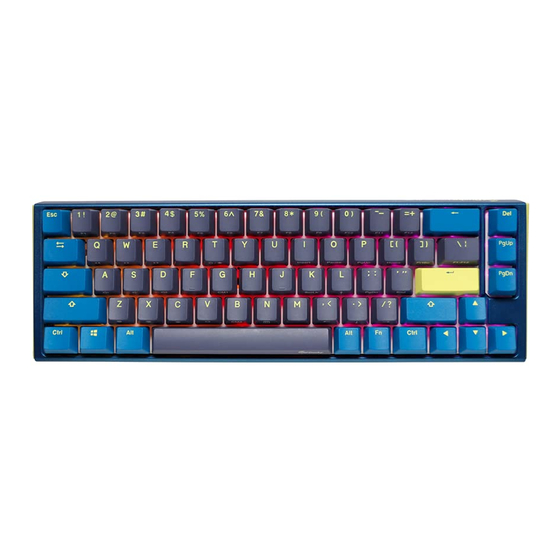
- Page 26 Ducky One 3 SF Keyboard configuration diagram, US layout used as example Standard Layer...
- Page 27 Ducky One 3 SF Keyboard configuration diagram, US layout used as example Fn Layer...
- Page 28 Ducky One 3 SF Keyboard configuration diagram, US layout used as example Fn + Alt Layer...
-
Page 29: Rgb Backlit Modes
RGB Backlit Modes ● All above modes can be adjusted with the following key sequence: ◆ Fn + Alt + /:Decrease speed ◆ Fn + Alt + ,:Increase speed ● Hold Fn + Alt + T for 3 seconds to turn o all backlit (including CM1 and CM2). ●... -
Page 30: Rgb Zone Customization Modes
RGB LED Zone Customization Modes CM1 cycle: First step: Turn on user’s customized zone and color. Fn + Alt + G Second step: Turn on user’s customized zone and color in breathe mode. Third step: Turn o CM1. CM2 cycle: First step: Turn on user’s customized zone and color. - Page 31 RGB LED Zone Customization Modes Recording steps: ● Adjust to the color first, then set the individual keys to be set to that color. 1. Press Fn + Alt + Caps Lock for 3 seconds, the buttons G (CM1) and B (CM2) will illuminate then press G to set CM1 and press B to set CM2.
-
Page 32: Multimedia Function
Multimedia Function Fn + W Mouse cursor up Fn + Q Left mouse button Fn + A Mouse cursor left Fn + E Right mouse button Fn + S Mouse cursor down Fn + R Roller up Mouse cursor right Fn + D Fn + F Roller down... -
Page 33: Display Mode
Display Mode Hold Fn + R_Alt + R_Ctrl for 3 sec To display various LED backlit modes ● The entire keyboard will be disabled while cycling through various RGB modes. ● Unplug the keyboard to quit Display Mode. Note: Used for showcasing purposes. -
Page 35: Key Switch Functions
Key Switch Functions Key Switch Function 1. Applicable keys: Fn/Alt/Ctrl/Windows/Caps lock 2. Operation: ● Press Fn + Alt + k for 5 seconds. ● Until the ESC, L_Ctrl, L_Win, L_Alt, R_Alt, Fn, R_Ctrl, and Caps lock keys are all lighting up. The colorways are respectively pink, red, orange, yellow, green, blue, and purple. -
Page 36: Dip Switch Functions
DIP2 N-Key Rollover mode 6-Key Rollover mode OFF(Default) DIP3 Ducky Vender ID (VID) Vender ID de nable OFF(Default) DIP4 Note : You can input the ideal VID in both situation, butthe VID can be only changed when DIP 3 turned on. - Page 37 Ducky One 3 SF Macro Step 1. Profile selections Note: When keyboard is plugged in, ● Switch to profile 1 Factory settings (Default) Caps Lock and Number Keys will Switch to profile 2 blink based on selected pro le number.
- Page 38 Ducky One 3 SF Macro Hotkeys Function Start recording : Press for 3 seconds. Finish recording: Press for 1 second. Fn + Alt + Caps Lock will blink in the amount of selected profile number. Backspace Delete current profile value.
-
Page 39: Ducky Sf Macro
Ducky One 3 SF Macro Setting Section Ducky SF Macro Configurable Keyboard Layer ● Standard Layer ● Fn Layer ● Fn + Alt Layer Ducky SF Macro Unsettable Key ● Fn ● Caps Lock Note: ● The Default supports outputting 4 Macro pro les at most simultaneously. That is, when the rst pro le is being executed, if the other Macro keys are pressed, the second pro le will be input at the same time. - Page 40 Ducky One 3 SF Macro Multimedia Function Keys Fn + Windows key + Keys below Mute Previous playlist Search Mouse cursor up Volume up Calculator Previous page Mouse cursor down Volume down My computer Next page Mouse cursor left Play / Pause...
- Page 41 Ducky One 3 SF Macro Keyboard Button Function Keys Fn + Shift+ Keys below Prompt profile value Backlit mode:Wave mode (Default) Profile 1 Backlit mode:Color Cycle mode Profile 2 Backlit mode:Rain Drop mode Profile 3 Backlit mode:Ripple mode Profile 4 Backlit mode:Random Reactive mode...
- Page 42 Ducky One 3 SF Macro Windows Common Function Keys Ctrl + C Copy select item Windows + D Desktop Ctrl + X Cut select item Windows + M Minimize all windows Ctrl + V Paste select item Windows + L...
- Page 43 Ducky One 3 SF Macro Set Up Example Note: Set the profile to profile 2~6 before setting Macro. Example A Configure the key “Z”to “Q” output. Operation method: Windows + M Press Fn + Alt + Tab for 3 seconds → Press Z → Press down Q → Press Fn + Alt → Press Fn + Alt + Tab for 1 second...
-
Page 44: Hot-Swap
Hot-swap Set-up Example Use key puller to pull out the key caps Use switch puller to pull out the switches Step 2 Step 1 Align switch pins with the holes Gently push the switch in Step 3 Step 4... -
Page 45: Disclaimers
Ducky One 3 SF DISCLAIMERS ●When using a Hot-swap model, make sure to support the hotswap socket with your nger when inserting the switch to ensure it does not damage the PCB from excessive force. ●Any liquid damage to the keyboard will void warranty. - Page 48 www.duckychannel.com.tw...
Need help?
Do you have a question about the One 3 SF and is the answer not in the manual?
Questions and answers