Table of Contents
Advertisement
Quick Links
Advertisement
Table of Contents

Related Manuals for Elmo HS-2


Summary of Contents for Elmo HS-2
- Page 1 ireless Present tation S System Inst ruct tion n Ma anua a l...
-
Page 2: Important Safeguards
■IMPORTANT SAFEGUARDS Make sure to read the “IMPORTANT SAFEGUARDS” in this guide before using this product. ■Read Instructions All the safety and operating instructions should be read before the appliance is operated. ■Retain Instructions The safety and operating instructions should be retained for future reference. ■Heed Warnings All warnings on the product and in the operating instructions should be adhered to. - Page 3 ■Grounding or Polarization This product may be equipped with either a polarized 2-wire AC line plug (a plug having one blade wider than the other) or a 3-wire grounding type plug, a plug having a third (grounding) pin. If the 2-Wire polarized plug will not fit in the outlet, try reversing the plug. If the plug still fails to fit, contact your electrician to replace your obsolete outlet.
- Page 4 When replacement parts are required, be sure the service technician has used replacement parts specified by the manufacturer or have the same characteristics as the original part. Unauthorized substitutions may result in fire, electric shock or other hazards. ■Safety Check Upon completion of any service or repairs to this product, ask the service technician to perform safety checks to determine that the product is in proper operating condition.
-
Page 5: Before You Use
■ It is prohibited under copyright law to use or copy any part or the whole of this document without our prior written consent. ■ ELMO shall not be liable for any claim for damage or loss of earnings or any claim raised by a third person due to the use, malfunction or repair of this product. -
Page 6: Table Of Contents
◆Operating panel ····················································································· 9 ◆Front panel ·························································································· 10 ◆Rear panel ··························································································· 11 ◆Remote control ····················································································· 12 ◆Fixing HS-2 to a desk ············································································· 13 ◆About the FAN ······················································································ 13 ❸ BASIC OPERATIONS ·············································································· 14 ◆Connecting to a projector or monitor ·························································· 14 ◆Connecting to a power source ··································································... - Page 7 ●Configuring the Security Settings···························································· 42 ●Configuring the Participants Settings ······················································· 43 ●Sharing the Screen ·············································································· 44 ●Viewing the Recorded Meeting ······························································ 46 ■ELMO Play ··························································································· 47 ◆Installing an app ···················································································· 47 ◆Uninstalling an app ················································································ 47 ❻ CONFIGURING THE SETTINGS ································································ 48 ◆Password screen ··················································································...
-
Page 8: ❶ Preparation
❶ PREPARATION ◆PACKAGE CONTENTS The items below are included with the product. If any item is missing, contact the dealer from whom you purchased the product. HS-2 (Main unit) AC adapter Power cable Remote control ※Batteries are not included in the package. -
Page 9: ❷ Part Names And Functions
❷ ❷ PAR RT NA AMES S AND D FUN CTIO OF EAC CH PAR ◆ ◆NAME ① ③ ② ⑥ ④ ⑤ ⑤ ⑥ unction perating pan ① ⇒P.9 ont panel ② ⇒P.10 ③ ear panel ⇒P.11 xing screw h holes ④... -
Page 10: Operating Panel
To turn ON/OFF the HS-2. Power button Press once: To turn ON. (Power LED: lights up blue) ③ Press again: To turn OFF. (Power LED: lights up red) To indicate the status of the HS-2. Flashing red: Starting Power LED ④ Solid red: Standby... -
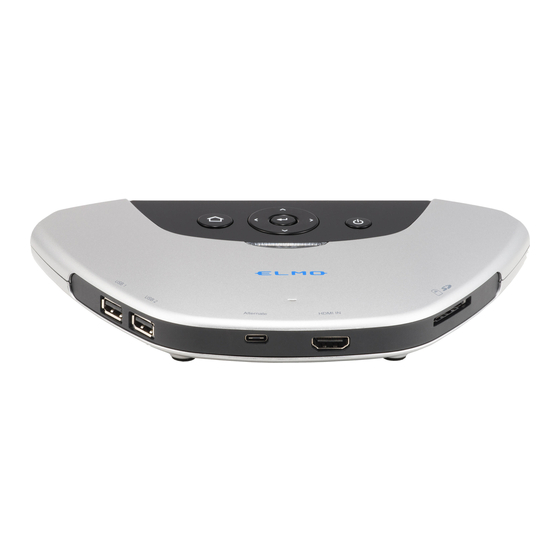
Page 11: Front Panel
◆FRONT PANEL ① ② ③ ④ Name Function To connect a USB device [USB2.0] such as a mouse, ① USB2.0 ports [Type-A] USB flash drive, microphone, and speaker. To connect a device with USB Type-C port (such as Mac, Chromebook, Windows that supports... -
Page 12: Rear Panel
◆REAR PANEL ① ② ③ ④ ⑤ ⑥ Name Function To connect a LAN cable to access the external network. LAN port ① (For EZT,web browsing, displaying digital textbook,video [RJ45] watching, etc.) HDMI Output port To connect a device with HDMI Type-A port (such as a ②... -
Page 13: Remote Control
⑧ To go to the Display selection screen. Home button ⑨ To adjust the volume. (+: increase -: decrease) Volume button ⑩ Channel button To switch the channel of the image to be input to HS-2. -
Page 14: Fixing Hs-2 To A Desk
G HS-2 T TO A DE ◆ ◆FIXING When fixing g the HS-2 t to a desk, u se M4 scre ews (pitch 0 .5 mm) with h a length th hat allows y you to insert mm from th... -
Page 15: ❸ Basic Operations
NITOR ◆ ◆CONNE ter connect ing the HDM MI cable to the HDMI O Output port of the HS-2 2, connect it t to the HDM MI port of th onitor or pro ojector. HDMI Outpu ut port HDMI cab... -
Page 16: Power On/Off
The image signal from the device connected via HDMI or USB Type-C is output from the HDMI Output port. If a device is connected to the HS-2 with a cable and there is no image signal input from the device, the Connection screen appears on the screen. -
Page 17: Inserting Batteries To The Remote Control
TING B ATTER IES TO THE RE EMOTE CONTR ◆ ◆INSER emove the c cover in the e back of the e remote co ontrol and in nsert 2pcs o of AAA batte eries. Note Pay at tention to th he direction of the batte ery. -
Page 18: ❹ Using The Hs-2
❹ USING THE HS-2 ■Cast app(Display app) The HS-2 supports wireless mirroring without installing a dedicated app or using a USB dongle regardless of Windows, iOS, Android, or Chrome OS. In addition, devices can be connected with cables using the HDMI Input port or USB Type-C port [DisplayPort Alternate]. - Page 19 3. Select [HS-2_***** **] from the list. ※It is p possible to c change the name of the e HS-2 to b e displayed d in the list f from "Devic ce name settin ng". Enable wireless s display.
- Page 20 3. Select [HS-2_***** **] from the list. ※It is p possible to c change the name of the e HS-2 to b e displayed d in the list f from "Devic ce name settin ng". lect the dev vice (HS-2)
-
Page 21: Displaying
HS-2. To displa ay the scree ens of the de evices conn nected to th he HS-2 in Split scree one scre en. (Max. 4 4 split scree ns. This me enu will app pear when... - Page 22 HS-2 ■Split scree ■ When there a are multiple input sourc es, the scre een can be s...
-
Page 23: Operating The Hs-2
- Device N Name To display y the device name of th e HS-2. - SSID To display y the SSID o of the HS-2. - Page 24 ■Navigation bar The Navigation bar [ ] is displayed when the cursor is moved to the bottom of the screen. To adjust the audio volume.(The volume adjustment bar is Volume displayed on the right side of the screen during operation.) )...
-
Page 25: Recording
Cast a app. Record ing will stop p when othe er app is starte If the e HS-2 ente rs the stand dby mode d during recor rding to exte ernal memo ory, a corrup pted file... -
Page 26: Audio Output
◆AUDIO OUTPUT The following table shows the audio output of the HS-2 for different connected devices and operating conditions. ※The operation sound of the HS-2 is always output. (〇:audio is output [Cast App] ×:audio is not output) <When microphone is enabled>... - Page 27 ※1 The audio of the connected source (HDMI or USB Type-C) is not output. ※2 The audio of the mirrored device (AirPlay, MiraCast, Chrome(Google)Cast) is output. ※3 The audio of the mirrored device (AirPlay, MiraCast, Chrome(Google)Cast) is combined and output. The audio of the HDMI or USB Type-C is not output.
-
Page 28: ❺ Advanced Operations
LAN po ort on the ba ack. → You ca n search th he browser a and watch v videos. ELMO PLA To update e or install a apps via the network. To open th he storage such as inte... -
Page 29: Paint
■ ■PAINT Select the Pa aint app [ ] in the li st of apps. T The Paint a app will laun nch and the e Paint icon will appear he screen. By selecting g the Paint i con [ on the scree en, you can n display the... -
Page 30: Drawing On The Screen
WING ON N THE S CREEN ◆ ◆DRAW Press th he Cursor b button [ ] on the r remote cont trol to displa ay the curso or [ Select t the Paint ico on [ to display th he Paint too Paint tool Select t the Pen icon... - Page 31 A browse er will start u up and you can access s the Interne omplete the e network se ettings of th e HS-2 in a advance. (⇒P.57:R Refer to “❻C CONFIGUR RING THE S SETTINGS proxy settin ngs.) ◆Network...
-
Page 32: File
■ ■FILE elect the File e app [ ] in the list o of apps. Yo ou can open n the storag e such as in nternal stor rage, SD ca ard, nd USB flash h drive. CTING T THE FIL ◆... -
Page 33: Ezt(Remote Meeting
(Rem ■ ■EZT mote M Meetin ng) ou can have e a remote m meeting usi ng EZT. Caution Start the meeting g after conn necting and setting the external m ic.&speaker r. If you con nnect or disco onnect or se et the extern nal mic.&sp... -
Page 34: Scheduling A Meeting
●Sched duling a a Meetin p the Sched dule icon. the detail of the mee eting sched dule. “Topic”, “D ate”, “Start Time”, “End d Time”, Tim me Zone”. p “RESERV VE”. Note (⇒P.34) You c can also mo dify the sch heduled me eting on thi... -
Page 35: Starting A Scheduled Meeting
●Starti ng a Sc chedule d Meeti p the Meetin ng icon. A lis st of schedu uled meetin gs will appe ear. Sele ect the mee eting to star p “NEW”. e meeting sc creen will a ppear and t the meeting g will start. -
Page 36: Starting A Meeting Immediately
●Starti ng a Me eeting Im mmedia ately p the New ic con. Sele ect the par rticipants. Sele ect the mem mbers you w want to invit te to the me eeting from the contact t list. p “NEW”. e meeting w will start. -
Page 37: Configuring The Meeting Settings
●Confi guring the Mee eting Se ettings p the Settin ngs icon. nfigure eac ch setting i tem. Desc cription To d display Roo om name an nd Meeting Microp phone To a adjust the m microphone volume. To o display the e connected d microphon Spea... - Page 38 ◆Mic.&spe Tap “Sett tings” to dis splay the “M Mic.&speake er settings” dialog box f for the HS-2 Tap “Mic rophone in use”. Selec ct the micro phone to us to finish th e configura tion. Note ...
- Page 39 1) Tap “Sett tings” to dis splay the “M Mic.&speake er settings” dialog box f for the HS-2 Tap “Spe eaker in use e”. Select th he speaker t to use.。 to finish t he configur ation.
- Page 40 ■Permis ssion setting If you pe erform the fo ollowing op perations at the first sta artup, a dia alog asking for permiss sion of acce authority will be disp played. Disp play Operatio Dialog ap “Unmute”. Meeting ap “Start Vide eo”.
- Page 41 2. Select “EZT”. 3. Select “Permissio ons”. 4. Enable e the pemis sions settin ng for “Came era”, “Stora a ge”, and “M M icrophone” ” . (...
-
Page 42: Available Operations During The Meeting
◆AVAILABLE OPERATIONS DURING THE MEETING ●Menu bar Operations Name Description Mute To mute the sound. Tap this icon again to unmute. Start Video To start the video streaming. Tap this icon again to stop the video streaming. Security To configure the meeting security settings.(⇒P.42) To display a list of participants.(⇒P.43)... -
Page 43: Configuring The Security Settings
●Confi guring the Sec curity Se ettings p the Secur rity icon. e Security s settings dia alog box w will appear. u can config gure each se etting item. Name Descriptio hen this opt ion is enab led ( no particip pants will be ock Meeting... -
Page 44: Configuring The Participants Settings
●C Configu uring th he Partic cipants Setting p the Partic cipants icon p the icon o of participa ant. u can config gure the Par rticipants se ettings such h as “Mute”, “Chat” and d “Make Hos st”. -
Page 45: Sharing The Screen
●Sharin ng the S Screen p the Share e icon to dis splay the S Screen sha aring option Description reen To share the e screen bei ing displaye ed on the m monitor with other partic cipants. White eboard To share the e whiteboard d so that bo... - Page 46 2-2 Op perations du uring the Sc creen Sharin en you sele ect “Screen” ”, a green fr rame indica ating the sha ared screen n will appea ar on the ent tire scre een. You ca an share the e screen of the Cast ap pp with othe...
-
Page 47: Viewing The Recorded Meeting
●Viewi ng the R Record ed Mee ting en the reco ording is fi nished, the e Send rec cording sha are email s creen will appear. Sele ect the rec cipient of th he email. Sele ect the recip pient of the email from the addres... -
Page 48: Elmo Play
■ELMO Play ELMO Play is an application for installing apps from the ELMO portal site. With ELMO Play, you can install convenient apps or update apps. (Some apps are chargeable.) ◆INSTALLING AN APP Connect to the Internet and select the ELMO Play app. -
Page 49: ❻ Configuring The Settings
HS-2 from m the standb by mode. Note The def fault passw ord is “0000 0000”(7 di... -
Page 50: Settings Screen
Disabled AP. Defau ult setting: Disab bledfault setting g: Disabled external AP *If you cha ange the setting g, the HS-2 will r restart. To enable or disable Start tup AP (Access Point). AP on at startu Enabled / Disabled... - Page 51 HS-2 setting Setting g value Name Selection Function item To change the e name of the H HS-2 to be displa ayed in the list when mirrorin g via MiraCast, AirPlay, or Chrome(Goog gle)Cast. Device name Default setting g: “HS-2_produc ct serial numbe r”...
- Page 52 AP, restart the HS-2. When n using the H HS-2 with th e PIN settin ngs enabled, , connect ea ach device w wirelessly on ne by one.
- Page 53 Caution Do not t change th e following items in the e System se ettings. Oth herwise the HS-2 may n not work proper rly. ・ Do o not chang ge the Hom e app from Hs2Home. ・ Do...
-
Page 54: Changing The Device Name
◆CHANGING THE DEVICE NAME For the mirroring via MiraCast, AirPlay, or Chrome(Google)Cast, it is possible to change the name of the HS-2 to be displayed in the list from "Device name setting". Characters that can be used for the device name... -
Page 55: Security Setting
◆SECURITY SETTING The password can be changed from the Password setting menu in the Security setting. Only 7 digits numbers can be used for password. If you do not want to use a password, leave this field blank. (⇒P.48: ◆Password screen ) ※The password with less than 7 digits cannot be set. -
Page 56: Connecting To The Network
G TO TH HE NETW WORK ◆ ◆CONNE ■LAN setting ■ Connect th he HS-2 to t the network k using a LA AN cable. Press the S Settings ico on in the list t of apps [ ] to open n the Setting gs screen. - Page 57 "Wirele ss connecti ion to exter rnal AP" in the settings With th he HS-2, it i is possible t to change t the channel of MiraCas st and AP as counte ermeasure a against wire eless interfe erence.
-
Page 58: Network Proxy Settings
ORK PR ROXY S SETTING ◆ ◆NETWO Proxy setting gs for the H HS-2 can be e configured d. The settin ng procedur re varies de epending on n the connection m method. ■Ethernet ■ Press the Setting s icon in the... -
Page 59: Pairing Of The Remote Control
LED flas shes blue. ress at the same time. Go to [P Pair with a n new device] ] > [HS-2 BT The blu e LED stop ps flashing a and pairing is complete Pairin ng is comple ete. -
Page 60: Resolution Of The Monitor
LUTION N OF TH E MON ITOR ◆ ◆RESOL Press th he Settings icon in the list of apps ] to op pen the Set ttings scree Go to [S Settings] > [ [System set ttings] [ ] > [Display Go to [A Advanced s ettings] >... -
Page 61: Keyboard Selection
There are two keyboards available, a Japanese keyboard and an English keyboard. The Japanese keyboard only supports romaji typing. ※The software keyboard cannot be operated with the D-pad on the HS-2 or remote control. Use the cursor of the remote control or connect the USB mouse. -
Page 62: Mic.&Speaker Settings
SPEAKE ER SET TTINGS ◆ ◆MIC.&S ■You can c ■ check the US SB mic.&sp peaker you a are currentl y using by o opening the e Mic.&spea aker settings s in the Setting gs menu. 1. Go to ] >Mic o Settings [ c.&speaker r settings [... -
Page 63: App Selection
If the above dialog is displayed, select Lightning [ ], WPS Office [ ], Hs2Home [ ], Gallery / Video Player [ ]. If you select another app, the selected app or the HS-2 may not work normally. Select "Always". -
Page 64: Installing The Client Certificate
HS-2 will n not work pr operly unles ss the scree en is unlock ked after ins stallation. From Se... - Page 65 Select t the connect ted device a and click on n the digital certificate. Enter th he password d to extract the certifica ate and pre ss "OK". Enter th he "Certifica ate name", s select "Wi-F Fi" in "Use c certificate in n formation", and press "OK".
- Page 66 Select “ “PIN” for the e screen loc Set the PIN. Enter "0 0000" in the e Screen loc ck setting an nd press "N Next". Enter "0 0000" again n in the PIN re-entry an nd press "Co onfirm".
- Page 67 10. The not tification win ndow will be e displayed . Select "Hi de all notific cations" and d press "Fin nish". n the list of 11. Select t the Settings s app [ f apps and s select "Wi-F Fi"...
- Page 68 "S ettings" and d select “Sc creen lock re e lease”. ※If you d o not unloc ck the scree n, the HS-2 2 will not op erate norm ally. 14. Select “ “None” in th he "Screen l ock select"...
-
Page 69: ❼ Faq (Frequently Asked Questions And Answers)
・The Cast settings of the HS-2 are disabled. →If the Cast settings are disabled, it is not possible to connect the HS-2 and the input device. Also, if "Automatic switching" setting in the Cast settings is disabled or if a single screen is displayed, the video of the second and subsequent devices will not be displayed automatically. - Page 70 ▶AirPlay Q. It is not possible to do the mirroring via AirPlay. A.・The input device is not connected to the HS-2 or an AP that exists on the same network as the HS-2 wirelessly. →Connect the input device to the HS-2 or an AP that exists on the same network as the HS-2.
- Page 71 ・The time of the input device, the time of the HS-2, and the time of the Internet are not synchronized. →If you set the clock manually, you may not be able to connect the HS-2 and the input device. The problem may be improved by enabling the Automatic time synchronization setting to always set the clock correctly.
- Page 72 ・USB microphone, USB speaker, or USB mic.&speaker is not recognized. →Some USB devices may not be used. Check whether it can be used with the HS-2 in advance. ・After initialization, there is no audio from the input device.
- Page 73 A. Immediately after the power of the AC adapter is turned on, negotiation between the remote control and the HS-2 starts. This process may take up to 10 seconds. If the remote control still does not work, perform a pairing again. (⇒P.58: ◆Pairing of the remote control ) If there is an error in the app, the remote control may become unusable.
- Page 74 Q. When I connect to the Internet by connecting to the AP of the HS-2 via Wi-Fi, the network is slow. A. Up to 16 devices can be connected to the AP of the HS-2 at the same time. The problem may be improved by reducing the number of connected devices.
-
Page 75: ❽ Troubleshooting
It is not possible to control the HS-2 from the remote ON. (The LED is lit in blue). Press the Power button to turn on the HS-2. ・Immediately after the power of the HS-2 is turned on or the battery of control. - Page 76 ・The audio volume of the device to be mirrored is set to 0 or is set to mute. ・The audio volume of the HS-2 is set to 0 or is set to mute. Wrong password has been entered. (For example, uppercase letter is Error message appears when used for lowercase letter or number “0”...
-
Page 77: ❾ Specifications
HDMI Output port (Type-A) X1 Network Video streaming Displays max. 4 split images on a single screen of the connected Split screen devices to the HS-2. Save destination Internal storage, SD card, USB flash drive Video input (wired) Input port HDMI (Type-A)×1、USB(Type-C)×1... -
Page 78: Video Input
Storage Internal storage 16GB (including OS and apps) SD card SD slot×1 for SD card and SDHC card (Class10 or higher) USB flash drive Still image recording / video recording (with audio) Bluetooth Remote control 16 buttons+Gyro mouse Network 10BASE-T、100BASE-TX、1000BASE-T Wi-Fi IEEE 802.11 ac/a/b/g/n Authentication... -
Page 79: Video Output
◆VIDEO OUTPUT ・HDMI video output format Resolution Aspect ratio Frequency 3840×2160p UHD、4K 16:9 30Hz 1920x1080p FHD、2K 16:9 60Hz 1280x720p 16:9 60Hz AUTO ◆VIDEO RECORDING Internal storage Save destination SD card and SDHC card (Class10 or higher) USB flash drive Recording format H.264, AAC Recording quality High / Normal / Low... -
Page 80: List Of Supported Media Types
◆LIST OF SUPPORTED MEDIA TYPES Description Extension Media type Still image JPG/PNG/BMP Jpeg file/Png file/Bmp file Video MP4 file PDF file Excel xlsx, xls Excel file PowerPoint pptx, ppt PowerPoint file Word docx, doc Word file ◆SYSTEM REQUIREMENTS Windows 8.1/10 CPU:Intel Core i5 (with processor higher than 2GHz) Windows RAM:More than 2GB (RAM more than 8GB... -
Page 81: Trademarks And Licenses
■ TRADEMARKS AND LICENSES is a registered trademark of TECHNO HORIZON CO., LTD. SD, SDHC, and logo are trademarks of SD-3C,LLC. HDMI and High-Definition Multimedia interface are trademarks or registered trademarks of HDMI Licensing LLC. Windows and other Microsoft products referenced herein are registered trademarks of Microsoft Corporation in the U.S. - Page 82 テクノホライゾン株式会社 OVERSEAS SUBSIDIARY COMPANIES 〒457-0071 ELMO USA CORP. 愛知県名古屋市南区千竈通二丁目 13番地 1 □Headquarters https://www.elmo.co.jp 6851 Jericho Turnpike Suite 145 製品のお問い合わせは、下記オフィスへ Syosset, NY 11791 Tel. (516) 501-1400 □ 札幌オフィス Fax.(516) 501-0429 〒060-0908 北海道札幌市東区北 8 条東 3 丁目 1-1 E-mail: elmo@elmousa.com 宮村ビル 3 階...
Need help?
Do you have a question about the HS-2 and is the answer not in the manual?
Questions and answers