Table of Contents
Advertisement
Quick Links
Advertisement
Table of Contents

Related Manuals for Elmo HS-2


Summary of Contents for Elmo HS-2
- Page 1 Wireless Presentation System HS-2 Instruction Manual...
-
Page 2: Important Safeguards
■IMPORTANT SAFEGUARDS Make sure to read the “IMPORTANT SAFEGUARDS” in this guide before using this product. ■Read Instructions All the safety and operating instructions should be read before the appliance is operated. ■Retain Instructions The safety and operating instructions should be retained for future reference. ■Heed Warnings All warnings on the product and in the operating instructions should be adhered to. - Page 3 ■Grounding or Polarization This product may be equipped with either a polarized 2-wire AC line plug (a plug having one blade wider than the other) or a 3-wire grounding type plug, a plug having a third (grounding) pin. If the 2-Wire polarized plug will not fit in the outlet, try reversing the plug. If the plug still fails to fit, contact your electrician to replace your obsolete outlet.
- Page 4 ■Safety Check Upon completion of any service or repairs to this product, ask the service technician to perform safety checks to determine that the product is in proper operating condition. ■Heat The product should be situated away from heat sources such as radiators, heat registers, stoves, or other products (including amplifiers) that produce heat.
-
Page 5: Before You Use
■ It is prohibited under copyright law to use or copy any part or the whole of this document without our prior written consent. ■ ELMO shall not be liable for any claim for damage or loss of earnings or any claim raised by a third person due to the use, malfunction or repair of this product. -
Page 6: Table Of Contents
➋ PART NAMES AND FUNCTIONS ································································ 8 ◆OPERATING PANEL ··············································································· 9 ◆FRONT PANEL ····················································································· 10 ◆REAR PANEL ······················································································· 11 ◆FIXING HS-2 TO A DESK ········································································ 13 ◆ABOUT THE FAN ·················································································· 13 ◆CONNECTING TO A PROJECTOR OR MONITOR ········································ 14 ➌ BASIC OPERATIONS ·············································································· 14 ◆CONNECTING TO A POWER SOURCE ·····················································... - Page 7 ◆PAIRING OF THE REMOTE CONTROL ······················································ 37 ◆RESOLUTION OF THE MONITOR ···························································· 38 ◆DATE AND TIME SETTINGS ···································································· 38 ◆KEYBOARD SELECTION ······································································· 39 ◆APP SELECTION ·················································································· 39 ➐ FAQ (Frequently asked questions and answers) ············································· 40 ◆SYMPTOMS AND SOLUTIONS ································································ 45 ➑...
-
Page 8: ➊ Preparation
➊ PREPARATION ◆PACKAGE CONTENTS The items below are included with the product. If any item is missing, contact the dealer from whom you purchased the product. HS-2 (Main unit) AC adapter Power cable Remote control ※Batteries are not included in the package. -
Page 9: ➋ Part Names And Functions
◆NAME OF EACH PART ① ③ ② ⑥ ④ ⑤ ⑥ Name Function Operating panel ⇒P.9 ① Front panel ⇒P.10 ② Rear panel ⇒P.11 ③ Fixing screw holes ⇒P.13 ④ Intake vent ⑤ Exhaust vent ⑥ ※The HS-2 has a built-in cooling fan. -
Page 10: Operating Panel
To turn ON/OFF the HS-2. Press once: To turn ON. (Power LED: lights up blue) Power button ③ Press again: To turn OFF. (Power LED: lights up red) To indicate the status of the HS-2. Flashing red: Starting Power LED ④ Solid red: Standby... -
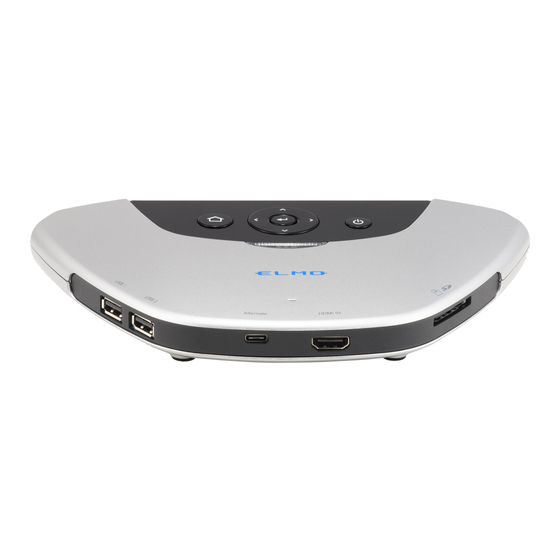
Page 11: Front Panel
◆FRONT PANEL ① ② ③ ④ Name Function USB2.0 ports [Type-A] To connect a USB device [USB2.0] such as a mouse, USB flash drive, USB camera, microphone, and ① speaker. USB Type-C Input port To connect a device with USB Type-C port (such as [DisplayPort Alternate] Mac, Chromebook, and Windows that supports DisplayPort Alternate (Alt) mode) for image input. -
Page 12: Rear Panel
◆REAR PANEL ① ② ③ ④ ⑤ ⑥ Name Function LAN port To connect a LAN cable to access the external network. ① [RJ45] (For web browsing, video watching, etc.) HDMI Output port To connect a device with HDMI Type-A port (such as a ②... - Page 13 To go to the Home screen. ⑧ Volume To adjust the volume. (+: increase -: decrease) ⑨ button Channel To switch the channel of the image to be input to HS-2. button ⑩ ※This function is available only on the Hs2Display screen.
-
Page 14: Fixing Hs-2 To A Desk
◆FIXING HS-2 TO A DESK When fixing the HS-2 to a desk, use M4 screws (pitch 0.5 mm) with a length that allows you to insert 5 mm from the bottom of the main unit. ■Securing unit M4 screwx2 ■Dimensions... -
Page 15: ➌ Basic Operations
➌ BASIC OPERATIONS ◆CONNECTING TO A PROJECTOR OR MONITOR After connecting the HDMI cable to the HDMI Output port of the HS-2, connect it to the HDMI port of the monitor or projector. HDMI Output port HDMI cable Monitor Projector ◆CONNECTING TO A POWER SOURCE... -
Page 16: Power On/Off
The image signal from the device connected via HDMI or USB Type-C is output from the HDMI Output port. If a device is connected to the HS-2 with a cable and there is no image signal input from the device, the Startup screen appears on the screen. -
Page 17: ➍ Using The Hs-2
➍ USING THE HS-2 ■Hs2Display(Display app) The HS-2 supports wireless mirroring without installing a dedicated app or using a USB dongle regardless of Windows, iOS, Android, or Chrome OS. In addition, devices can be connected with cables using the HDMI Input port or USB Type-C port [DisplayPort Alternate]. - Page 18 ※Depending on the device the connection procedure may vary. ※Android devices do not support the touch back control function. ※Some Android devices may not be used with the HS-2. ・When using Windows OS(Windows10) 1. Click the Action Center icon [ ] in the task bar.
- Page 19 ▶Mirroring via AirPlay ・When using iOS, iPad OS, or Mac OS 1. Turn on the Wi-Fi setting of your device and select the SSID of the HS-2. Then connect the device to the HS-2 via Wi-Fi. 2. From the Control Center of your device, turn on the Screen Mirroring [ 3.
-
Page 20: Operating The Hs-2
SCREEN”. ■Switching the screens Multiple screens can be displayed on the HDMI output screen by connecting the device and the HS-2 with cable or Wi-Fi (mirroring) when Hs2Display screen is displayed. Multiple screens can be switched between single screen display and split screen display. (Up to 4 screens) ■Single screen... - Page 21 ■Split screen The screen can be split up into 4 areas by clicking the Split screen button [ ] and then clicking [ after making the selection to be displayed. ※A number (split position and selection number) is displayed on the top right of the selected screen. Selection screen Split screen Selected screens...
- Page 22 ■Menu The menu is displayed when the Menu display button [ ] is selected on Hs2Display screen. To operate the mouse on your computer using the remote control of the HS-2. ※Check "Allow input" when connecting wirelessly. Touch back Compatible only with Windows.
-
Page 23: Recording
※Recording can also be stopped by pressing the record icon in the upper left of the screen. ※Recording is possible only when using this app. ※If the HS-2 enters the standby mode during recording, a corrupted file will be generated. Make sure that the HS-2 enters the standby mode after the recording is stopped. -
Page 24: Audio Output
◆AUDIO OUTPUT The following table shows the audio output of the HS-2 for different connected devices and operating conditions. ※The operation sound of the HS-2 is always output. (〇:audio is output [HS2Display] ×:audio is not output) <When microphone is enabled>... - Page 25 ※1 The audio of the connected source (HDMI or USB Type-C) is not output. ※2 The audio of the mirrored device (AirPlay, MiraCast, Chrome(Google)Cast) is output. ※3 The audio of the mirrored device (AirPlay, MiraCast, Chrome(Google)Cast) is combined and output. The audio of the HDMI or USB Type-C is not output. ※4 The audio of the HDMI or USB Type-C is output.
-
Page 26: ➎ Advanced Operations
→ You can search the browser and watch videos. This app is displayed at startup. The images from devices connected to the HS-2, Hs2Display wirelessly or wired, can be switched and displayed as desired. Max 4 split screen display is possible. -
Page 27: List Of Apps
To draw on various background images using a pen or marker. Video conference To do a video conference via the Internet. app(EZT) ※ EZT will be released on ELMO Play. To open Office documents and PDF files. WPS Office ELMO PLAY... -
Page 28: Paint
■PAINT By selecting the [ ] icon on the screen, you can display the Paint tool with icons such as pen, marker, and eraser to draw on the screen. Select a pen, marker, or eraser to display a sub menu where you can change the type of pen or eraser. ※The selected icon will be highlighted (background: light blue). -
Page 29: Drawing On The Screen
◆ DRAWING ON THE SCREEN Step1.Press the Cursor button [ ] on the remote control to display the cursor [ Step2.Select the Paint icon [ ] to display the Paint tool. Paint tool Step3. Select the Pen icon [ ] to display a sub menu. You can select pen type, thickness, and color. Select the Pen icon again to close a sub menu. -
Page 30: Browser
] on the Home screen is selected, a browser starts up and you can access the Internet. ※Complete the network settings of the HS-2 in advance. (Refer to “⑥CONFIGURING THE SETTINGS ◆ CONNECTING TO THE NETWORK”.) ※Videos such as YouTube can be played, but some videos cannot be played. Electronic textbooks can be displayed, but some functions may be restricted. -
Page 31: Video Conference App(Ezt
■VIDEO CONFERENCE APP(EZT) With this app, you can do video conference using the HS-2. ※EZT needs to be downloaded and installed from ELMO Play. (To be updated at a later date.) ■ELMO Play ELMO Play is an application for installing apps from the ELMO portal site. -
Page 32: ➏ Configuring The Settings
Default setting: Disabled *If you change the setting, the HS-2 will restart. When set to "Enabled", "Proxy host" and "Proxy port" are enabled, and the HS-2 can connect to the Internet via a Proxy status Enabled / Disabled proxy server. - Page 33 Default setting: Disabled ※AirPlay, MiraCast, Chrome(Google)Cast cannot be used if 4K input Enabled / Disabled this setting is enabled. ※The HS-2 automatically restarts when the setting is changed. To enable or disable the mute function during recording. Mute Enabled / Disabled...
- Page 34 To display information about your tablet. You can change the name of the About tablet device. ※Do not change the following items in the System settings. Otherwise the HS-2 may not work properly. ・Do not change the Home app from Hs2Home. ・Do not change the Sleep setting from OFF.
-
Page 35: Connecting To The Network
※If a LAN cable is connected and the "Ethernet" setting is completed, the LAN connection has priority over Wi-Fi. (⇒P.31:Ethernet) When DHCP is set to "ON", the HS-2 automatically connects to the network. To enter the IP address manually, set it to "OFF". - Page 36 Step5. Tap or click the "Connect" button to connect to the Wi-Fi network. Note With the HS-2, it is possible to change the channel of MiraCast and AP as a countermeasure against wireless interference. The HS-2 supports only W52 of 5GHz and does not support W53 (52-64ch) and W56 (100-140ch).
-
Page 37: Network Proxy Settings
◆NETWORK PROXY SETTINGS Proxy settings for the HS-2 can be configured. The setting procedure varies depending on the connection method. ■Ethernet 1.Press the Settings button [ ] to open the Settings screen. 2.Enable the Proxy status setting [ ] of “Proxy settings” in “Network settings”. -
Page 38: Pairing Of The Remote Control
The LED on the remote control flashes blue. LED flashes blue. Press at the same time. 4.Go to [Pair with a new device] > [HS-2 BT]. The blue LED stops flashing and pairing is complete. Pairing is complete. 5.Press the Cursor button [ ] on the remote control to display the cursor [ ]. -
Page 39: Resolution Of The Monitor
◆RESOLUTION OF THE MONITOR 1.Press the Settings button [ ] to open the Settings screen. 2.Go to [Settings] > [System settings] [ ] > [Display][ 3.Go to [Advanced settings] > [HDMI] > [Resolution]. 4. A list of resolutions available on your display appears. Select the resolution you want to use. -
Page 40: Keyboard Selection
If the above dialog is displayed, select Lightning [ ], WPS Office [ ], Hs2Home [ ], Gallery / Video Player [ ]. If you select another app, the selected app or the HS-2 may not work normally. Select "Always". -
Page 41: ➐ Faq (Frequently Asked Questions And Answers)
→Go to [Network & Internet] in the Settings menu and turn on Wi-Fi. ・The firewall of the input device is enabled. →If the firewall is enabled, it may not be possible to connect the HS-2 and the input device. ・MiraCast channel and AP channel may be interfering with each other. - Page 42 AP that exists on the same network as the HS-2. →Connect the input device to the HS-2 or an AP that exists on the same network as the HS-2. ・The device is connected to Virtual Private Network (VPN) or a proxy server.
- Page 43 →When using the HS-2 in the 2.4GHz band, radio wave interference may occur with microwave ovens, Bluetooth products, wireless routers, etc. Use the HS-2 in the 5GHz band or keep it away from interference sources. Do not block the HS-2 or the input device with metal cabinets, walls, TVs, etc.
- Page 44 ・USB external microphone, USB speaker, or USB mic.&speaker is not recognized. →Some USB devices may not be used. Check whether it can be used with the HS-2 in advance. ・After initialization, there is no audio from the input device.
- Page 45 Q. When I connect to the Internet by connecting to the AP of the HS-2 via Wi-Fi, the network is slow. A. Up to 16 devices can be connected to the AP of the HS-2 at the same time. The problem may be improved by reducing the number of connected devices.
-
Page 46: ➑ Troubleshooting
・The remote control can only be used when the power of the HS-2 is the HS-2 from the remote ON. (The LED is lit in blue). Press the Power button to turn on the HS-2. control. ・Immediately after the power of the HS-2 is turned on or the battery of the remote control is inserted, communication with the HS-2 is started by pressing the button on the remote control. - Page 47 ・The audio volume of the device to be mirrored is set to 0 or is set to mute. ・The audio volume of the HS-2 is set to 0 or is set to mute. Wrong password has been entered. (For example, uppercase letter is Error message appears when used for lowercase letter or number “0”...
-
Page 48: ➒ Specifications
HDMI Output port (Type-A) X1 Network Video streaming Displays max. 4 split images on a single screen of the connected Split screen devices to the HS-2. Save destination Internal storage, SD card, USB flash drive Video input (wired) Input port HDMI (Type-A)×1、USB(Type-C)×1... -
Page 49: Video Input
Storage Internal storage 16GB (including OS and apps) SD card SD slot×1 for SD card and SDHC card (Class10 or higher) USB flash drive Still image recording / video recording (with audio) Bluetooth Remote control 16 buttons+Gyro mouse Network 10BASE-T、100BASE-TX、1000BASE-T Wi-Fi IEEE 802.11 ac/a/b/g/n Authentication... -
Page 50: Video Output
◆VIDEO OUTPUT ・HDMI video output format Resolution Aspect ratio Frequency 3840×2160p UHD、4K 16:9 30Hz 1920x1080p FHD、2K 16:9 60Hz 1280x720p 16:9 60Hz AUTO ◆VIDEO RECORDING Internal storage Save destination SD card and SDHC card (Class10 or higher) USB flash drive Recording format H.264, AAC Recording quality High / Normal / Low... -
Page 51: List Of Supported Media Types
◆LIST OF SUPPORTED MEDIA TYPES Extension Description Media type Still image JPG/PNG/BMP Jpeg file/Png file/Bmp file Video MP4 file PDF file Excel xlsx, xls Excel file PowerPoint pptx, ppt PowerPoint file ◆SYSTEM REQUIREMENTS Word docx, doc Word file Windows 8.1/10 CPU:Intel Core i5 (with processor higher than 2GHz) Windows RAM:More than 2GB (RAM more than 8GB... -
Page 52: Trademarks And Licenses
■ TRADEMARKS AND LICENSES is a registered trademark of TECHNO HORIZON CO., LTD. SD, SDHC, and logo are trademarks of SD-3C,LLC. HDMI and High-Definition Multimedia interface are trademarks or registered trademarks of HDMI Licensing LLC. Windows and other Microsoft products referenced herein are registered trademarks of Microsoft Corporation in the U.S. - Page 53 TECHNO HORIZON CO., LTD. 〒457-0071 2-13-1 Chikamatori Minami-ku 名古屋市南区千竈通二丁目13番地1 Nagoya, 457-0078, Japan Web︓https://www.elmo.co.jp OVERSEAS SUBSIDIARY COMPANIES 製品のお問い合わせは、下記オフィスへ ELMO USA CORP. Headquarters □ 札幌オフイス 6851 Jericho Turnpike 〒060-0908 札幌市東区北 8 条東 3 丁目 1-1 Suite 145 宮村ビル 3F Syosset, NY 11791 TEL.011-594-8450...
Need help?
Do you have a question about the HS-2 and is the answer not in the manual?
Questions and answers