Advertisement
Available languages
Available languages
Quick Links
Advertisement
Chapters
Troubleshooting

Related Manuals for Funkey DP 1088


Summary of Contents for Funkey DP 1088
- Page 1 DP 1088 Slimline Digitalpiano Bedienungsanleitung / User Manual Version: 12/2021...
- Page 2 Vielen Dank, dass Sie sich für dieses Produkt entschieden haben. Um sicherzustellen, dass Sie mit diesem Produkt voll und ganz zufrieden sind, lesen Sie sorgfältig und verstehen Sie diese Bedienungsanleitung, bevor Sie dieses Instrument verwenden. Bewahren Sie diese Bedienungsanleitung an einem sicheren Ort auf. Die Bedienungsanleitung muss an alle nachfolgenden Anwender weitergegeben werden.
- Page 3 Vorsicht Bitte beachten Sie folgende grundlegenden Hinweise, um sich oder andere nicht zu gefährden und Schäden an externen Geräten zu vermeiden. Warnhinweise Bauen Sie das Instrument nicht auseinander und nehmen Sie keine Modifikationen daran vor. Dies könnte Verletzungen durch Stromschlag zur Folge haben. Betrauen Sie eine Fachwerkstatt mit eventuell nötigen Service- und Wartungsarbeiten oder wenden Sie sich an Ihren Händler.
-
Page 4: Table Of Contents
Inhaltsverzeichnis Zusammenbau ........................5 Rückseitiges Anschlusspanel ...................6 USB to Host ........................6 AUX In/Out ........................6 Netzteilbuchse........................6 Kopfhöreranschlüsse ......................7 Bedienelemente........................8 Linke Bedieneinheit ......................8 Power ...........................8 Master Vol ........................8 Funktion ........................8 Funktionsbelegung der Klaviaturtasten ................8 ① Funktionstaste......................9 ①+② Demo song ......................9 ①+③ Voice ........................9 ①+③-③... -
Page 5: Zusammenbau
Zusammenbau ① ② . Benützen Sie hierfür die beiden Befestigen Sie die Pedaleinheit an der Pedalplatte. ③ mitgelieferten Schrauben mittlerer Länge (4x45). ② ④ Montieren Sie nun den Unterbau aus Pedalplatte und Seitenteilen . Fügen Sie die ⑤ vier Zylindermuttern in die Öffnungen an der Rückseite der Pedalplatte ein. -
Page 6: Rückseitiges Anschlusspanel
Rückseitiges Anschlusspanel USB to Host Über die USB to Host Buchse können Sie Ihr Piano mittels eines USB A->B Kabels zu einem Computer verbinden. AUX In/Out Mit dem AUX In Eingang können Sie Musiksignale einer externen Musikquelle über die Lautsprecher Ihres Pianos wiedergeben. Mit dem AUX Out Anschluss können Sie Ihr Piano an einen Musikverstärker anschließen. -
Page 7: Kopfhöreranschlüsse
Kopfhöreranschlüsse Die beiden Kopfhöreranschlüsse an der linken Unterseite des Spieltischs können gleichzeitig genutzt werden. Beim Anschluss eines Kopfhörers an die Kopfhörerbuchse 1 wird der Klang des Instruments über die Kopfhörer und zusätzlich weiterhin über die Lautsprecher wiedergegeben. Beim Anschluss an die Kopfhörerbuchse 2 werden die Lautsprecher des Instruments deaktiviert. -
Page 8: Bedienelemente
Bedienelemente Linke Bedieneinheit Power Mit dem Netzschalter nehmen Sie Ihr Instrument in Betrieb. Bitte schalten Sie Ihr Instrument bei Nichtbenutzung aus um Energie zu sparen. Master Vol Mit diesem Drehregler können Sie die Lautstärke Ihres Pianospiels einstellen. Funktion Durch Halten der Funktionstaste aktivieren Sie die Bedienfunktionen der Klaviaturtasten. -
Page 9: ① Funktionstaste
① Funktionstaste ① Halten Sie die Funktionstaste gedrückt, um die Funktionsbelegung der Klaviaturtasten anzusteuern. ①+② Demo ① ② Halten Sie die Funktionstaste gedrückt und drücken Sie die DEMO Taste um die Demofunktion des Pianos zu aktivieren. Das Piano spielt nun den gespeicherten Demo Song ab. -
Page 10: ①+⑧ Tempo
einen 4/4 Takt. Wählen Sie die 0 um alle Metronomschläge mit gleicher Gewichtung wiederzugeben. ①+⑧ TEMPO ① Halten Sie die Funktionstaste gedrückt und tippen Sie über die Zahlentasten der TEMPO Funktion die gewünschte Geschwindigkeit für das Metronom oder einen Demo Song ein. -
Page 11: Trouble Shooting
Trouble Shooting Sollte eine Funktionsstörung auftreten, prüfen Sie bitte folgende Fehlerquellen. Fehler Ursache Lösung Das Piano lässt sich nicht 1.Das Netzkabel ist nicht 1.Stecken Sie das Netzkabel einschalten eingesteckt richtig ein 2.Die Steckdose hat keinen 2.Nutzen Sie eine andere Strom Steckdose Das Piano gibt keinen Ton 1.Die Lautstärke ist auf den... -
Page 12: Produktspezifikationen
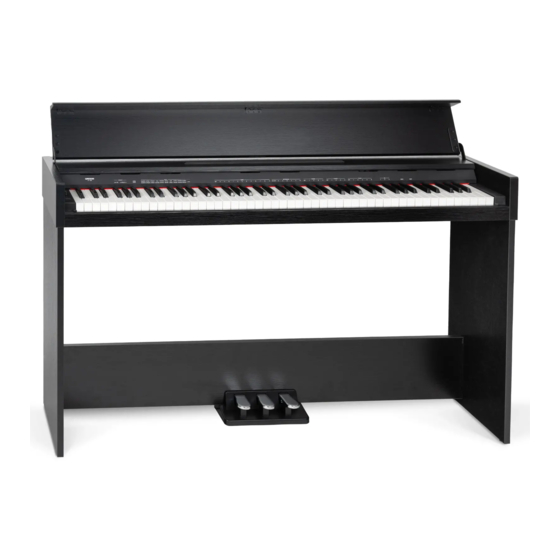
Produktspezifikationen Keyboard 88 anschlagsdynamische Standardtasten Anschlagsempfindlichkeit 5 Stufen, Off Max. Polyphonie Voices Demo 1 Piano Demo, 20 Voice Demo Pedale 3 (Soft, Sostenuto, Sustain) Anschlüsse Audio In/Out (6,35mm Stereo), USB to Host, 2x Kopfhörer (6,35mm Stereo), Pedal, Netzteil Lautsprecherleistung 2x15W Abmessungen (BxTxH in mm) 1344x327x794 Mitgeliefertes Zubehör... - Page 13 WEEE-Erklärung (Waste of Electrical and Electronic Equipment) Ihr Produkt wurde unter Verwendung hochwertiger Materialien und Komponenten entwickelt und hergestellt, die recycelbar und wiederverwendbar sind. Dieses Symbol bedeutet, dass elektrische und elektronische Geräte am Ende ihrer Lebensdauer vom Hausmüll getrennt entsorgt werden müssen. Bitte entsorgen Sie dieses Gerät bei Ihrer örtlichen kommunalen Sammelstelle oder im Recycling-Center.
- Page 14 DP 1088 Slimline Digital Piano User Manual Version: 12/2021...
- Page 15 Thank you for choosing this product. ensure that you are fully satisfied with this product, carefully read and understand this manual before using this instrument. Keep this manual in a safe place. The operating instructions must be passed on to all subsequent users. Observe operating instructions! The WARNING signal word identifies hazards that, without precautions, could result in serious injury.
- Page 16 Caution Please observe the following basic information in order not to endanger yourself or others and to avoid damage to external devices. Warning Do not disassemble the instrument and do not modify it. This could result in electric shock. Entrust a specialist workshop with any necessary service and maintenance or contact your dealer.
- Page 17 Contents Assembly ..........................5 Rear connection panel .......................6 USB to Host ........................6 AUX In/Out ........................6 Power supply socket ......................6 Headphone jacks ........................7 Operating elements ......................8 Left control panel ......................8 Power ...........................8 Master Vol ........................8 Function ........................8 Function assignment of the keyboard keys ...............8 ①...
-
Page 18: Assembly
Assembly Attach the pedal unit ① to the pedal plate. ②. Use the two medium-length screws ③ (4x45) for this purpose. Now mount the substructure consisting of pedal plate ② and side parts ④. Insert the four cylinder nuts ⑤ into the openings at the rear of the pedal plate. Screw in the four long screws ⑥... -
Page 19: Rear Connection Panel
Rear connection panel USB to Host The USB to Host jack allows you to connect your piano to a computer using a USB A->B cable. AUX In/Out The AUX In input allows you to play music signals from an external music source through your piano's speakers. -
Page 20: Headphone Jacks
Headphone jacks The two headphone jacks on the left underside of the console can be used simultaneously. When connecting headphones to the headphone jack 1, the sound of the instrument is reproduced via the headphones and additionally still via the loudspeakers. When connecting to the headphone jack 2, the instrument's loudspeakers are deactivated. -
Page 21: Operating Elements
Operating elements Left control panel Power Use the power switch to put your instrument into operation. Please switch off your instrument when not in use to save energy. Master Vol This knob allows you to adjust the volume of your piano playing. Function By holding down the function key, you activate the operating functions of the keyboard keys. -
Page 22: ① Function Key
① Function key Press and hold the function key ① to access the function assignment of the keyboard keys. ①+② D emo Hold down the function key ① and press the DEMO key ② to activate the piano's demo function. The piano will now play the stored demo song. During playback, the keyboard keys are deactivated. -
Page 23: ①+⑧ Tempo
①+⑧ TEMPO Hold down the function key ① and use the number keys of the TEMPO function to type in the desired speed for the metronome or a demo song. For example, type 0; 8 and 7 for the metronome speed 87 BPM (beats per minute). You can also increase or decrease the tempo by holding down the function key ①... -
Page 24: Trouble Shooting
Trouble Shooting If a malfunction occurs, please check the following error sources. Error Cause Solution The piano does not turn on 1.the power cord is not 1.plug in the power cord plugged in correctly 2.the socket has no power 2.use another socket The piano does not emit 1.the volume is set to the 1. -
Page 25: Product Specifications
Product specifications Keyboard 88 velocity sensitive standard keys Touch sensitivity 5 levels, Off Max. Polyphony Voices Demo 1 Piano Demo, 20 Voice Demo Pedals 3 (Soft, Sostenuto, Sustain) Connections Audio In/Out (6.35mm stereo), USB to Host, 2x Headphones (6.35mm stereo), Pedal, Power Supply Speaker power 2x15W... - Page 26 WEEE Declaration (Waste of Electrical and Electronic Equipment) Your product has been designed and manufactured using high quality materials and components that are recyclable and reusable. This symbol means that electrical and electronic equipment must be disposed of separately from household waste at the end of their service life.
Need help?
Do you have a question about the DP 1088 and is the answer not in the manual?
Questions and answers