Advertisement
Quick Links
Advertisement

Subscribe to Our Youtube Channel
Related Manuals for Metsys RS2-RG


Summary of Contents for Metsys RS2-RG
- Page 2 CONTENTS Introduction Maintenance and Care Figures and Icons 02-05 Safety instructions Operation 07 - 09 Product Specifications Battery Environmental Protection Product Inclusions Warranty Contact Social Media ON THE COVER Metsys RS2-RG MM Receiver.
- Page 3 In this case our warranty expires. In the unlikely event of a failure or defect, have the appliance examined and repaired by Metsys. In all your queries and spare part orders, always quote the 8-digit serial number (see type plate) of your device.
- Page 4 02 I...
- Page 5 CAUTION Prior to the first start-up, it is definitely necessary to carefully read the Safety instructions! CAUTION Do not modify the device. Modifications can cause injuries and malfunctions. I 03...
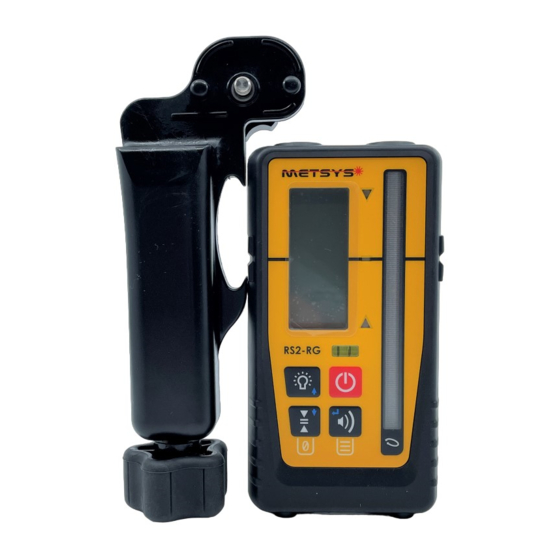
- Page 6 1 Magnet 2 LED grade indicator (yellow) 3 LED grade indicator (green) 4 LED grade indicator (red) 5 Laser-sensitive area 6 Marking notch 7 Clamp 8 Keypad 9 Bubble vial 10 Display 11 Beeper 12 Battery door and latch 13 Type plate with serial number 14 Fixing thread for the clamp 15 On / Off 16 Beeper volume...
- Page 7 19 Numeric digits / text display 20 Grade indication arrows 21 On grade indicator 22 Beeper volume 23 Accuracy (Dead band) 24 Low battery Numeric digits / text display Three digits display either the numeric elevation or simple text messages. Numeric elevation can be displayed in mm, cm, inch or fractional inch.
- Page 8 In case of transport damage please inform your vendor immediately. Only authorized and trained personnel are allowed to repair the device. Only use genuine spare parts from Metsys This ensures continuous device safety. Do not look directly into the laser beam.
- Page 9 NOTE: Switching the device on / off Press the On / Off button [15] Adjusting the volume Pressing the beeper volume button [16] cycles Low / High / Off > High: Beeper symbol permanently displayed; text "Hi" for one second >Low: Beeper symbol permanently displayed;...
- Page 10 User defined on-grade level: An arbitrary level within -10 and +40mm around the marking notch can be used as on-grade level. The user defined on-grade level is set by pressing the accuracy button [17] for two seconds while the device is in the laser beam.
- Page 11 Menu Entries: Sen - Sensitivy: Hi(gh)/Low > Default: High. Set it to Low if you have problems with disturbing sources like fluorescent or strobe lights. AvG - Averaging: Hi(gh) / Low > Default: Low. Set it to High if you need to have more stable readings under difficult atmospheric conditions.
- Page 12 FEATURE SPEC'S ± ° > > > ° ° ° ° Inserting / changing the battery Change the battery if is displayed . Open the battery compartment by unlatching the battery door [12]. Remove the battery and insert a new one (observe correct polarity!). Dispose of the used battery (see chapter on environmental protection).
- Page 13 Do not dispose of the device with domestic waste. Have the device disposed of by an authorized waste management company or your municipal waste management organization. Adhere to the applicable regulations. In case of doubt contact your waste management organization. Recycle all packaging material in an environmentally friendly manner.
- Page 14 BAYSWATER NORTH, VICTORIA 3153 03 9 7 2 0 6 222 P H O N E : support@metsys.com.au E M A I L : P R O D U C T D E S I G N E R Justin Davis P U R C H A S E O N L I N E www.lightwavetechnology.com.au...
Need help?
Do you have a question about the RS2-RG and is the answer not in the manual?
Questions and answers