Table of Contents
Advertisement
Quick Links
Advertisement
Table of Contents

Related Manuals for ELPRO ERRTS ALERT2


Summary of Contents for ELPRO ERRTS ALERT2
- Page 1 ERT-A2 Configuration Manual Revision 0.5...
-
Page 2: Follow Instructions
ELPRO products use communications channels that are subject to noise and interference. The products are designed to operate in the presence of noise and interference, but in an extreme case noise and interference can cause product operation delays or operation failure. -
Page 3: Safety Notices
At ELPRO we are focusing on helping our customers deploy and maintain our solutions in a secure environment. We continue to evaluate cybersecurity updates that we become aware of and provide the necessary communication on our website as soon as possible. - Page 4 Note: This device should only be connected to PCs that are covered by either a FCC DoC or are FCC certified. Manufacturer Band Model number Description Coax kit Gain ELPRO 148- ANTB000300 VHF Dipole Whip 3dB Antenna c/w 0 dB 174MHz 5M Coax N type Connector ELPRO...
-
Page 5: Table Of Contents
Follow instructions ..........................ii Proper use ............................... ii Product disposal ............................ii General instructions ..........................ii Europe ..............................ii Deployment of ELPRO products in customer environment ..............ii Product Notices ............................iii ATTENTION ........................... iii Safety notices ............................iii CAUTION ............................iii Avoid .............................. - Page 6 ERT-A2 ALERT2 Configuration Manual Revision 1.0 Serial (Serial / SDI-12) ........................13 Connections (Terminals) ........................13 Rain (Digital) ..........................14 River Digital (Quadrature or Incremental) ..................14 River (Analog) ..........................14 Solar (Ext Supply) .......................... 14 Serial (Serial / SDI-12) ........................15 System Design ............................
- Page 7 ERT-A2 ALERT2 Configuration Manual Revision 1.0 Data log File download ........................43 General Specifications........................... 44 Communications Channel Specifications ..................46 C1, C3 or C4 Condor Radio - Internal .................... 46 4G/LTE Cellular Integrated Gateway Router ................. 47 External Satellite Iridium Short Data Bust Modem - Integrated ........... 47 Accessories ............................
-
Page 8: Ert-A2 Overview
ALERT2 protocol The ELPRO ERTA2 unit provides an extremely versatile and feature packed unit allowing standalone installations with the addition of only sensor connections and possibly a battery charging source such as solar panel. -
Page 9: Networking
ERT-A2 ALERT2 Configuration Manual Revision 1.0 Networking Up to two internal communication channels are available. Primary channel supports VHF/UHF radio, 4G/LTE cellular or satellite networks. The secondary channel provides a redundancy mode and supports cellular 4G/LTE and satellite. Communication Redundant Comms Primary 5W Options Gateway... -
Page 10: Ordering Guide
Figure 4: ERTA2 Receiver and 115U-2-A2 Decoder-Gateway including connectivity to include ALERT1 data conversion to ALERT2 or industrial protocols Modbus/DNP3. For more information on configuration of modes and features described above see relevant sections of this user manual below or refer to ELPRO web site for additional application notes. Ordering Guide Model Overview The ERT-A2 can be delivered as several different models and/or options. - Page 11 Satellite Gateway Not fitted Blank Order model guide Notes: • Not all possible build options above are available for order. Please check with your ELPRO supplier. • Example: Cable gland, internal rechargeable battery, secondary AU cell radio, EL-ERT-CXR- • All models with primary VHF/UHF radio -1, -3, -4, -5 and -H require GPS option for ALERT2 TDMA operation.
-
Page 12: Accessories
ERT-A2 ALERT2 Configuration Manual Revision 1.0 Accessories Application Order Code Description USB programming Cable CBLUSB-ATOB USB 2.0 CABLE - TYPE A to TYPE B, 1M LONG (Used to configure 115E/215/415/915U units). RS232 to RJ45 serial cable CBLSER-RJ45 Serial Cable RS-232: 0.9m (3ft) long, RJ45(male) for 115E-2 gateway-decoder to DB9(female) - Straight-through. - Page 13 ERT-A2 ALERT2 Configuration Manual Revision 1.0 high power long life 5.8AHr battery pack, with cable and connector Solar Installation ERT10WSOL Solar power 10 watt panel, 3pin plug & Bracket for Tree application Solar Installation SOLPAN10W Solar Panel 12V PV Module 10W AC power supply PS-WW-XP-24DC-mm AC Plug Pack Universal Input, 24V DC 1.25A Output - AU wall plug...
-
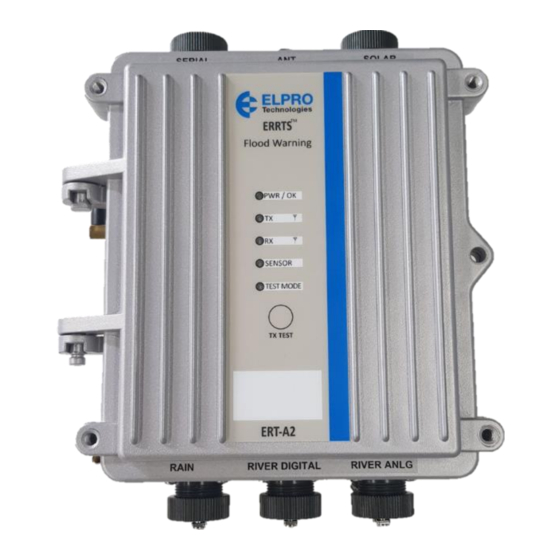
Page 14: Installation
Revision 1.0 Installation Enclosure ELPRO ERTA2 electronics and battery are enclosed in a rugged IP66 rated cast Aluminium 190mm x 197mm enclosure with an opening/removable door. Sensor and power connections are made through options for military specification screw-in connectors (MilSpec) or through cable entry glands into internal industrial push connect wiring terminals. -
Page 15: Rain Tree/Standpipe Install
ERT-A2 ALERT2 Configuration Manual Revision 1.0 Rain Tree/Standpipe Install If the ERTA2 is to be mounted in a Tree, there is an aluminium accessory holder that allows the Radio and a battery to be housed on the plate that can then be lowered into the tree enclosure similar to the older Legacy cannister. - Page 16 ERT-A2 ALERT2 Configuration Manual Revision 1.0 Figure 6: Recommended installation earthing for outdoor installation Note: When installing into a Tree (standpipe) enclosure, the grounding is provided by the antenna connection and the tree installation. No additional ground connection is required.
-
Page 17: Sensor Input Connections
ERT-A2 ALERT2 Configuration Manual Revision 1.0 Sensor Input Connections The ERTA2 unit can be connector to several different types of external sensor inputs such as discrete on/off, pulsed, 4-20mA analog and SDI-12, allowing a large number of different sensors to be monitored in a single installation. -
Page 18: Sdi-12 Sensor Input
ERT-A2 ALERT2 Configuration Manual Revision 1.0 in the ERTA2 unit to only turn on during the sample period and can also provide a sensor warmup time before sampling the analog value. The 4-20mA signal is normally used for measuring river level using a pressure transducer which detects water pressure at the riverbed or from a bubbler system which uses a constant flow of gas through a pipe to the water level. -
Page 19: River (Analog)
ERT-A2 ALERT2 Configuration Manual Revision 1.0 River (Analog) Externally Powered devices can be connected directly to the AIN+ & AIN- connection pins. If connecting to a single ended device, then the module can provide the +24V Loop supply and will need to be connected as per the diagram. -
Page 20: Serial (Serial / Sdi-12)
ERT-A2 ALERT2 Configuration Manual Revision 1.0 Serial (Serial / SDI-12) The Serial connector has the communication connections for RS232 and SDI-12 (Mil Spec connections not available with Cellular or Satellite communications options). • RS232: Used for connecting to the unit for configuration/diagnostics in legacy applications or for an alternate ALERT2 communications output port. -
Page 21: Rain (Digital)
ERT-A2 ALERT2 Configuration Manual Revision 1.0 Rain (Digital) The Rain input connector on the ERT-A2 is for connecting a Tipping Bucket Rain Gauge (TBRG), which should be connected across Digital input #3 and GND. River Digital (Quadrature or Incremental) Shaft encoders connector allows for connection of a shaft encoder. -
Page 22: Serial (Serial / Sdi-12)
ERT-A2 ALERT2 Configuration Manual Revision 1.0 Warning: The solar input is suitable for solar panels rated as 12V nominal only. 24V solar panel can produce open circuit voltages of 44Vdc which will exceed the rated input of the solar regulator and cause damage. -
Page 23: System Design
ERT-A2 ALERT2 Configuration Manual Revision 1.0 System Design Unit type overview The ERT-A2 unit can be configured through the menu to support three different unit types: Field Station: Very low power consumption unit which is in a sleep mode most of the time monitoring its sensor inputs and wakes to send data frames when events occur or on periodic update messages. -
Page 24: Repeater Station
ERT-A2 ALERT2 Configuration Manual Revision 1.0 Field Station units will operate at the lowest current consumption modes and therefore in rain only applications can operate from internal battery for more than 2 years without replacement. Field stations can be optioned with either VHF or UHF radio, 25W VHF radio, Cellular or Satellite communications options. -
Page 25: Base Receiver Station
ERT-A2 ALERT2 Configuration Manual Revision 1.0 o Supply monitoring (battery/supply in) o RSSI, temperature, internal faults Base Receiver Station The base receiver station configuration mode is used for the collection of ALERT2 or legacy ALERT1 data at the network access point. -
Page 26: Repeater Station - Multi-Frequency Or A1 Migration
ERT-A2 ALERT2 Configuration Manual Revision 1.0 Antenna systems would usually be installed separately, but if there is limited space on the mast structure then a duplexer can be used to run a single antenna. Using a duplexer typically would require a minimum frequency separation of around 4MHz. When using two antennas in the installation, to maximize the performance care should be taken to ensure there is adequate antenna separation. - Page 27 ERT-A2 ALERT2 Configuration Manual Revision 1.0 Linked Repeater to second receive frequency network data. Allows merging of two or more frequencies into one stream in complex networks. Repeater will aggregate data frames in periods of high message density. Can also be used to create a High Capacity Repeater configuration for network backbone applications.
-
Page 28: Unit Configuration
You will need a USB type A to type B cable to connect your laptop/computer to the ERT-A2 unit. This is commonly used for peripheral devices such as printers/scanners and is available from ELPRO, part number CBLUSB-ATOB. To access the text-based configuration menu through USB or RS-232 you will need a serial terminal emulator. - Page 29 ERT-A2 ALERT2 Configuration Manual Revision 1.0 For best formatting of the ERTA2 menus in “Tera Term” set the Receive New-line to AUTO in the Setup/Terminal menu as per below: Click OK and hit enter on the keyboard and you should see the ERT-A2 login menu shown below. To login as Engineer select option “a) Engineer”...
-
Page 30: Configuration Quick Start Guide
To access the user menu you will need to use a USB type A to Type B cable. This is usually the type of USB cable you would get with a printer or scanner or see your ELPRO dealer for this accessory. -
Page 31: Quick Setup Alert2
ERT-A2 ALERT2 Configuration Manual Revision 1.0 consumption, so is best to keep the value large. Default value and maximum value is 600 seconds (10 minutes). ALERT2 Quick Setup For flood warning applications this is a quick setup for rain, river and battery sensors to match with Bureau of Meteorology guidelines. - Page 32 ERT-A2 ALERT2 Configuration Manual Revision 1.0 Once you have selected Communication Mode for Integrated Radio Reporting, configure the VHF/UHF radio using the menu options below. Communications Menu: Communication Mode => Integrated Select the type of primary communications Radio Reporting installed in the unit. Options are Integrated Radio Reporting (VHF or UHF radio), Cellular or Satellite.
-
Page 33: Cellular Communications Setup
ERT-A2 ALERT2 Configuration Manual Revision 1.0 A repeater can also be configured with up to 4 address list filters. Filters can be either pass or reject and include up to 32 address ranges in each single list. Each address range entry can be a single address or a range. - Page 34 ERT-A2 ALERT2 Configuration Manual Revision 1.0 First install the SIM card and configure the cell modem. To install the SIM card, the cell modem must be removed to access the SIM holder underneath the unit. To do this remove the two Philips screws that are through the holes in the cell modem bracket and loosen the two screws that are in the keyway side of the bracket.
-
Page 35: 4G/Lte Primary Communications Operation
ERT-A2 ALERT2 Configuration Manual Revision 1.0 Please refer to 645M-4 user documentation for more information. Once this is complete you can power the ERTA2, and it will power the cellular modem to make a startup transmission. The ERTA2 will only power the +12V switched supply for 2 or 3 mins so go to the diagnostic menu and select the menu item Communications Supply Force On to enable power to cellular modem. -
Page 36: Rs-232 Reporting
ERT-A2 ALERT2 Configuration Manual Revision 1.0 If another event occurs while the modem is powered the ERTA2 will send this while the modem is powered. Note: ensure that the inputs sensitivity and paralysis times are configured carefully to ensure best current consumption and that multiple events are not keeping the modem powered longer than necessary. - Page 37 ERT-A2 ALERT2 Configuration Manual Revision 1.0 setup and the value to settle before ERTA2 sample. Consult with transducer instruction manual for this value. 10 seconds is a good default if unknown. Best to keep this value as short as possible for best energy usage. River Sensitivity (mm): 10 Value in engineering units that the input will need to change before a event is triggered.
- Page 38 ERT-A2 ALERT2 Configuration Manual Revision 1.0 Save Current Config? (y/n): Now the base level configuration is set, if you need any other inputs configured you can move to the I/O setup menu and configure external discrete, analog, SDI-12 sensor or internal inputs.
-
Page 39: Sensor Inputs Configuration
ERT-A2 ALERT2 Configuration Manual Revision 1.0 Sensor Inputs Configuration For each digital, analog or SDI-12 sensor value connected to the ERTA2 unit configured to report in the ALERT2 data frame, the user will need to configure the follow parameters. Sensor ID: Sensor ID value to be sent. ALERT2 standard does have some default sensor ID values defined, so please refer to these as described in this manual. - Page 40 ERT-A2 ALERT2 Configuration Manual Revision 1.0 Supply Voltage Unsigned integer (Solar or external) Received Signal Signed integer dBm/Signal dBm/ Signal Strength (RSSI) Quality Quality Internal Signed Integer deg C deg F Temperature Internal Status Word Unsigned integer *Note: dBm used for Cellular, VHF/UHF radio and Signal Quality used for Satellite connectivity...
-
Page 41: Discrete/Digital Input Setup
ERT-A2 ALERT2 Configuration Manual Revision 1.0 Discrete/Digital Input setup Sensor input configuration is best completed after you have configured the Unit Config and Communications as selected from main menu. Once you have this basic setup completed then access the input setup through I/O Setup option from main menu. This menu is displayed below. The current status of inputs will be displayed in the header of this menu. - Page 42 ERT-A2 ALERT2 Configuration Manual Revision 1.0 Format Scale Offset Display Value Digital 1 Menu: Sensor ID (255 to disable) Report Format Scaling (per count) Zero / Offset Display Units Display Scaling Report Sensitivity Digital input mode for inputs 1 and 2 can be selected in the menu option as below. Input mode Din1/Din2 Selection: DI1 Pulse, DI2 On-Off Both On-Off...
- Page 43 ERT-A2 ALERT2 Configuration Manual Revision 1.0 Analog Sensor Input sample and warmup time can be configured when choosing the Analog Sampling menu option. Analog Sample Time: (min) 5 Analog Warmup Time: (sec) 1 Analog sample time is configured in minutes with a range of 1 to 1440 minutes. Sensor warmup time is the time that the ERTA2 will wait to allow sensor reading to stabilize before taking the value reading.
-
Page 44: Sdi-12 Smart Sensor Configuration
ERT-A2 ALERT2 Configuration Manual Revision 1.0 SDI-12 Smart Sensor Configuration This configuration allows SDI-12 sensors to added and variables configured to be sent over the ERTA2 communications port. TIP: If you are adding multiple sensors to the SDI-12 port it is best to connect one sensor at a time and use scan to add sensor measurement variables, change address to unique value. - Page 45 ERT-A2 ALERT2 Configuration Manual Revision 1.0 Model: 5ELPROTECH##0000011.0001 Format Offset Sens Value #1.11# #22.78# #3.33# #4.44# #5.56# #6.67# #7.78# #8.89# SDI SENSOR 5ELPROTECH##0000011.0001 Menu: Selection: For the above example sensor you can see that there was 8 variables reported by the SDI-12 sensor and can be mapped as an input to transmit in the ERTA2 unit.
-
Page 46: Diagnostics
ERT-A2 ALERT2 Configuration Manual Revision 1.0 Diagnostics The ERT-A2 provides a range of diagnostic features to allow quick and successful installation, commissioning and fault finding in the field. Configuration Menu Items Unit Diagnostic Menu: Show I/O Values Display current external input values for discrete, pulsed and analog inputs. -
Page 47: Set Factory Defaults
ERT-A2 ALERT2 Configuration Manual Revision 1.0 Set factory defaults Factory defaults can be reset either through Unit Setup menu option or through button push process as described below. 1. Connect terminal to USB 2. Reset unit 3. Press test button for 3 seconds 4. -
Page 48: Radio Firmware Update
ERT-A2 ALERT2 Configuration Manual Revision 1.0 Radio Firmware Update Step 1: Load firmware image into radio. Load Firmware to Radio This USB connection will go off-line for approximately 1 minute to connect to the USB drive. DIO4 LED indicates loading is complete. Wait for DIO4 LED to come on, then reconnect and press a key <... - Page 49 Connection made to TCP socket AT+QIOPEN=1,0,"TCP","10.255.40.17",31000,0,2 CONNECT Setting date/time to 20/06/16 22:24:09 Data connection established Send data frames Generate ALERT2 frames: ================= GENERAL SENSOR REPORT ==================== |==> ID=0; val=442432 ALERT2A,1,4300,ELPRO,N,1,2020,6,16,22,24,9.951,0,0,0,0,0,0,0,0,0,1,11,4300,74,92,49,01,06,00,14, 00,06,C0,40 |==> ID=7; val=2500 ALERT2A,1,4300,ELPRO,N,1,2020,6,16,22,24,9.111,0,0,0,0,0,0,0,0,0,1,10,4300,74,92,49,01,05,07,23, 00,09,C4 |==> ID=8; val=131 ALERT2A,1,4300,ELPRO,N,1,2020,6,16,22,24,9.424,0,0,0,0,0,0,0,0,0,1,8,4300,74,92,49,01,03,08,11,8 |==> ID=9; val=243 ALERT2A,1,4300,ELPRO,N,1,2020,6,16,22,24,9.576,0,0,0,0,0,0,0,0,0,1,8,4300,74,92,49,01,03,09,11,F |==>...
-
Page 50: Firmware Upgrade
ERT-A2 ALERT2 Configuration Manual Revision 1.0 Firmware upgrade Note: Firmware updates and log files must use USB2.0 only not USB3.0) 1. Plug in USB stick (formatted as standard FAT32 file system) that contains ERT-A2Vx.x.bin firmware file. 2. Press and release boot push button and then within 1 second press and hold test button for more than 1 second. -
Page 51: General Specifications
ERT-A2 ALERT2 Configuration Manual Revision 1.0 3. Unit will indicate starting process by short flash of all four input LEDs and then progress of writing file with input LED scan through 1 to 4. DO NOT REMOVE USB stick during writing process. - Page 52 ERT-A2 ALERT2 Configuration Manual Revision 1.0 Radio Diagnostics Monitoring communications, Radio Signal strength, antenna fail, internal temperature, radio faults Logging Internal data logging for inputs and other internal events 32MB (1 year with 10 registers at 1 min) Logged data in form of ALERT2 ASCII messages Recovered via USB, microSD Card Inputs All physical and internal inputs: digital/pulsed/analog...
-
Page 53: Communications Channel Specifications
ERT-A2 ALERT2 Configuration Manual Revision 1.0 Compliance Regulatory Australia: RCM, Europe: CE/RED, USA: FCC, Canada: IC FCC CFR47 Part 15; EN 301 489 Safety EN/IEC 62368 Power Supply Nominal supply 17-30 Vdc, under/over voltage protection 10.5-15Vdc supply to battery connection alternate (internal battery not fitted) Battery Options Lithium Iron Phosphate (LFP): Internal rechargeable... -
Page 54: 4G/Lte Cellular Integrated Gateway Router
ERT-A2 ALERT2 Configuration Manual Revision 1.0 ALERT 2™: 2- 6.25/12.5/25kHz -117dBm Channel spacing 6.25, 12.5, 25.0kHz (software configurable) Data Rate ALERT1 : v23 300 bps ALERT2™: 2- 4800 bps Typical Range 50km+ (62 miles) (LoS) Idle current draw Field Station: 300µA @ 13.8Vdc Repeater Station: 65mA @ 13.8Vdc Base Receiver: 65mA @ 13.8Vdc Transmit current draw... -
Page 55: Accessories
ERT-A2 ALERT2 Configuration Manual Revision 1.0 Uplink: 7dB average Compatible SYN7391 Series, SAF2040 Series, SAF5340 Series, SAF5350 Series, Antennas SAF4070-IG, SAF7352-IG and SAF5270-G Regulatory CE: EN301 441, EN301 489-20, EN60950 FCC: CFR47 Parts 2, 15, 25 IC: RSS170 Receive Current 18mA average, 80mA peak @ 13.0Vdc Transmit Current 80mA average, 580mA peak @13.0Vdc... - Page 56 ERT-A2 ALERT2 Configuration Manual Revision 1.0 ENC-645MGTY-AU Cellular Gateway/Router kit including cable, mounting hardware and 645M-4 Notes: 1. Available RF power and frequency may vary depending on country of application. Please confirm with local regulatory body. 2. SDI-12 disabled when used. RS485 can be used for external communications, ALERT1 data input, ALERT2 output for redundant communications.
Need help?
Do you have a question about the ERRTS ALERT2 and is the answer not in the manual?
Questions and answers