Table of Contents
Advertisement
1.
WALKTEM 2 RELEASE NOTES (WUI version 1.3.7.10) ............................................................................................... 2
2.
CENTRE LOOP LAYOUT (TL-1K6, 40x 40m Transmitter Loop) ................................................................................... 3
A. Lay out the TL-1k6 transmitter loop first: ............................................................................................................. 3
B. Lay out RC-5 receiver coil next: ............................................................................................................................ 3
C. Lay out RC-200 receiver loop: .............................................................................................................................. 3
D. Connect TX loop and RX coils to WalkTEM TX & RX units: ................................................................................... 4
E. Connect the WalkTEM TX & RX units together: .................................................................................................... 5
F. Connect external power to the TX (and RX if required): ....................................................................................... 5
3.
DAMPING RESISTOR DECISIONS ............................................................................................................................... 6
4.
CENTRE LOOP LAYOUT (TL-400, 20X20m Transmitter Loop) .................................................................................... 8
5.
CENTRE LOOP LAYOUT (TL-10k HP6, 100x100m Transmitter Loop) ......................................................................... 9
6.
CENTRE LOOP LAYOUT (TL-40k HP6, 200x200m Transmitter Loop) ......................................................................... 9
7.
TX-60 LAYOUT, CONNECTIONS AND OPERATION ................................................................................................... 10
8.
USER INTERFACE AND MEASUREMENT CONFIGURATION ...................................................................................... 12
9.
MEASUREMENTS .................................................................................................................................................... 15
10. FILE MANAGEMENT & INVERSION .......................................................................................................................... 15
11. WALKTEM 2 LAY-OUT DIMENSIONS ....................................................................................................................... 18
CONTENTS
Advertisement
Table of Contents

Related Manuals for abem WalkTEM 2


Summary of Contents for abem WalkTEM 2
-
Page 1: Table Of Contents
CONTENTS WALKTEM 2 RELEASE NOTES (WUI version 1.3.7.10) ....................2 CENTRE LOOP LAYOUT (TL-1K6, 40x 40m Transmitter Loop) ................... 3 A. Lay out the TL-1k6 transmitter loop first: ......................3 B. Lay out RC-5 receiver coil next: ..........................3 C. Lay out RC-200 receiver loop: ..........................3 D. -
Page 2: Walktem 2 Release Notes (Wui Version 1.3.7.10)
1. ABEM WALKTEM 2 RELEASE NOTES (WUI version 1.3.7.10) The final stages of development for the WalkTEM 2 instrument have been impacted by the Covid-19 pandemic. As a result the decision has been made to release the product with some limitations on functionality, and reduced support literature, but to then release a series of firmware and documentation updates to improve the operation and customer experience in the coming months. -
Page 3: Centre Loop Layout (Tl-1K6, 40X 40M Transmitter Loop)
ABEM WALKTEM 2 ABRIGDED USER MANUAL P a g e 2. CENTRE LOOP LAYOUT (TL-1K6, 40x 40m Transmitter Loop) A. Lay out the TL-1k6 transmitter loop first: − to ensure current flow and measurements are all positive, we lay everything in a clockwise order;... -
Page 4: Connect Tx Loop And Rx Coils To Walktem Tx & Rx Units
ABEM WALKTEM 2 ABRIGDED USER MANUAL P a g e D. Connect TX loop and RX coils to WalkTEM 2 TX & RX units: − the RC-5 / RC-200 connect to Inputs A and B, on the RX unit; it is good practice to put the RC-5 into Input A and the RC-200 into Input B;... -
Page 5: Connect The Walktem Tx & Rx Units Together
E. Connect the WalkTEM 2 TX & RX units together: use the 1.5m TX sync cable to connect the WalkTEM 2 RX and TX units together. Although it is advised to connect this cable before powering up the instruments, the units will sync at any time the connection is made. -
Page 6: Damping Resistor Decisions
In the original WalkTEM all damping resistors were mounted externally and the choice was entirely down to the operator and their experience of how a ‘good’ sounding should look. With the WalkTEM 2, there are a range of damping resistors installed inside the TX unit, which it is possible to test and analyze in order to determine the best possible resistance value for any given loop or survey area. - Page 7 - the resistor should be attached to the instrument end of the 3m TX lead-in cable (right) – although this image depicts the connection on a WalkTEM 1, the arrangement would look the same on a WalkTEM 2 TX TX 3m Lead-in unit;...
-
Page 8: Centre Loop Layout (Tl-400, 20X20M Transmitter Loop)
The TX-60 battery is non-removeable and can only be charged using the Office Power Supply; the TX-60 must be switched on to charge (but it does not need to be attached to the WalkTEM 2 RX). The TX-8 and TX-20 do not have internal batteries. -
Page 9: Centre Loop Layout (Tl-10K Hp6, 100X100M Transmitter Loop)
ABEM WALKTEM 2 ABRIGDED USER MANUAL P a g e 5. CENTRE LOOP LAYOUT (TL-10k HP6, 100x100m Transmitter Loop) A. Similar layout to using the TL-1k6: - pull out the TL-10k transmitter loop first, this loop is split across two reels;... -
Page 10: Layout, Connections And Operation
One for powering the control electronics & cooling fans, and at least 3 for supplying the current generator. Only using two batteries for the current generator is no different from running the WalkTEM 2 on 24V without the TX-60. More batteries will increase the voltage (to a maximum of 250V) and create a higher transmitter current. - Page 11 WALKTEM vs TX-60 TRANSMITTER LOOP LEAD-IN CABLES The standard lead-in wire for use with the original WalkTEM used “banana plug” connectors; the WalkTEM 2 and the TX- 60 use a heavier gauge wire, split-spade connectors and screw terminals:...
-
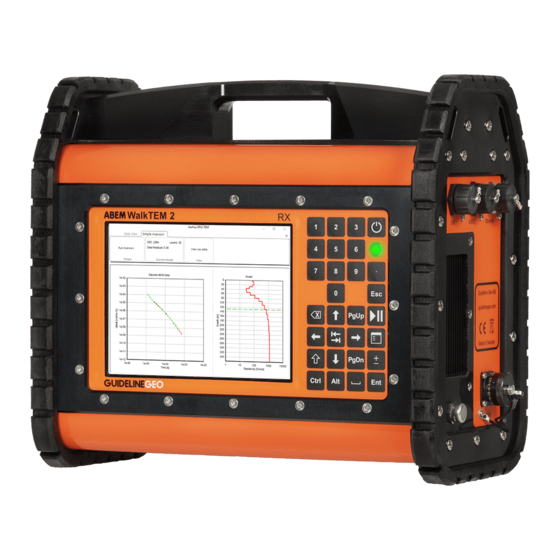
Page 12: User Interface And Measurement Configuration
ABEM WALKTEM 2 ABRIGDED USER MANUAL P a g e | 12 8. USER INTERFACE AND MEASUREMENT CONFIGURATION Tab for setting up Tab for initiating Tab for file Tab for instrument Select existing project to Choose your preferred measurement and monitoring... - Page 13 ABEM WALKTEM 2 ABRIGDED USER MANUAL P a g e | 13 A. The first step is to navigate to the “Administration” tab (PGUp or PGDn) and choose the correct frequency of electricity transmission for the country or region you are surveying within.
- Page 14 ABEM WALKTEM 2 ABRIGDED USER MANUAL P a g e | 14 D. Next add in which receiver coils are being used on each input channel. For a 20x20m loop, only use the RC-5. For a 40x40m or 100x100m transmitter loop, the RC-5 &...
-
Page 15: Measurements
ABEM WALKTEM 2 ABRIGDED USER MANUAL P a g e | 15 9. MEASUREMENTS A. All that is required on this page is to press “Start”. This will initiate the cycle of noise, low moment and high moment measurements. A progress bar will indicate how far into the measurement process you are and an estimation of time remaining. - Page 16 ABEM WALKTEM 2 ABRIGDED USER MANUAL P a g e | 16 B. To review soundings, select “Plot Data” from the menu or shortcut to it by pressing “Shift+7”. This will initiate the ABEM WalkTEM Visualization Tool; a title screen will show whilst it loads.
- Page 17 “Run Inversion” (this may require a single press on the down arrow on the WalkTEM 2 front panel) and press “Ent” on the keypad. The inversion software will automatically...
-
Page 18: Walktem 2 Lay-Out Dimensions
ABEM WALKTEM 2 ABRIGDED USER MANUAL P a g e | 18 11. WALKTEM 2 LAY-OUT DIMENSIONS Tapes or measuring wheels can be used to layout accurate loops if so desired, using the following measurements:... - Page 19 ABEM WALKTEM 2 ABRIGDED USER MANUAL P a g e | 19...
Need help?
Do you have a question about the WalkTEM 2 and is the answer not in the manual?
Questions and answers