Table of Contents
Advertisement
INSTALLATION MANUAL
Super Slim Four-Way Cassette
Model Numbers:
URC-071AS / CRE-071AS
URC-100AS / CRE-100AS
URC-125AS / CRE-125AS
URC-140AS / CRE-140AS
IMPORTANT NOTE:
Please read this manual carefully before installing or operating your new air conditioning unit and keep it available for future
reference.
Advertisement
Table of Contents

Related Manuals for ActronAir Cascade URC-071AS

Summary of Contents for ActronAir Cascade URC-071AS
- Page 1 INSTALLATION MANUAL Super Slim Four-Way Cassette Model Numbers: URC-071AS / CRE-071AS URC-100AS / CRE-100AS URC-125AS / CRE-125AS URC-140AS / CRE-140AS IMPORTANT NOTE: Please read this manual carefully before installing or operating your new air conditioning unit and keep it available for future reference.
-
Page 2: Table Of Contents
Table of Contents Safety Precautions ................04 Components ................... 05 Installation Overview ..............06 Indoor Unit Installation ..............07 Outdoor Unit Installation ..............11 Drainpipe Installation ..............13 Refrigerant Piping Connection ............15 Wiring ..................... 17 Leak Test and Air Evacuation ............25 Panel Installation ................ - Page 3 This refers to electrical works only This manual is a controlled document which contains confidential and proprietary information. Distribution, modification, copying and/or reproduction are prohibited without written consent from ActronAir Product design and specifications are subject to change without prior notice for product improvement.
-
Page 4: Safety Precautions
1. Safety Precautions Super Slim Four-Way Cassette WARNING 1. Carefully read all the Safety Precautions before installation. 2. In certain functional environments, such as kitchens, server rooms, etc., the use of specially designed air-conditioning units is highly recommended. 3. Only qualified HVAC technicians* should install, repair and service this air conditioning unit. Improper service or alteration by unqualified technician could result in significant and major damage to the product or property which may render your warranty null and void. -
Page 5: Components
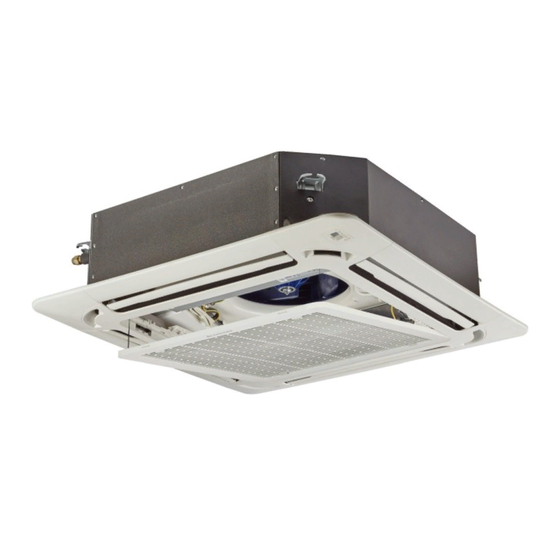
2. Components Super Slim Four-Way Cassette The air conditioning system comes with the following components. Use all of the installation parts and accessories to install the air conditioner. Improper installation may result in water leakage, electrical shock and fire, or cause the equipment to fail. -
Page 6: Installation Overview
3. Installation Overview Super Slim Four-Way Cassette Installation Order Install the drainpipe Install the outdoor unit Install the indoor unit Connect the Refrigerant Pipes Connect the wires Leak test and evacuate the refrigeration system Install the front panel Perform a test run Page 6... -
Page 7: Indoor Unit Installation
4. Indoor Unit Installation Super Slim Four-Way Cassette Indoor Unit Installation Drain pump (within indoor unit) Drain pipe Front grille Air outlet Display panel Air inlet Louvre Refrigerant pipe Fig. 4.1 Safety Precautions WARNING CAUTION • Install the indoor and outdoor units, cables and wires •... - Page 8 4. Indoor Unit Installation Super Slim Four-Way Cassette Select Installation Location NOTE: Panel installation should be done after piping and wiring. CAUTION The indoor unit should be installed in a location that meets the following requirements: DO NOT install the unit in the following locations: þ...
- Page 9 4. Indoor Unit Installation Super Slim Four-Way Cassette Hang Indoor Unit 1. Use the included paper template to cut a rectangular hole in the ceiling, leaving at least 1m on all sides. The hole will be 88 x 88cm big. Be sure to mark the areas where ceiling hook holes will be drilled. Refrigerant piping side Drain hose side >1m...
- Page 10 4. Indoor Unit Installation Super Slim Four-Way Cassette Indoor Unit Installation Instructions 5. Mount the indoor unit. You will need two people to NOTE lift and secure it. Insert suspension bolts into the unit’s hanging holes. Fasten them using the included washers and Ensure that the indoor unit is level.
-
Page 11: Outdoor Unit Installation
5. Outdoor Unit Installation Super Slim Four-Way Cassette Select Installation Location The outdoor unit should be installed in the location that þ If the location is exposed to strong winds (for meets the following requirements: example: near a seaside), the unit must be placed against the wall to shelter it from the wind. - Page 12 5. Outdoor Unit Installation Super Slim Four-Way Cassette Outdoor Unit Domensions Split Type Outdoor Unit (Refer to Fig 5.4, 5.5, and Table 5.1) Fig. 5.4 Fig. 5.5 Fig. 5.6 Table 5.1 Length Specification of Split Type Outdoor Unit (unit mm) Mounting Dimensions Outdoor Unit Dimensions Model Number...
-
Page 13: Drainpipe Installation
6. Drainpipe Installation Super Slim Four-Way Cassette Drain Joint Installation Indoor Drainpipe Installation Before bolting the outdoor unit in place, you must install The drainpipe is used to drain water from the unit. the drain joint at the bottom of the unit. (See Fig. 6.1). Improper installation may cause unit and property damage. - Page 14 6. Drainpipe Installation Super Slim Four-Way Cassette Indoor Drainpipe Installation 3. Using a 65-mm core drill, drill a hole in the wall. Make NOTE ON DRAINPIPE INSTALLATION sure that the hole is drilled at a slight downward angle, so that the outdoor end of the hole is lower than the •...
-
Page 15: Refrigerant Piping Connection
7. Refrigerant Piping Connection Super Slim Four-Way Cassette Safety Precautions WARNING • All field piping must be completed by a qualified HVAC technician and must comply with local and national regulations. • When the air conditioner is installed in a small room, measures must be taken to prevent the refrigerant concentration in the room from exceeding the safety limit in the event of refrigerant leakage. - Page 16 7. Refrigerant Piping Connection Super Slim Four-Way Cassette Safety Precautions WARNING • All field piping must be completed by a licensed technician and must comply with the local and national regulations. • When the air conditioner is installed in a small room, measures must be taken to prevent the refrigerant concentration in the room from exceeding the safety limit in the event of refrigerant leakage.
-
Page 17: Wiring
8. Wiring Super Slim Four-Way Cassette Safety Precautions Outdoor Unit Wiring WARNING WARNING • Be sure to disconnect the power supply before working Before performing any electrical or wiring work, turn off on the unit. the main power to the system. •... - Page 18 8. Wiring Super Slim Four-Way Cassette Indoor Unit Wiring 4. Connect the fork-lugs to the terminals. Match the Prepare the cable for connection wire colors/labels with the labels on the terminal block, and firmly screw the lug of each wire to its a.
- Page 19 8. Wiring Super Slim Four-Way Cassette Indoor Unit Wiring Diagram 1 SYNCHRONOUS SYNCHRONOUS MOTORS MOTORS SWING SWING SWING SWING MOTOR 1 MOTOR 2 MOTOR 3 MOTOR 4 SWITCH 1 SWITCH 2 CN 2 CN 3 CN 5 CN 5 CN 6 SWING CONTROL BOARD LIFT CONTROL BOARD CN 66...
- Page 20 8. Wiring Super Slim Four-Way Cassette Indoor Unit Wiring Diagram Page 20...
- Page 21 8. Wiring Super Slim Four-Way Cassette Outdoor Wiring Wiring Diagram (URC-071AS) Page 21...
- Page 22 8. Wiring Super Slim Four-Way Cassette Outdoor Wiring Wiring Diagram (URC-100AS) Page 22...
- Page 23 Super Slim Four-Way Cassette 8. Wiring Outdoor Wiring Wiring Diagram (URC-125AS and URC-140AS) Page 23...
- Page 24 8. Wiring Super Slim Four-Way Cassette Connecting Diagram OUTDOOR UNIT OUTDOOR UNIT 2(N) L POWER SUPPLY (SUGGESTED MINIMUM*) 2.5mm² - URC-053AS / URC-071AS URC-071AS 2 CORE 14/0.20 (0.44mm²) 4.0mm² - URC-100AS SHIELDED DATA CABLE 6.0mm² - URC-125AS / URC-140AS WITH SHIELD WIRE CONNECTED TO EARTH 1mm²...
-
Page 25: Leak Test And Air Evacuation
9. Leak Test and Air Evacuation Super Slim Four-Way Cassette Leak Test To indoor unit Run interconnecting pipe work from condenser to evaporator. refrigerant pipes Connect the liquid and suction pipe to the indoor and outdoor unit flare connections (please see refrigerant piping 4000 kPa leak connection instruction). - Page 26 9. Leak Test and Air Evacuation Super Slim Four-Way Cassette Evacuation Instructions Before using manifold gauge and vacuum pump, read their 8. Insert hexagonal wrench into the packed valve (high pressure valve) and open the valve by turning the operation manuals to familiarize yourself with how to use wrench in a 1/4 counterclockwise turn.
- Page 27 9. Leak Test and Air Evacuation Super Slim Four-Way Cassette Note on Adding Refrigerant CAUTION • Refrigerant charging must be performed after wiring, vacuuming and the leak test. • DO NOT exceed the maximum allowable quantity of refrigerant or overcharge the system. Doing so can damage or impact the unit’s function.
-
Page 28: Panel Installation
10. Panel Installation Super Slim Four-Way Cassette The Installation of the Panel Step 2: Remove the installation covers at the four corners by sliding them outwards CAUTION • DO NOT place the panel face down on the floor, against a wall, or on uneven surfaces. Step 1: Remove the front Grille Fig. - Page 29 10. Panel Installation Super Slim Four-Way Cassette The Installation of the Panel 3. Use 2 screws to screw in the panel into the indoor unit. (See Fig 10.6) CAUTION • Failure to tighten screws can cause water leakage. (See Fig 10.10) •...
- Page 30 10. Panel Installation Super Slim Four-Way Cassette Emergency Procedure The Emergency procedure can be followed when the Hang the grille controller is faulty. Take off the grille from the suspension wire and tie the suspension wire to the point that does not hinder the unit operates.
-
Page 31: Test Run
11. Test Run Super Slim Four-Way Cassette Before Test Run Test Run Instructions (continued) A test run must be performed after the entire system has 5. For the Outdoor Unit been completely installed. Confirm the following points a. Check to see if the refrigeration system is leaking. before performing the test: b. -
Page 32: Twin Systems
Introduction Twin systems enable living and work spaces to be conditioned with 2 of the same ActronAir indoor cassette units connected to a common outdoor unit. When installed, it is vital to assign one unit as a “Main” and the other “Slave”. This will differentiate which unit will receive input from the controller and, the other, to mimic the Main unit - further explained in “SW5 Indoor Board Dip... - Page 33 12. Twin System Super Slim Four-Way Cassette INDOOR UNITS SETTINGS Branch Joint Installation FOR MAIN-SLAVE SETTING SW5 SWITCH Part of the Twin configuration, both Main and Slave units will share a common liquid and gas line. To ensure that there is an equal refrigerant distribution, a branch joint is installed.
- Page 34 12. Twin System Super Slim Four-Way Cassette Fault Codes Fault Digital Tube Defrost Alarm Running Timer EEPROM Failure Quick Flash Indoor Fan Speed lost Quick Flash Quick Flash Communication Failure of Quick Flash Quick Flash Quick Flash lifting Grille Lifting Grille Fault Quick Flash Quick Flash Quick Flash...
- Page 35 12. Twin System Super Slim Four-Way Cassette Field Wiring Diagram INDOOR UNIT 2 INDOOR UNIT 1 S1 S2 TO OUTDOOR UNIT TO OUTDOOR UNIT POWER SUPPLY POWER SUPPLY 2 CORE 14/0.20 (0.44mM) SHIELDED DATA CABLE TO INDOOR UNIT POWER SUPPLY 220-240V/1Ph+N/50Hz The outdoor unit is to receive power input of 220-240V/1Ph+N/50Hz via L1, L2 and Ground terminals.
-
Page 36: Maintenance
13. Maintenance Super Slim Four-Way Cassette Maintenance Procedures DANGER This section describes the procedures that must be performed as a part of normal maintenance program. Beware of Rotating Fan Blades ! Regular servicing of equipment by licensed HVAC • Always make sure that all power supply, to the technician is highly recommended. - Page 37 13. Maintenance Super Slim Four-Way Cassette Electrical Service Frequency Parts Detail of Service Check Service Methods Printed Circuit Tighten Terminals as necessary on Visual Inspection. Boards printed circuit boards. Check all electrical Electrical terminals, mains, Re-tighten if loose. Connections communications, etc.
- Page 38 13. Maintenance Super Slim Four-Way Cassette Outdoor Unit Service Frequency Parts Detail of Service Check Service Methods For highly corrosive environment, Visual check for wash panels quarterly with water Casing / Panels damage, rust and dust & neutral detergent solution. Wax and Frames accumulation.
- Page 39 ..........................................................................................................................................................................................................................................................................................................................................................................................................................................................................................................................................................................................................................................................................................................................................................................................................................................................................................................................................................................................................................................................................................................................................Page 39...
- Page 40 1300 522 722...
Need help?
Do you have a question about the Cascade URC-071AS and is the answer not in the manual?
Questions and answers