Table of Contents
Advertisement
Quick Links
Advertisement
Table of Contents

Related Manuals for Chauvin Arnoux RayCAm C.A 1886


Summary of Contents for Chauvin Arnoux RayCAm C.A 1886
- Page 1 I.R. thermography camera C.A 1886 C.A 1888 E N G L ISH User’s manual...
- Page 2 English Thank you for buying a RayCAm I.R. thermography camera. For best results from your device: read this user manual attentively, observe the precautions for its use MEANING OF THE SYMBOLS USED Selective sorting of wastes for the recycling of electrical and electronic equipment within the European Union.
- Page 3 English Characteristics of the laser: Class 2, < 1 mW, wavelength 635nm WARNING LASER RADIATION DO NOT LOOK DIRECTLY INTO THE BEAM CLASS 2 LASER DEVICE C.A1886 – C.A1888...
-
Page 4: Table Of Contents
English CONTENTS 1. PRECAUTIONS OF USE .....................6 2. DESCRIPTION ......................7 2.1 F ......................7 RONT PANEL 2.2 K ........................8 EYPAD 2.3 V ..................8 IEW OF BACK AND BOTTOM 3. STARTING UP ......................9 3.1 C .....................9 HARGING THE BATTERY 3.2 I ..................10 NSTALLING THE BATTERY 3.3 S ....................11... - Page 5 English 6.4 D ..............29 ESACTIVATING THE ANALYSIS TOOLS 6.4.1 Deactivation of the analysis tools ..............29 6.5 R .....................29 ECORDING THE IMAGE 6.6 A )........30 SSOCIATING VOICE REMARKS WITH THE IMAGES OPTION 6.6.1 Voice recording..................30 6.7 A ...................30 DJ STMENT OF THE TRIGGER 6.7.1 Adjustment of the release ................30 7.
-
Page 6: Precautions Of Use
English 1. PRECAUTIONS OF USE Before using the camera, make sure that you have read and understood the safety precautions described below. Make sure that the camera is used correctly. Please refer to this manual each time you encounter a hazard symbol. To avoid exposure to laser radiation, injury, or damage to the device, and be sure that you use the camera in a risk-free way, observe the safety recommendations given below:... -
Page 7: Description
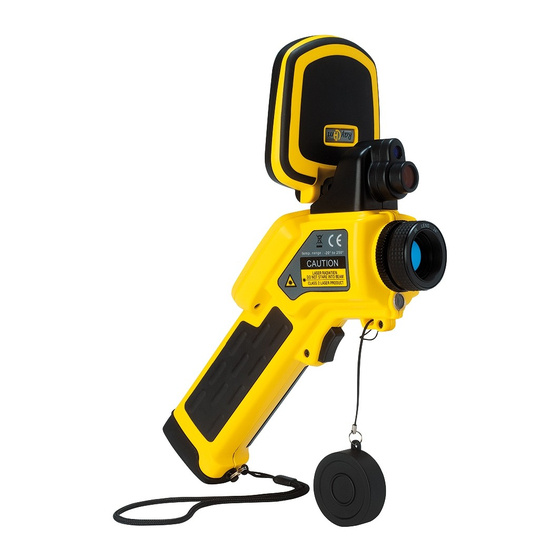
English 2. DESCRIPTION 2.1 FRONT PANEL LCD screen Torch Visual Keypad objective IR objective Battery compartment cover Laser pointer Configurable trigger C.A1886 – C.A1888... -
Page 8: Keypad
English 2.2 KEYPAD Cancellation Automatic On/Off button adjustment Menu/Validation Freeze/Activate image Record image 2.3 VIEW OF BACK AND BOTTOM Battery compartment cover clip External power supply Video output Mini USB Mini SD card C.A1886 –C.A1888... -
Page 9: Starting Up
English 3. STARTING UP 3.1 CHARGING THE BATTERY Align the edge of the charger on the line marked on the battery and push the battery in until it locks. Connect the power cord to the charger and plug into a power outlet. ... -
Page 10: Installing The Battery
English 3.2 INSTALLING THE BATTERY The battery must be fully charged before it is used for the first time (the battery reaches full capacity only after complete charging/discharging cycles). Switch off the camera. Push the clip of the battery compartment cover toward the front, then lift the cover. -
Page 11: Switching On And Off
English Symbols representing the battery charge condition Battery adequately charged Battery low Battery needs to be replaced or recharged 3.3 SWITCHING ON AND OFF The power check light remains on for as long as the camera is on. Place your thumb above the keypad and your index finger in front of the configurable trigger. -
Page 12: Checking The Information On The Lcd Screen
English 3.4 CHECKING THE INFORMATION ON THE LCD SCREEN The LCD screen provides a field of view corresponding to 100% of the actual shot Upper limit of colour scale Colour scale Lower limit of colour scale Time Dynamic / Battery condition Frozen mode Emissivity in... -
Page 13: Setting The Date And Time
English 3.5 SETTING THE DATE AND TIME You must set the date and time when you switch the camera on for the first time. Check that the camera is in Null mode. Press the MENU key and select the [System Setup] menu. Analysis ►... - Page 14 English Press the UP or DOWN arrow to select [Local setup], then press the MENU/VALIDATION key. Language French Video output Temp. unit °C Dist. unit Meter Local parameters Press the UP or DOWN arrow to select the field to be modified. ...
-
Page 15: Basic Functions
English 4. BASIC FUNCTIONS 4.1 USING THE LCD SCREEN Open the LCD screen in the direction Aim the I.R. camera at the target. For a better temperature measurement, frame the subject in the centre of the LCD screen. The screen is switched to standby when you close it. -
Page 16: Restoring The Default Settings
English 4.3 RESTORING THE DEFAULT SETTINGS Switch the I.R. camera off. Press the On/Off and C buttons simultaneously. Hold them down a few seconds. The camera reboots with the default parameters. The stored data are not deleted when you reset the camera. 5. -
Page 17: Parallax Adjustment
English Press the "Menu/Validation" key to display the menu, then select "I.R./Visible". Analysis ► File ► IR / Visible Manual Adj. Object Param. System Setup► Press the "left" or "right" arrow to select the percentage of infrared (possible only in "MixVision”). This percentage is the percentage of thermal image in the display (100% means pure I.R. -
Page 18: Adjusting The Image
English To align the two images: Make sure that you are in NULL mode Hold the C key down and press; the left arrow to shift the image to the left; the right arrow to shift the image to the right; the up arrow to shift the image upward;... -
Page 19: Adjusting The Image
English After this operation, press the MENU/VALIDATION key to save the modifications or the C key to close the menu window without saving. To activate manual adjustment, make sure that continuous adjustment (Menu => Camera setup) is desactivated. 5.3.3 Adjusting the image Press the MENU/VALIDATION key. - Page 20 English About the adjustments of the image Assigns the pseudo-colours of the thermal image. 6 palettes are provided: Metal, Reversed metal, Rainbow, Palette Natural, Grey, and Reversed grey. Assigns the function of the A key. You may choose among three options: Level and contrast, level, or contrast.
-
Page 21: Measurement Range
English 5.4 MEASUREMENT RANGE You can switch from one temperature range to another, depending on the model of camera you have. Press the MENU/VALIDATION key. Press the UP or DOWN arrow to select [Adjust Manual], then press the MENU/VALIDATION key. Adjustment of measurement range. -
Page 22: Analysis Function
English 6. ANALYSIS FUNCTION 6.1 ADJUSTMENT OF THE ANALYSIS PARAMETERS Press the MENU/VALIDATION key. Press the UP or DOWN arrow to select [Object Param.], then the MENU/VALIDATION key. Press the UP or DOWN arrow to select the field to be modified. Press the LEFT or RIGHT arrow to define the values. - Page 23 English About the analysis parameters Selects the object of which you want to set the Object parameters. Different objects have different emissivities; Emiss use different emissivities to measure different objects. The distance between an object and the I.R. Distance camera is not a constant.
-
Page 24: Adjustment Of The Analysis Parameters
English 6.2 ADJUSTMENT OF THE ANALYSIS PARAMETERS Press the MENU/VALIDATION key. Press the UP or DOWN arrow to select the [System Setup] menu, then press the MENU/VALIDATION key. Press the UP or DOWN arrow to select [Analysis], then the MENU/VALIDATION key. Analysis setup Analysis ►... - Page 25 English About the analysis adjustments. Activates or desactivates the temperature alert. When the parameter is set to "On": - if the [Capture Spot] parameter is "Maximum" in the analysis tools, the alert is triggered as soon as the Alert threshold set is exceeded.
-
Page 26: Parameterizing The Analysis Tools
English 6.3 PARAMETERIZING THE ANALYSIS TOOLS This item describes how to adjust the thermal image analysis tools. 6.3.1 Analysis by point Press the MENU/VALIDATION key. Press the UP or DOWN arrow to select the [Analysis] menu, then validate. Adjustment of the point to be analyzed ... -
Page 27: Profile Analysis
English To change the type of isotherm, its width, its alert, and its colour, refer to the previous section. 6.3.3 Profile analysis Press the MENU / VALIDATION key. Press the UP or DOWN arrow to select [Analysis] menu. Press the UP or DOWN arrow to select [Profile], then press the MENU/VALIDATION key Temperature... - Page 28 English Setting the analysis area. Press the UP or DOWN to select an area. Press LEFT or RIGHT to select the Maximum or Minimum or Average temperature of the area. < Area1 Min.> < Area2 Min.> < Area3 Max.> <...
-
Page 29: Desactivating The Analysis Tools
English LOWER and LEFT arrow LOWER and RIGHT arrow 6.4 DESACTIVATING THE ANALYSIS TOOLS This section describes how to remove the analysis tools used from the screen. 6.4.1 Deactivation of the analysis tools Press the MENU/VALIDATION key Press the UP or DOWN arrow to select the [Analysis] menu. Select the analysis tool you want to remove. -
Page 30: Associating Voice Remarks With The Images (Option)
English The image is recorded in the active directory. To change directories, go to "File setup" => Name of folder". 6.6 ASSOCIATING VOICE REMARKS WITH THE IMAGES (OPTION) 6.6.1 Voice recording You can associate up to 30 seconds of voice remarks with an image. Install the Bluetooth headset (provided as an option). - Page 31 English Press the UP or DOWN arrow to select the [Camera setup] menu, then press the MENU/VALIDATION key. Palette Metal Auto. Adjust Level and span Continuous adj. Level and span Shutter period Never Shut down Never Trigger button Laser on Laser adjust.
-
Page 32: Reading And Erasing
English 7. READING AND ERASING 7.1 OPENING THE IMAGES You can display recorded images and analyze them on the LCD screen. Press the MENU/ENTER key. Press the UP or DOWN arrow to select the [File] menu. Press the UP or DOWN arrow to select [Open], then press the MENU/VALIDATION key. -
Page 33: Playing The Remarks (Option)
English Press the C key, then the S key, to return to image analysis. Select the directory name. Press the MENU/VALIDATION key. Press the UP or DOWN arrow to select the [File] menu, then press the MENU/VALIDATION key. Press the UP or DOWN arrow to select the [File setup] menu, then press the MENU/VALIDATION key. -
Page 34: Erasing The Images
English 7.3 ERASING THE IMAGES Note that images once erased cannot be recovered. So be very careful before erasing an image. Press the MENU/VALIDATION key, then the UP or DOWN arrow to select the [File] menu. Press the UP or DOWN arrow to select [Delete], then press the MENU/VALIDATION key. -
Page 35: Transferring Images
English 8. TRANSFERRING IMAGES 8.1 TRANSFER BY MINI SD CARD You can withdraw the Mini SD card from the device and load the images into your computer using the Mini SD card reader provided. Open the flap on the Mini SD card slot. Press lightly on the card, then let it exit. -
Page 36: Connections And Downloading
English 9. CONNECTIONS AND DOWNLOADING 9.1 CONNECTION TO A MONITOR It is possible to use a video screen connected by a video cable (provided) to display and analyze the images you have taken. Switch the I.R camera off. Connect the video cable to the video output jack on the bottom of the device. - Page 37 English Switch on the camera. The power indicator of the camera lights green while flashing blue. In this mode, the camera is getting ready to search for the Bluetooth headset. On/Off button and power supply indicator Hold the On/Off button of the headset down for approximately 2 seconds to couple the headset and the camera.
-
Page 38: Troubleshooting
English Press the C and Enter keys simultaneously to clear the Bluetooth headset. When you are wearing the headset, you can record voice remarks or listen to those already recorded. 10. TROUBLESHOOTING Problem Cause Solution The camera fails The device is off •... -
Page 39: Maintenance
We recommend checking this instrument yearly. For checks and calibrations, contact one of our accredited metrology laboratories (information and contact details available on request), at our Chauvin Arnoux subsidiary or the branch in your country. 11.3 REPAIR For all repairs before or after expiry of warranty, please return the device to your distributor. -
Page 40: Warranty
English 12. WARRANTY Except as otherwise stated, our warranty is valid for twelve months starting from the date on which the equipment was sold. Extract from our General Conditions of Sale provided on request. The warranty does not apply in the following cases: Inappropriate use of the equipment or use with incompatible equipment, - Modifications made to the equipment without the explicit permission of... -
Page 41: Appendix
English 13. APPENDIX 13.1 TABLE OF EMISSIVITIES Material Temperature (°C) Approximate emissivity Metals Aluminium 0.09 Polished aluminium Commercial aluminium 0.09 sheet Oxidized chrome- 0.55 25~600 anodised aluminium Slightly oxidized 25~600 0.10~0.20 aluminium Highly oxidized 25~600 0.30~0.40 aluminium Brass Shiny brass (extreme 0.03 polishing) Oxidized brass... - Page 42 English Nickel 0.05 Polished by anodising Electrolysed 0.01 Unpolished 185~1010 0.09~0.19 Nickel wire 198~600 0.37~0.48 Nickel sheet (oxidized) Nickel oxide 650~1255 0.59~0.86 Nickel alloy Nickel-chromium alloy 50~1000 0.65~0.79 wire (shiny) (refractory) 50~1040 0.64~0.76 Nickel-chromium alloy Refractory nickel- 50~500 0.95~0.98 chromium Nickel-silver alloy 0.14 Stainless steel...
-
Page 43: Technical Characteristics
English 14. TECHNICAL CHARACTERISTICS Description Characteristic C.A 1886 C.A 1888 Type UFPA microbolometer Spectral band 8 ~14µm Detecter Resolution 160x120 384x288 NETD 0.08 C@ 30 0.05 C@ 30 50 Hz Frequency (9Hz outside the UE area, Models P01651260E or P01651270E) Imaging Objective/focusing 20°x15°... - Page 44 English Description Characteristic C.A 1886 C.A 1888 4 points: 3 that can be positioned anywhere on the screen and 1 for Points of analysis automatic detection of Max or Min temp, profile, area analysis, isotherm, difference of temperature. Tracking of Automatic tracking of the hottest or temperature coldest point in the whole image...
-
Page 45: Delivery Condition
English 15. DELIVERY CONDITION C.A 1886 I.R. thermography camera ..........P01651260 C.A 1886 I.R. thermography camera (9Hz) ........P01651260E C.A 1888 I.R. thermography camera ..........P01651270 C.A 1888 I.R. thermography camera (9Hz) ........P01651270E Delivered with: 1 battery charger ... - Page 46 Tel: +86 21 65 21 51 96 - Fax: +86 21 65 21 61 07 SCANDINAVIA - CA Mätsystem AB USA - Chauvin Arnoux Inc - d.b.a AEMC Instruments Box 4501 - SE 18304 TÄBY 200 Foxborough Blvd. - Foxborough - MA 02035...
Need help?
Do you have a question about the RayCAm C.A 1886 and is the answer not in the manual?
Questions and answers